Roles
SET UP · VIEW · UPDATE · REMOVE
Set groups first, put roles in them, tick what each role can see, then copy, reassign, or deactivate without leaving anyone with no access.
Where to find it: Permissions › Roles & Groups.
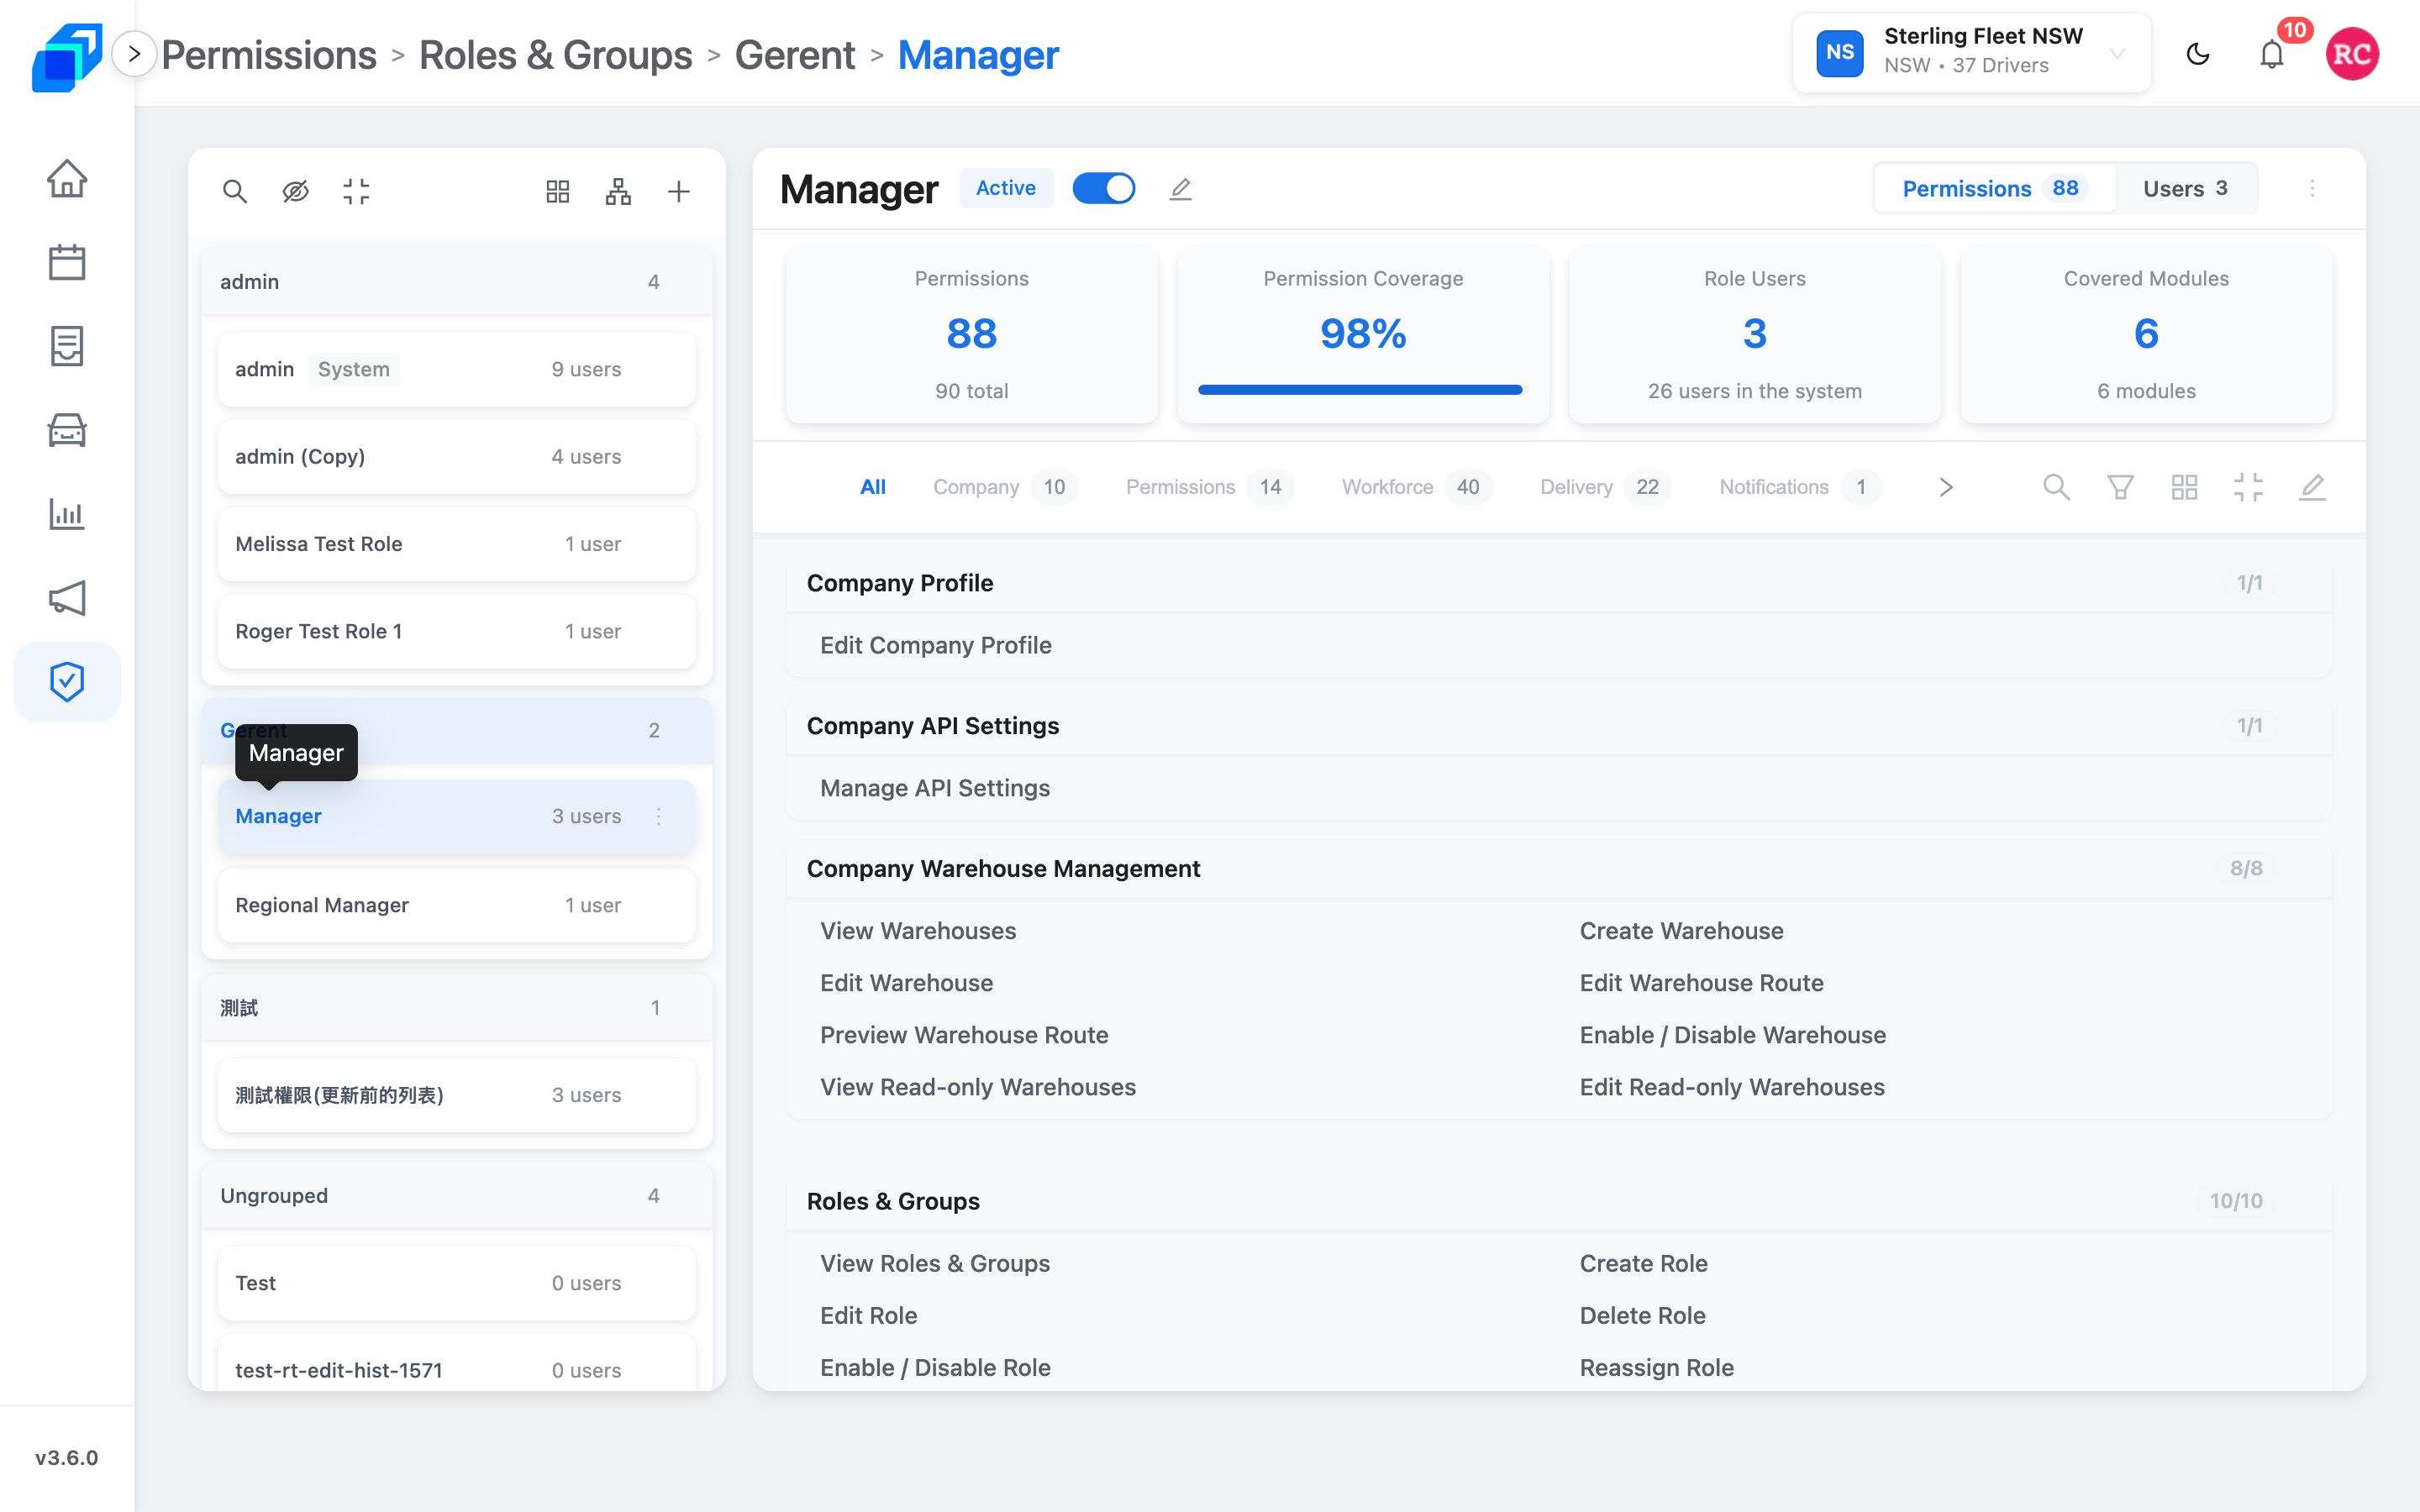
The left list shows your groups in order (admin, Gerent, Manager – or your names), each role sits in a group, and the people in that role can open only the menus you ticked – a dispatcher gets Delivery and Order Management, and no Permissions.
You only see this menu if your role can manage roles. If it is missing, ask someone who can. Menus you cannot use are hidden, not greyed out.
The structure others copy
A group is a layer on the left. A role is a job inside that layer. People get the role, not the group.
| Group (left) | Example roles | Who it is for | How to tick |
|---|---|---|---|
| admin | admin (badge System) | Company-wide | Leave it. System sees every view. Do not deactivate. |
| Gerent | Manager, Regional Manager | General-manager layer | Copy admin or keep Manager as the reference. Broad access, not System. |
| Your next group | Dispatcher, warehouse lead | Day-to-day | Copy Manager, then untick the whole Permissions area and Manage API Settings. |
| Ungrouped | – | Parking only | Drag working roles out. |
On this fleet the general-manager group is named Gerent (live name – keep it). You can rename groups except the locked Administrator / admin group and Ungrouped.
Do not put every job in admin. Copy Manager when the new job is close, so ticks stay consistent.
1. Set groups first – SET UP
- Open Permissions › Roles & Groups.
- In the left header, click the groups control (tip Manage Groups).
- Click Add Group. Name layers from the top: admin, Gerent (general manager), then Manager or your local names.
- Drag groups to that order. Drag roles from Ungrouped into the right group.
- Click Confirm Update.
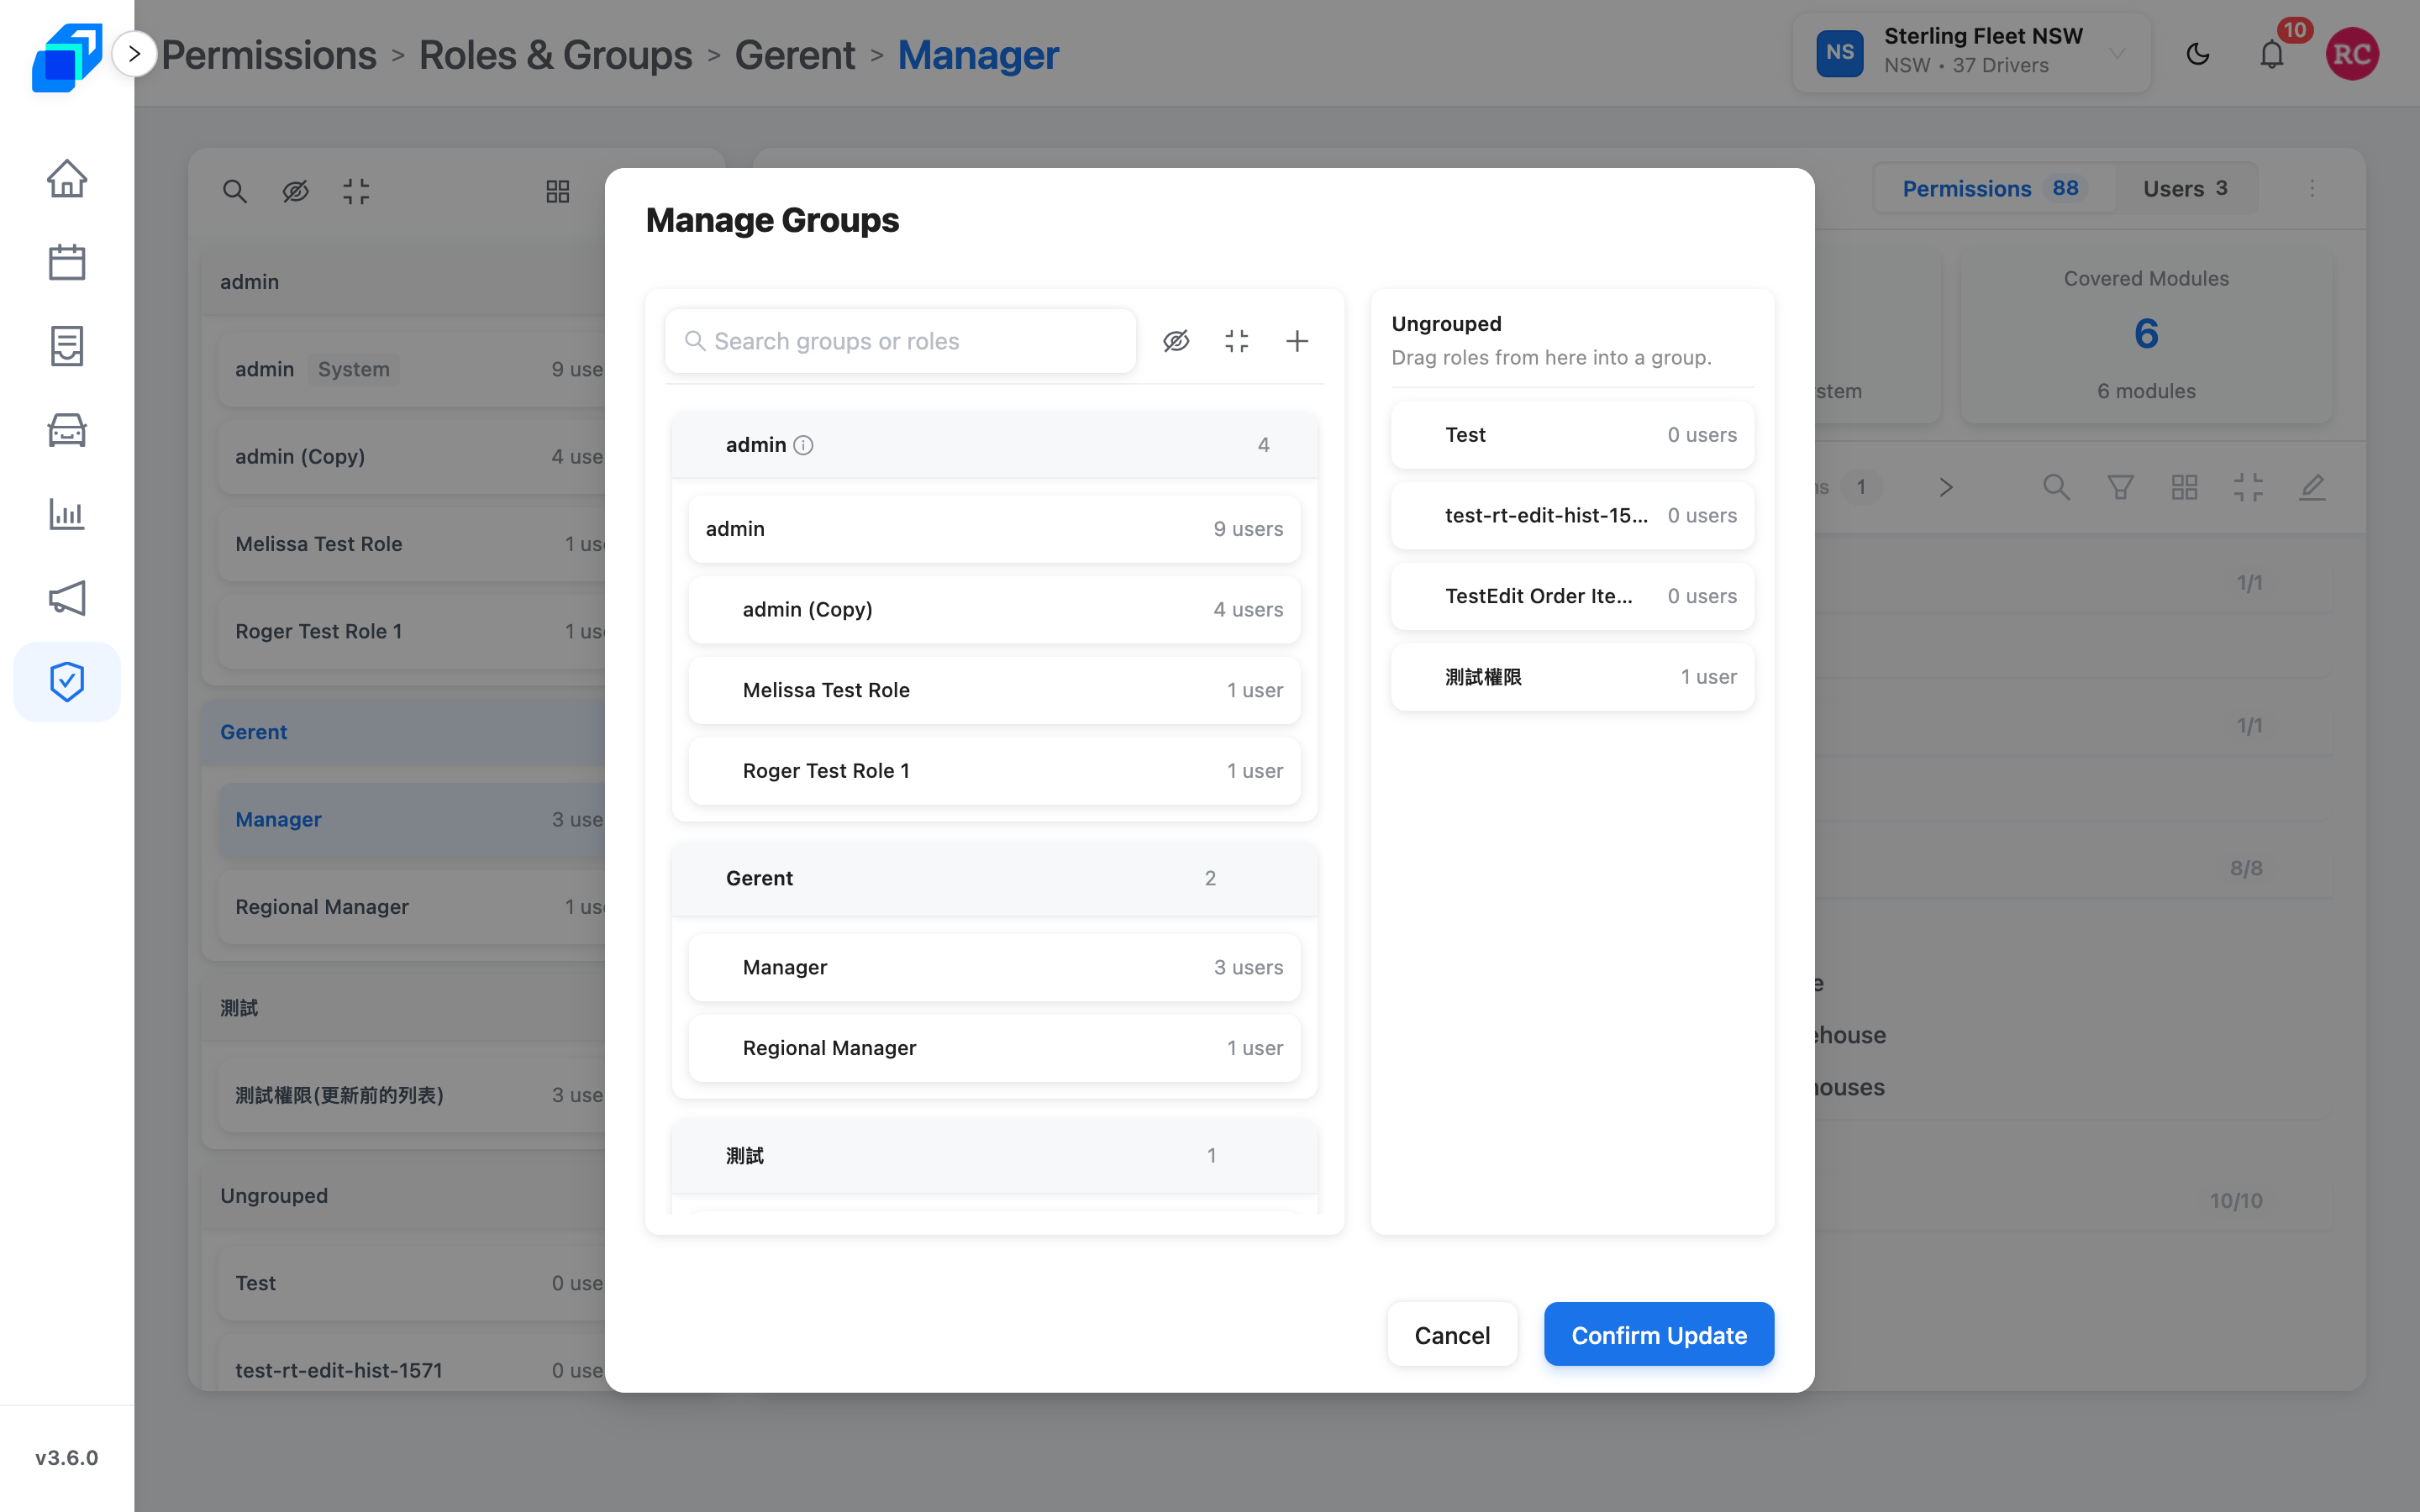
Ungrouped cannot be renamed. The Administrator group cannot be renamed. Deleting a group moves its roles to Ungrouped.
2. Open a role and read the ticks – VIEW
Click a role on the left. The header shows Active (or Inactive), a pencil (Edit Role), and Permissions / Users.
Chips under the counts filter the list: All, Company, Permissions, Workforce, Delivery, Notifications, Insight. Click a chip to see only that area. Counts on the chips (for example Delivery 22) are how many ticks that area has.
Above the list, click the magnifier to open Search permissions... – the list narrows as you type. Beside it, Filter & Legend has a Status filter: All, Assigned or Unassigned. Pick Assigned to see only this role's ticks.
What each area unlocks
Use the on-screen names. Tick the view first; create / edit / delete only if that job must change data.
Company (opens company settings, not the day)
| Tick | What they can do |
|---|---|
| Edit Company Profile | Company properties |
| Manage API Settings | API settings – keep on admin / Manager only |
| View Warehouses | Warehouse list |
| Create Warehouse / Edit Warehouse / Edit Warehouse Route / Preview Warehouse Route | Add and change sites and routes |
| Enable / Disable Warehouse | Turn a warehouse off or on |
Without View Warehouses, the Warehouse menu is hidden.
Permissions (who can change access – keep tight)
| Tick | What they can do |
|---|---|
| View Roles & Groups | Open this page |
| Create Role / Edit Role / Delete Role | Wizard, pencil, Delete Role |
| Enable / Disable Role | The Active switch |
| Reassign Role | Move people when you deactivate or delete |
| Create Group / Edit Group / Delete Group / Reorder Groups | Manage Groups |
| View Users / Add Users / Edit Users / Enable / Disable Users | People on a role, and the Users list |
A dispatcher does not need this area. Permissions stays hidden only while the role has no tick anywhere in it – no role tick, no group tick and no user tick. A role with only Create Group still sees Permissions.
View Roles & Groups, Create Role, Edit Role, Delete Role and Enable / Disable Role are the five administrator ticks. Any one of them opens Roster, Delivery, Insight and Permissions, whatever else you untick. Their buttons all show too, so this is a full administrator, not a wider dispatcher.
Workforce (Roster, leave, fleets, drivers, vehicles)
Click the Workforce chip.
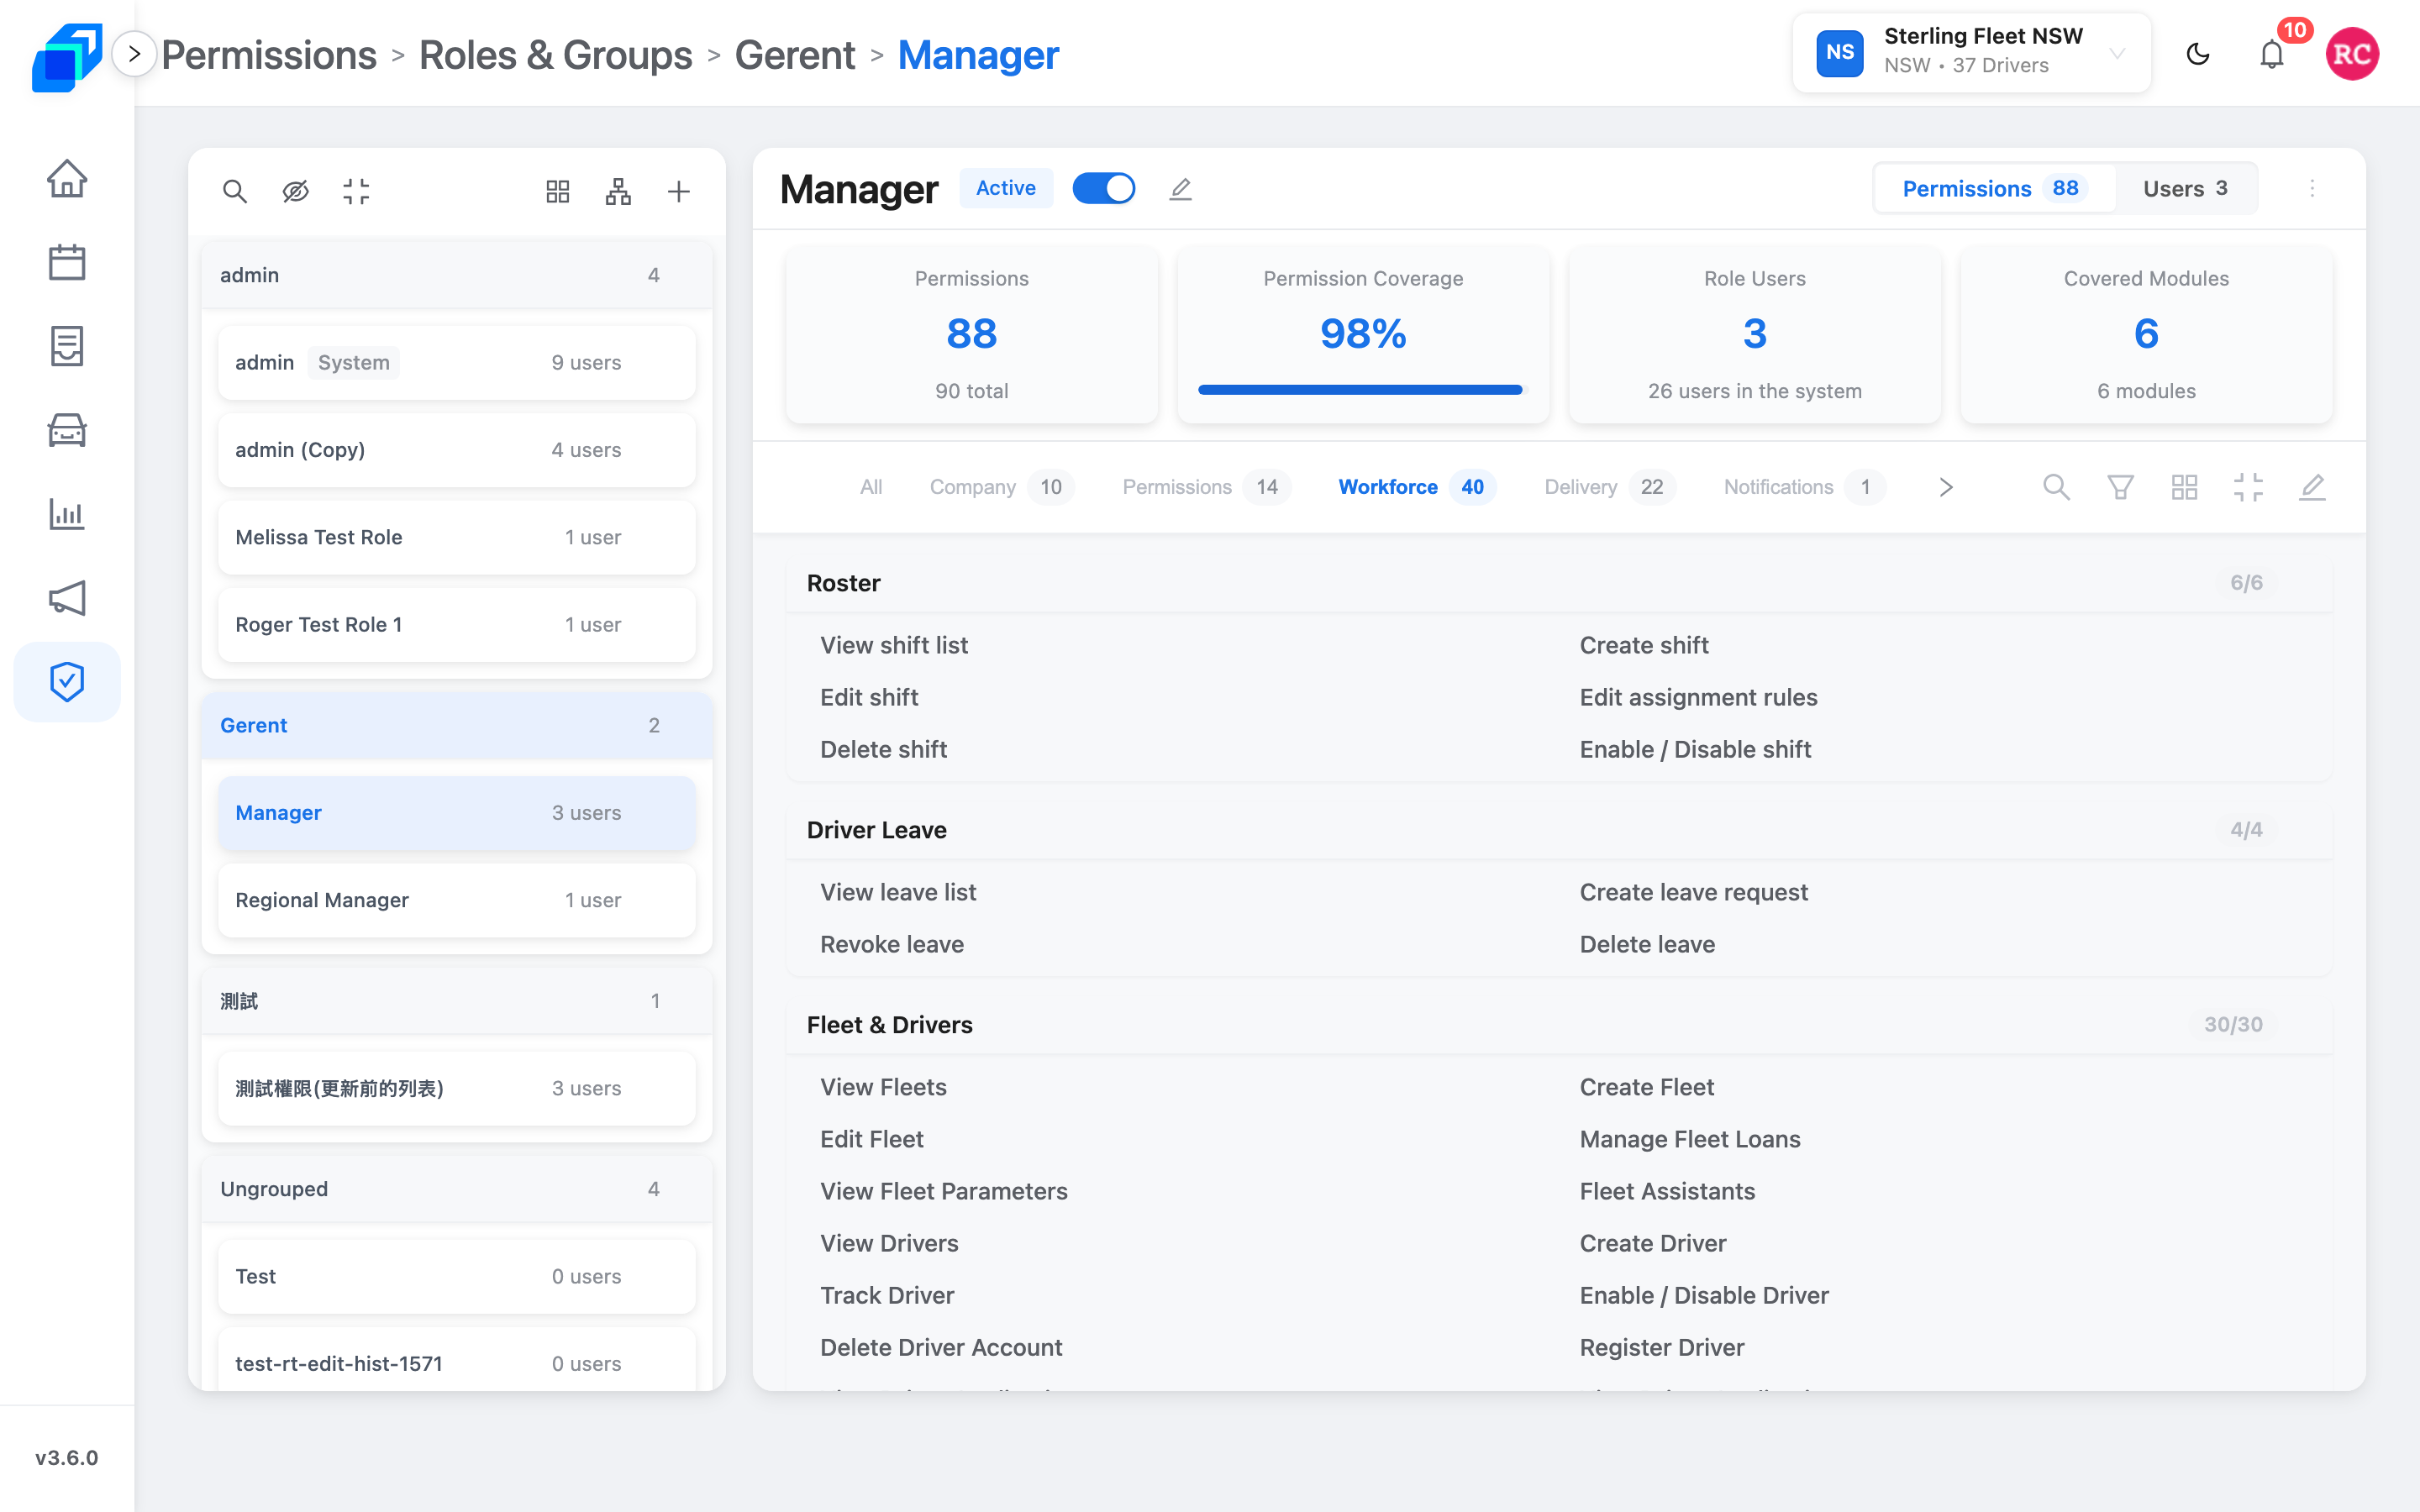
| Tick | What they can do |
|---|---|
| View shift list | Roster menu |
| Create shift / Edit shift / Edit assignment rules / Delete shift / Enable / Disable shift | Build and change shifts |
| View leave list / Create leave request / Revoke leave / Delete leave | Driver Leave |
| View Fleets / Create Fleet / Edit Fleet | Fleets list |
| Register Driver / View Drivers / Create Driver / Track Driver / Enable / Disable Driver / Delete Driver Account | Add a driver, track one, turn an account off or delete it |
| View Vehicles / Create Vehicle / Edit Vehicle | Vehicles |
Roster appears with any Roster or Driver Leave tick, not only a view. Fleets is separate – it needs View Fleets.
Delivery (the day)
Click the Delivery chip to see only this area. Grey text is not granted on this role.
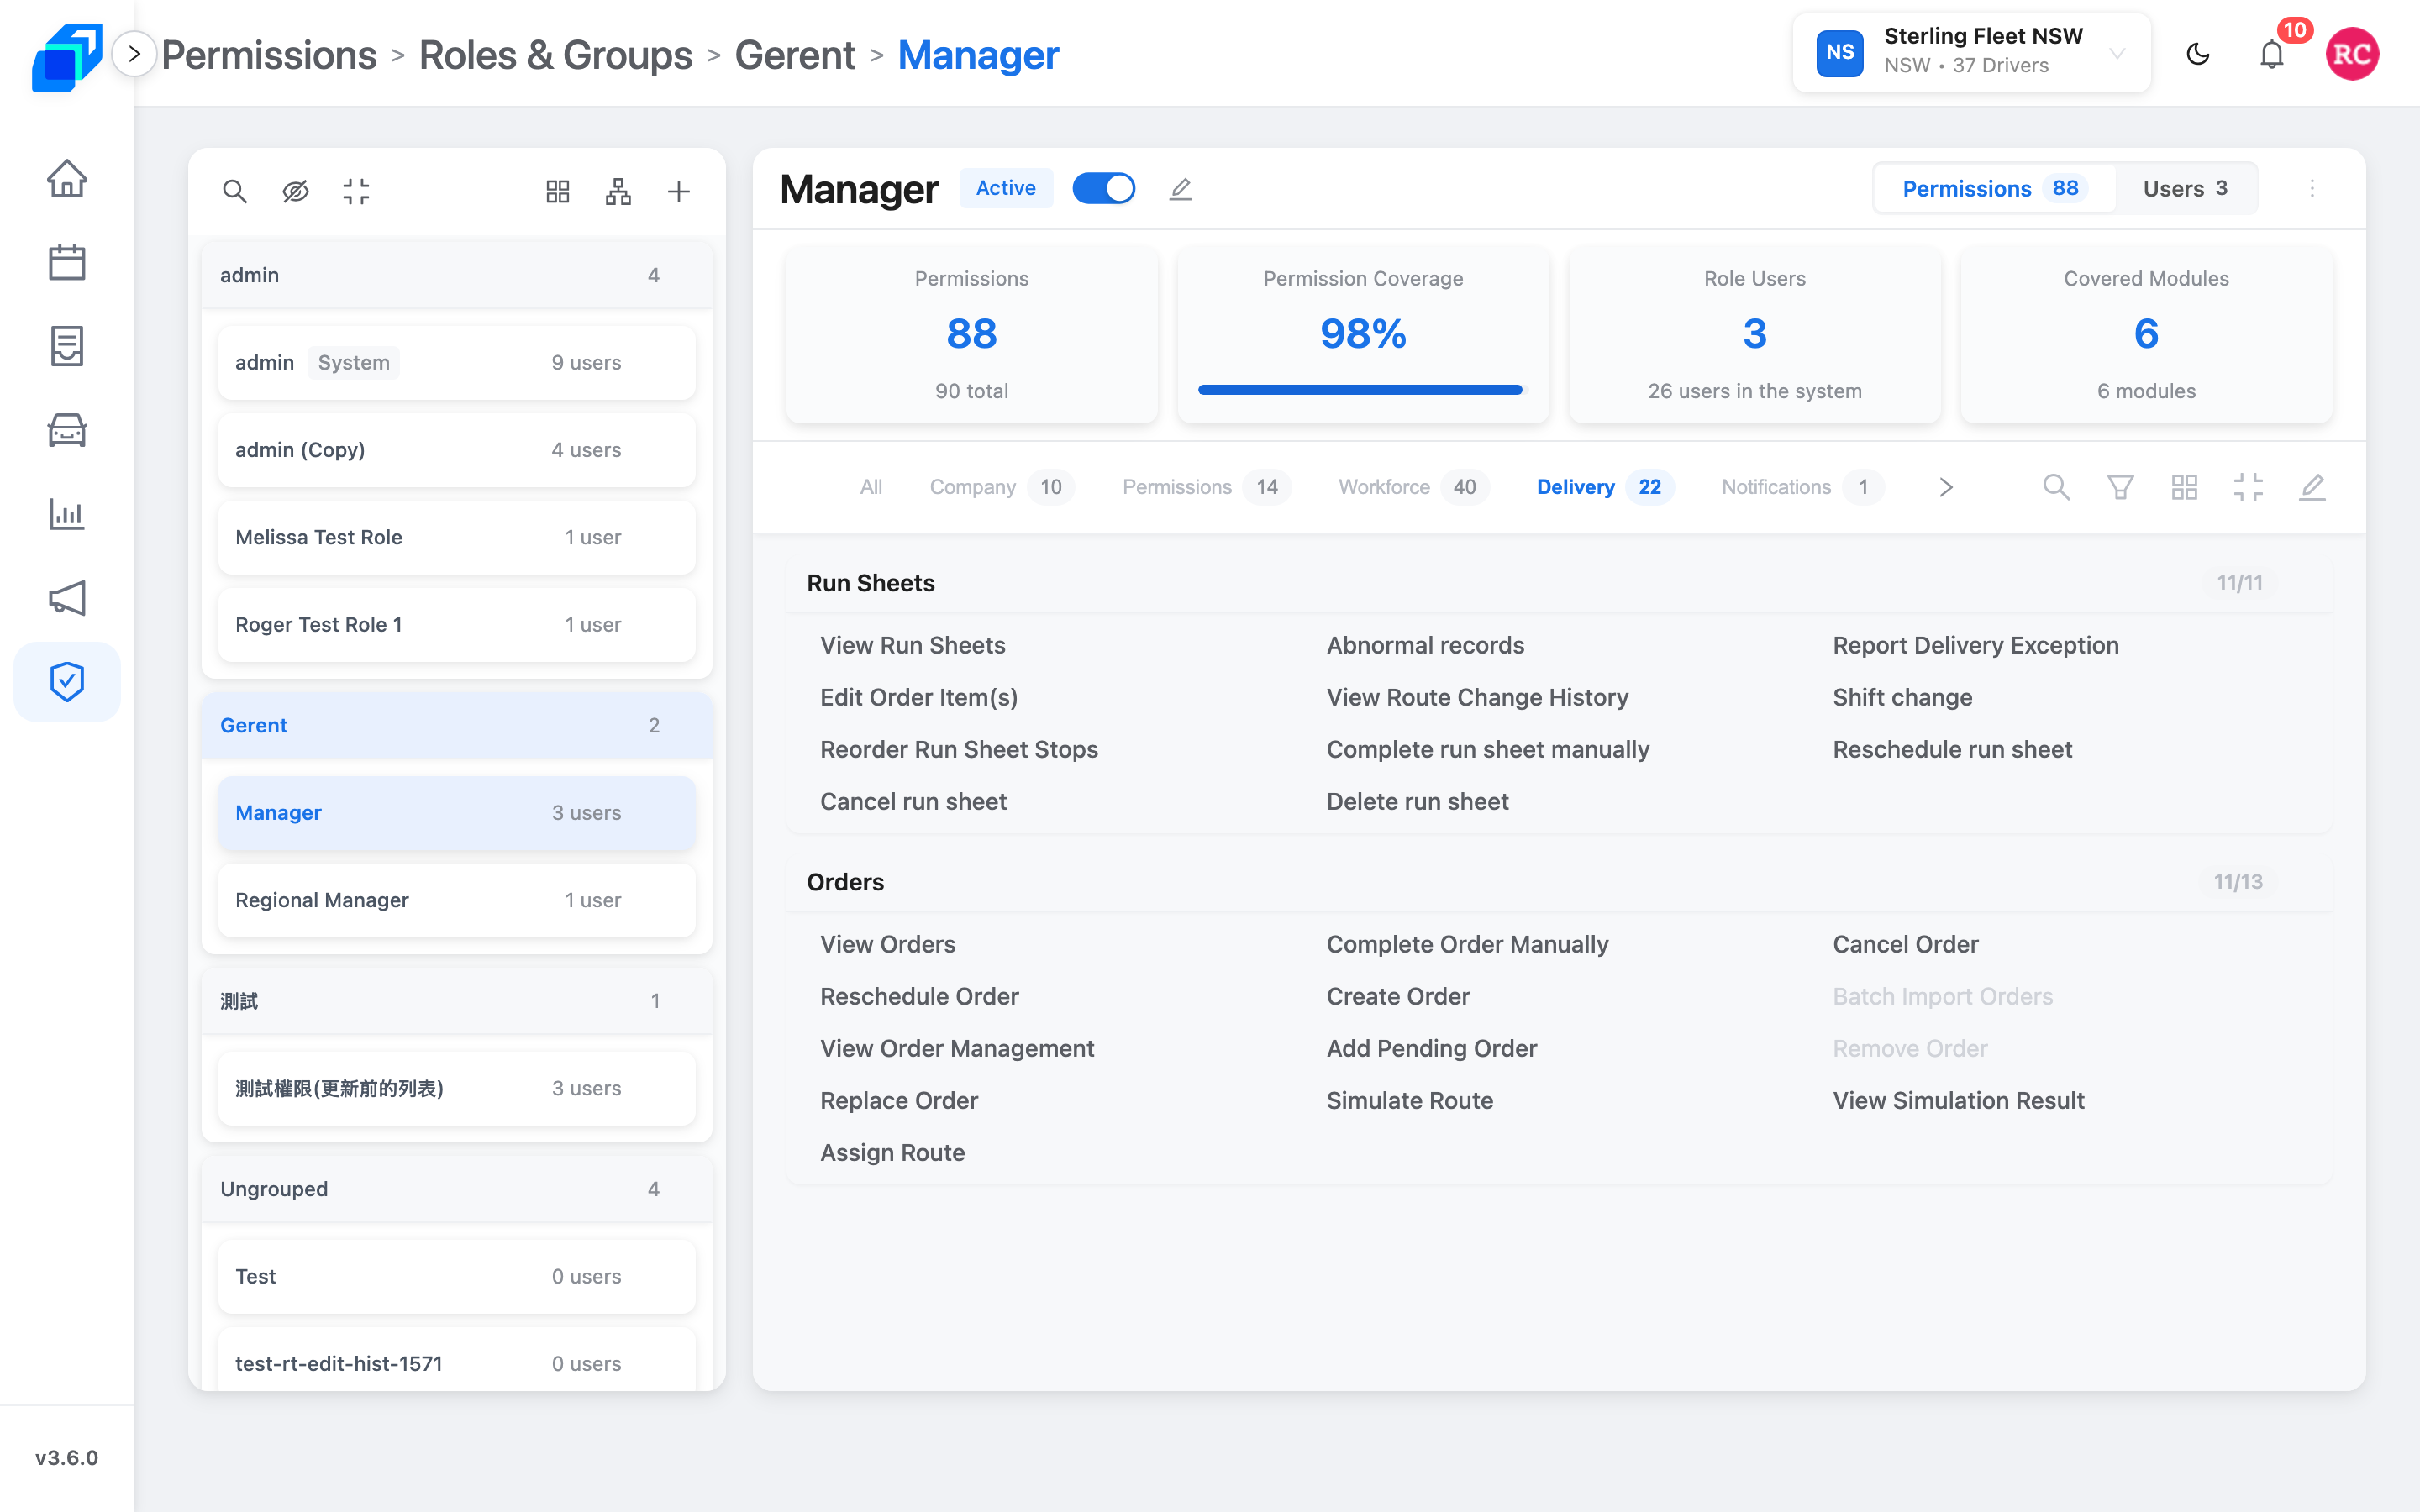
| Tick | What they can do |
|---|---|
| View Run Sheets | Delivery › Run Sheets (list and detail) |
| View Orders | Delivery › Order |
| Create Order | Create New Order |
| Batch Import Orders | Import Orders |
| Cancel Order / Reschedule Order / Complete Order Manually | Row actions on an order |
| View Order Management | Order Management board |
| Add Pending Order | Add on a pending card |
| Simulate Route / View Simulation Result | Simulate in Results |
| Assign Route | Assign in Results |
| Remove Order / Replace Order | Take off or move an order |
| Reorder Run Sheet Stops | Reorder Stops |
| Shift change / Reschedule run sheet / Cancel run sheet | Sheet actions – Shift change is the tick behind Change shift |
| Abnormal records / View Route Change History | History on the sheet |
Delivery in the left menu appears if they have View Run Sheets or View Orders. Order Management needs View Order Management. Simulate and Assign need those two ticks – without them the buttons are hidden.
Notifications – the bell is always there. Extra ticks only change admin of notifications.
Insight – Insight in the menu, the driver-performance view. Revenue, Driver KPI and Daily Report are separate screens that your fleet may not have switched on, so ticking a box here does not by itself put one in the menu.
3. Recommended ticks by job
Copy Manager, then change only what this table says to remove.
| Job | Group | Start from | Remove (untick) | Keep |
|---|---|---|---|---|
| Company admin | admin | System role admin | Nothing. Do not edit System. | Everything |
| General manager | Gerent | Manager (or copy admin) | Nothing required. Optional: leave Manage API Settings only if they set APIs | Delivery, Workforce, Company warehouses, Insight |
| Dispatcher | Your ops group | Copy Manager | The whole Permissions area, and Manage API Settings | View Orders, Create Order, View Order Management, Add Pending Order, Simulate Route, Assign Route, View Run Sheets, Reorder Run Sheet Stops, View shift list, View Warehouses, View Drivers |
| Warehouse only | Your ops group | Copy Manager | Delivery write (Assign Route, Create Order), and the whole Permissions area | View Warehouses, Edit Warehouse, Edit Warehouse Route |
| Roster only | Your ops group | Copy Manager | Delivery write, and the whole Permissions area | View shift list, Create shift, Edit shift, View leave list |
You'll know a dispatcher is right when they see Delivery and Order Management, and they do not see Permissions.
4. Who has this role – VIEW / UPDATE
Click Users (next to Permissions). Filter by fleet. A person can have more than one role. Ticks add up across roles – a tick on any one of them is enough.
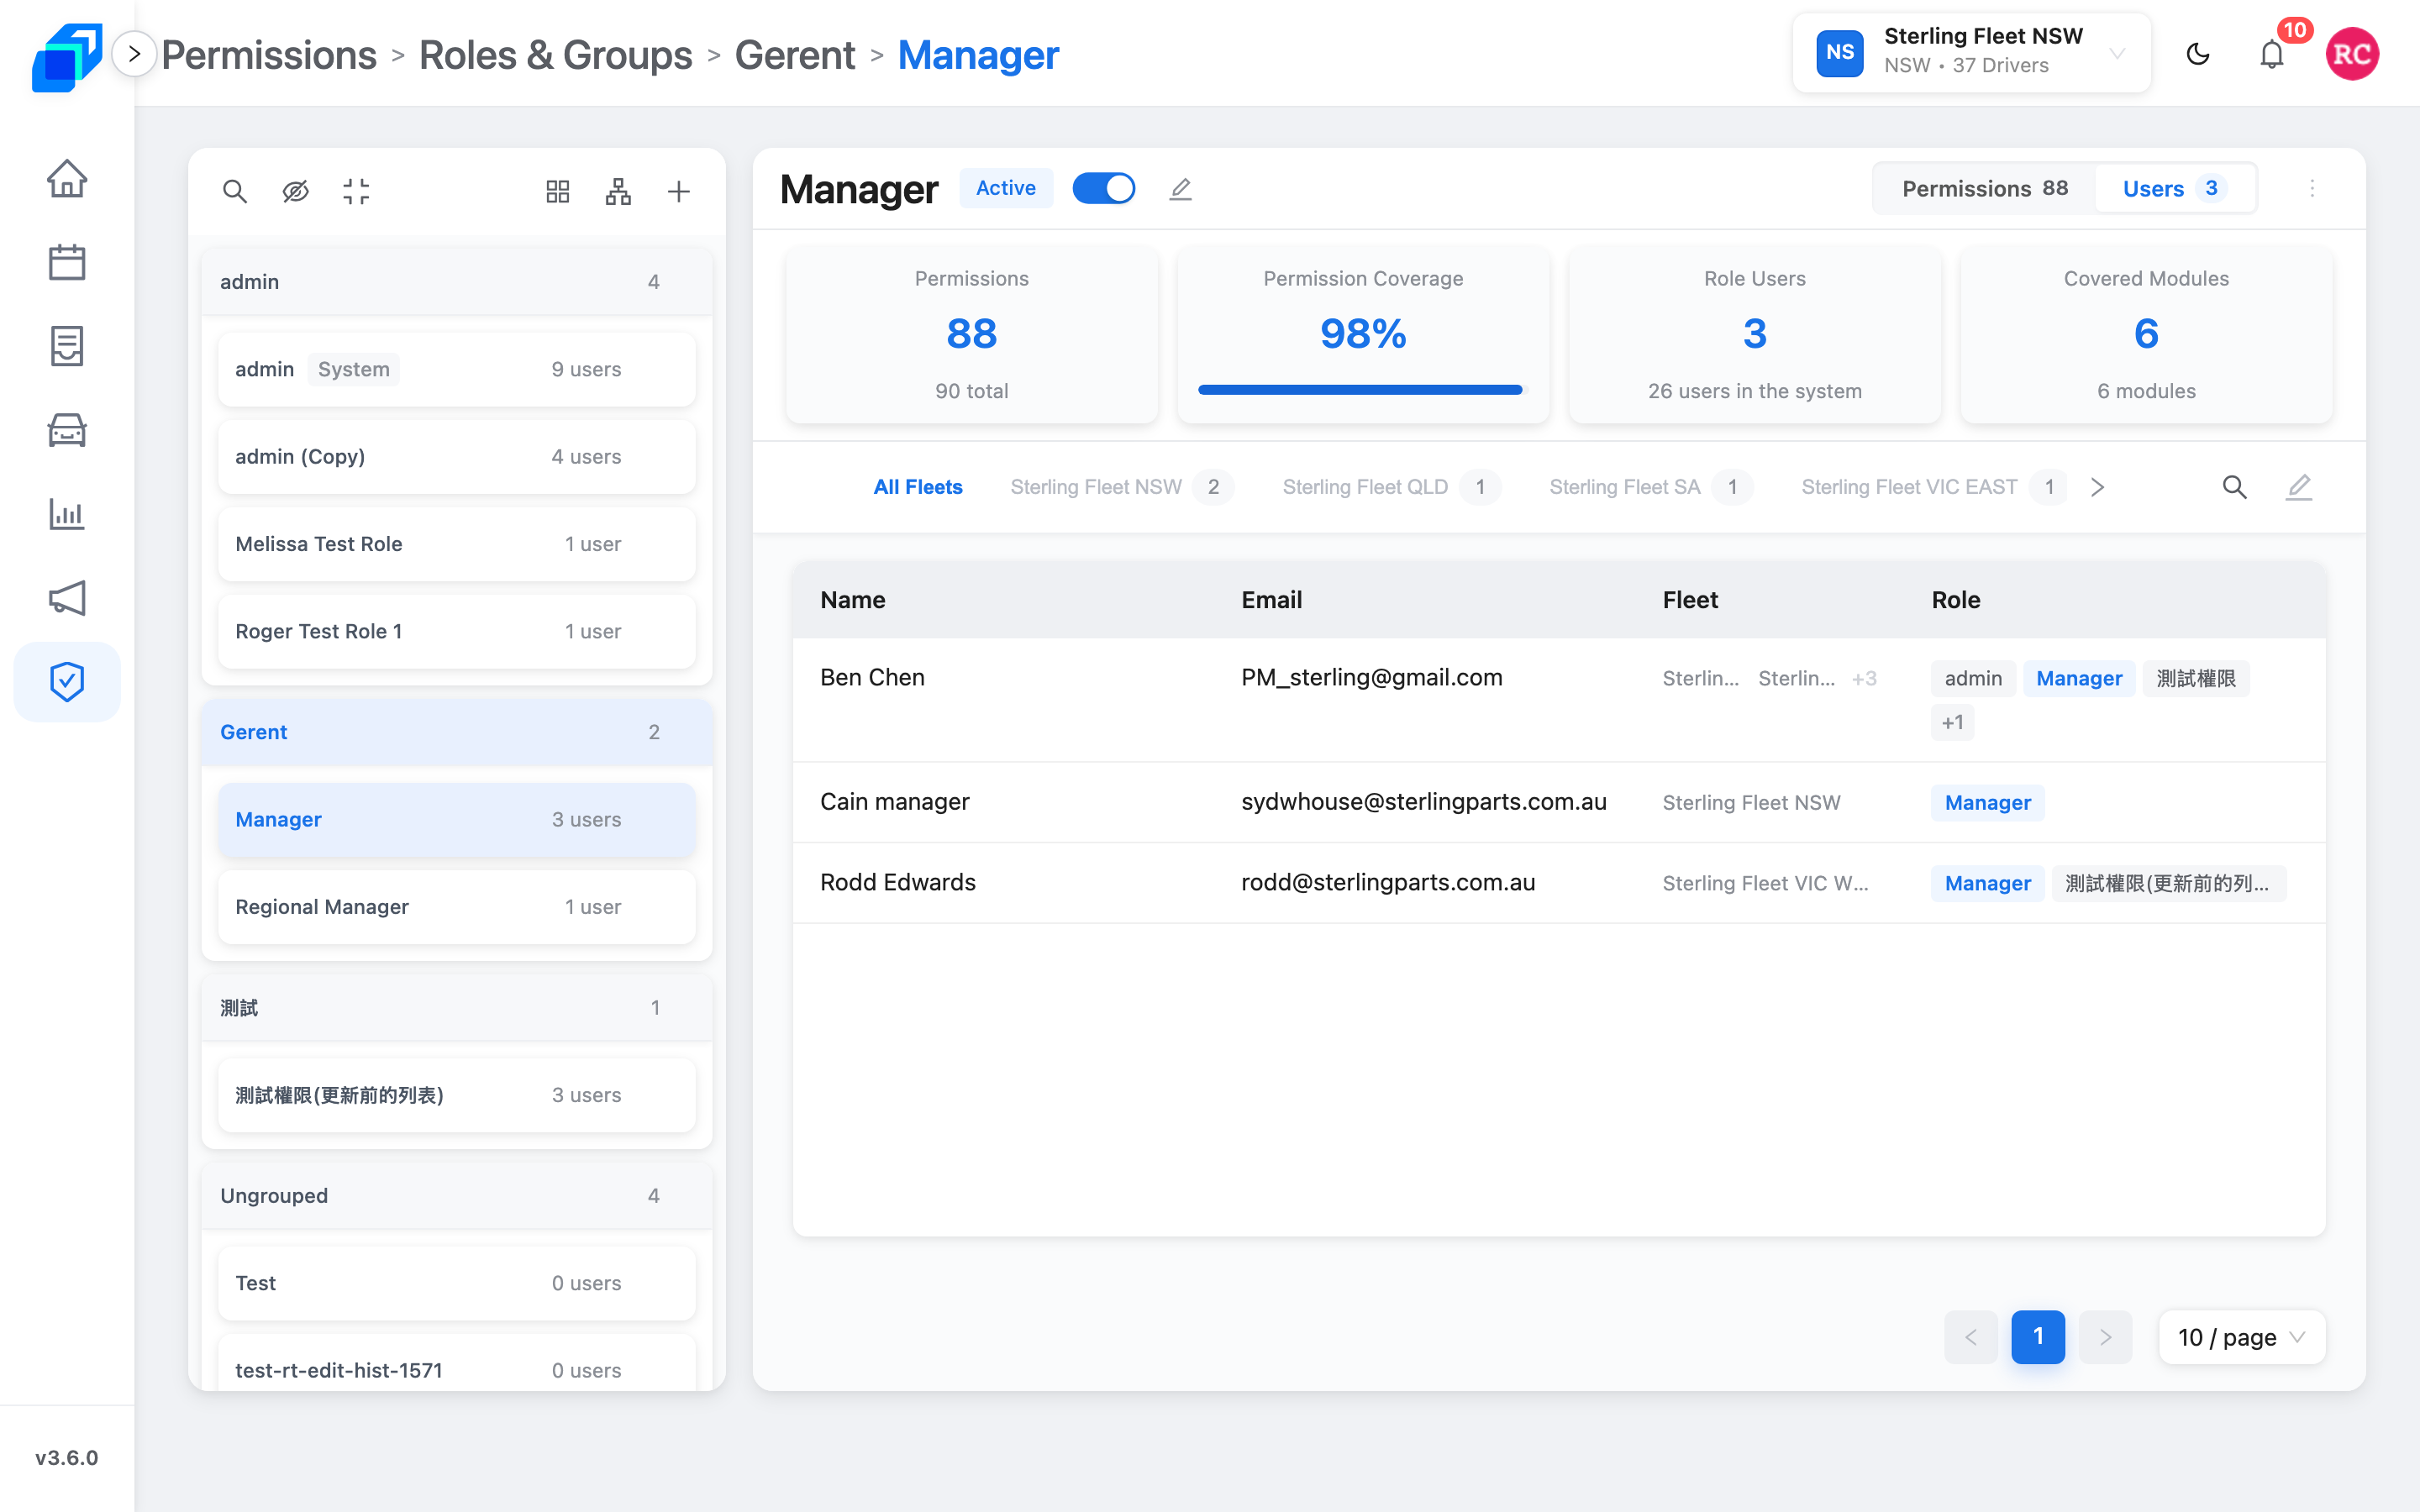
When the role already has people, the pencil tip reads Edit. Tick names, then Save. Discard leaves the list as it was. When the role has no people, that control is a plus, tip Add Users.
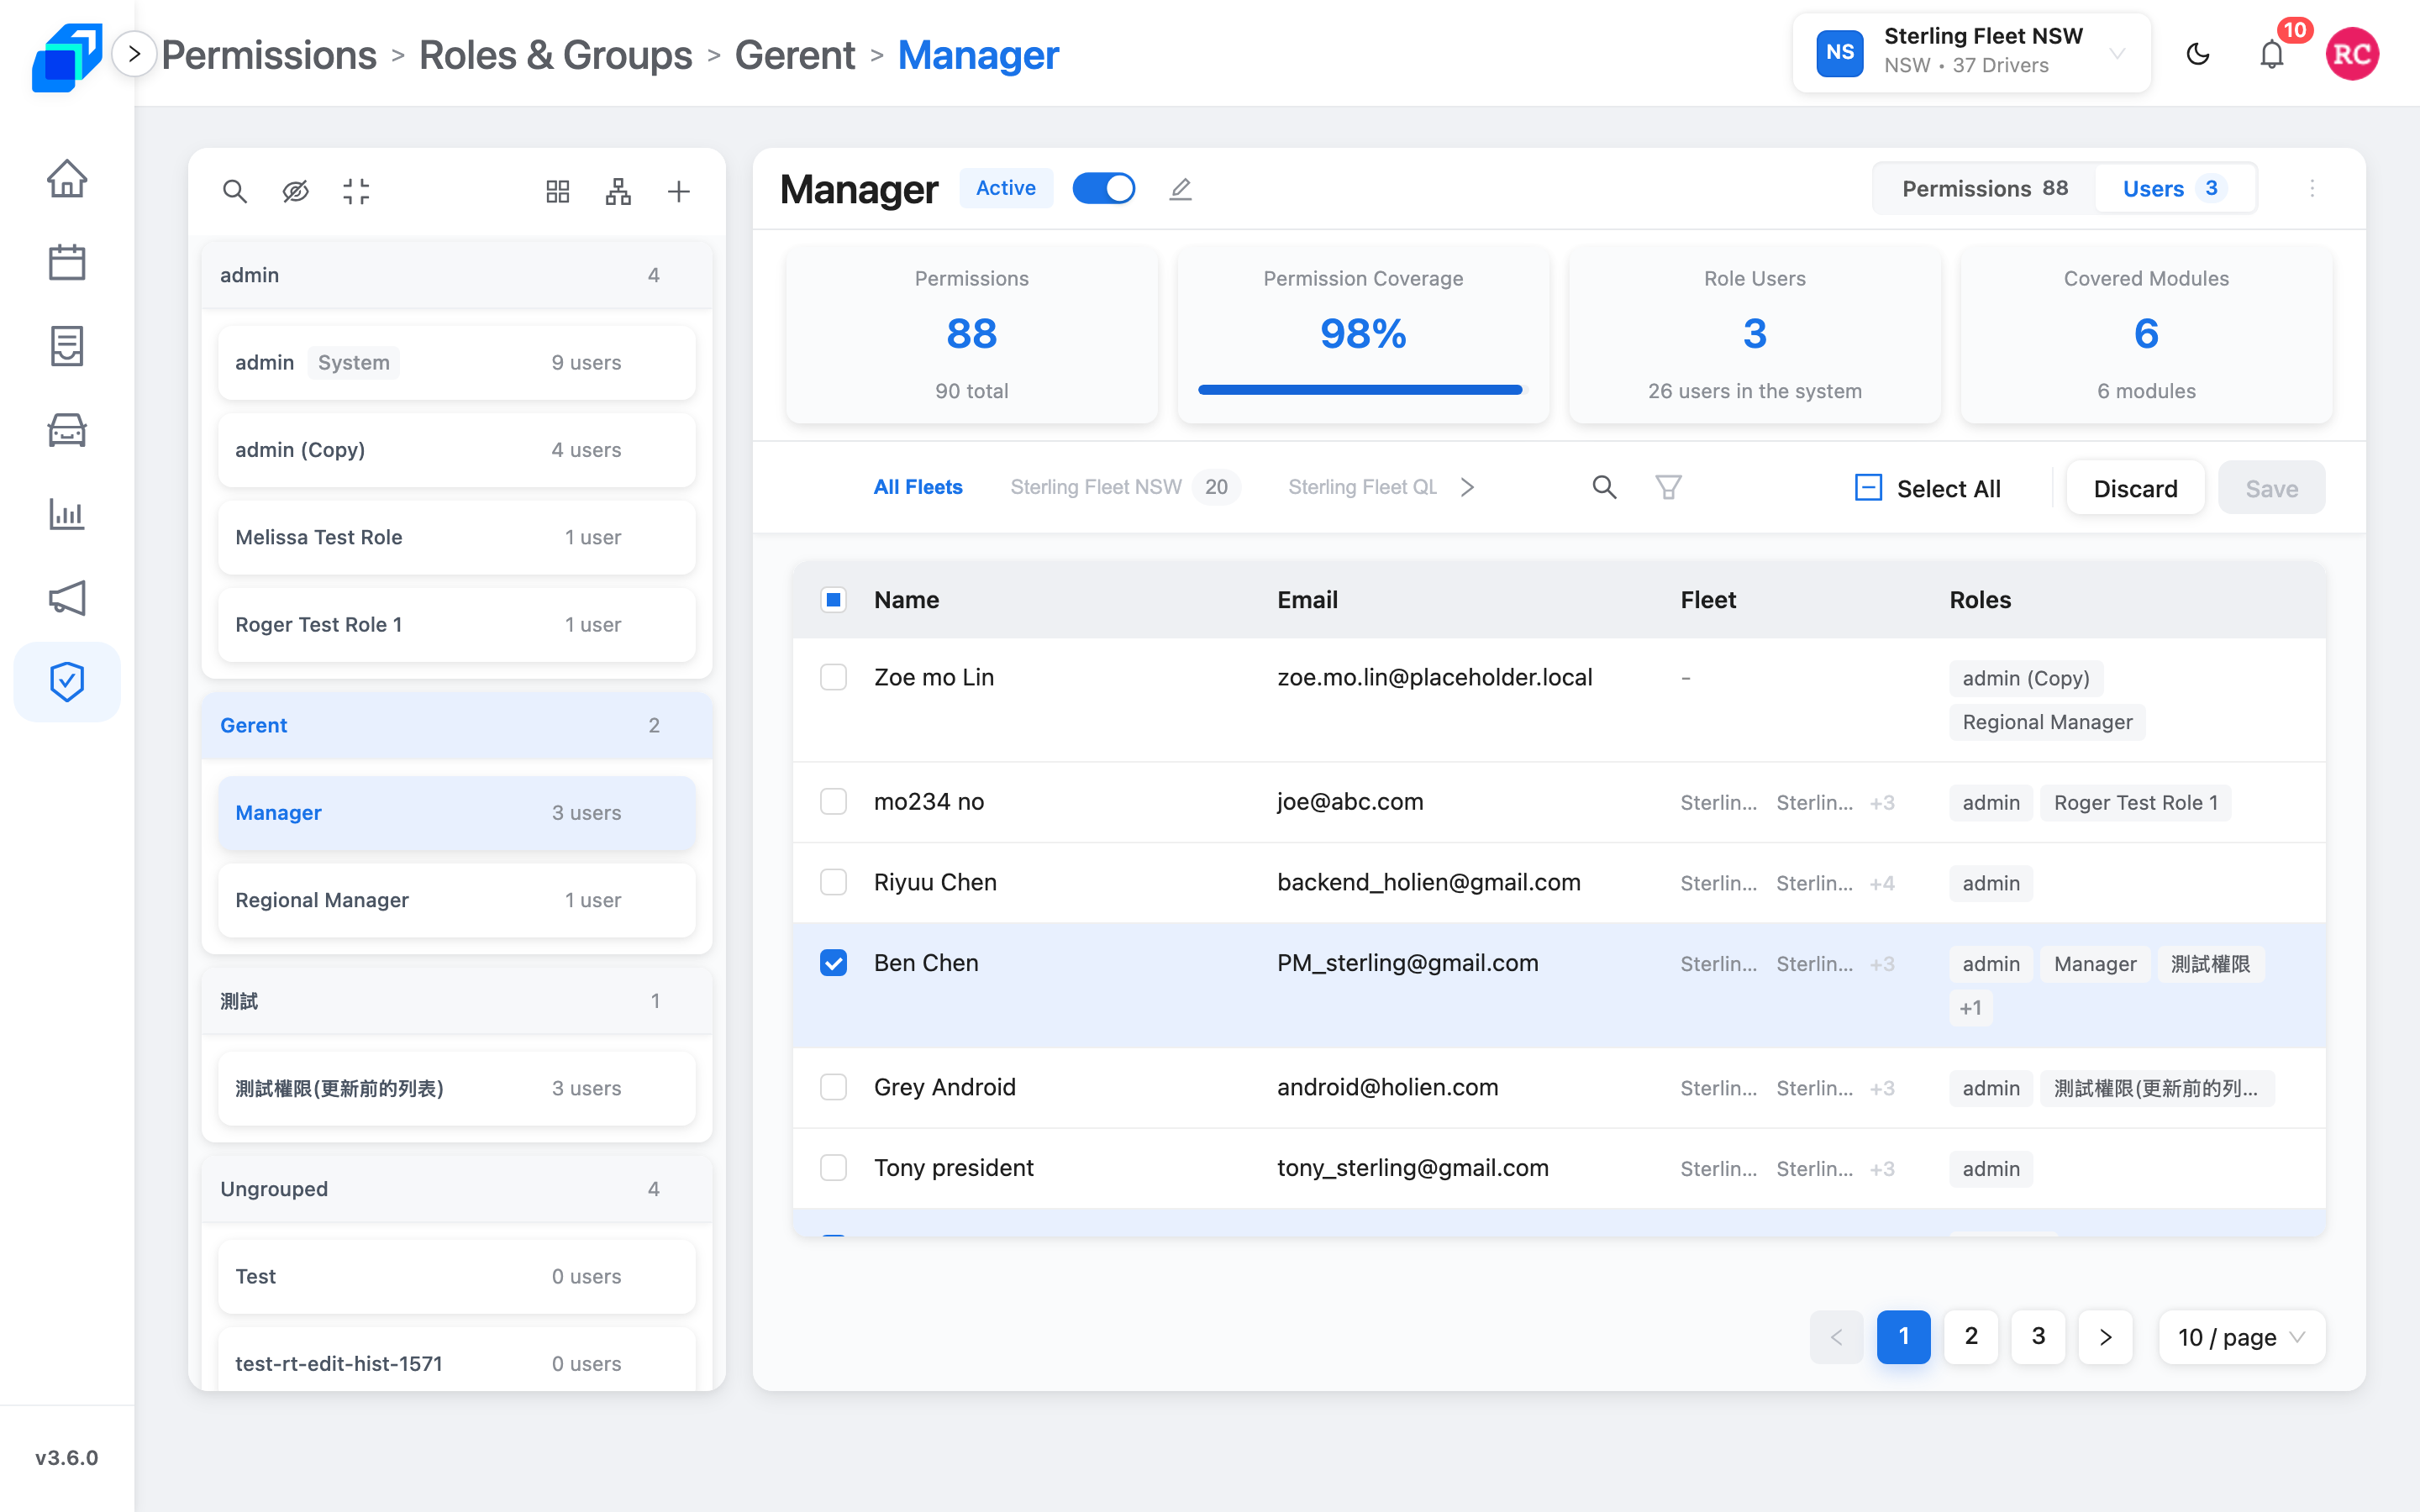
Removing someone takes away only this role's ticks – other roles they have stay.
5. The person's own account – SET UP / UPDATE
A role is a set of ticks; a person is an account. A name appears in section 4 only after that person has an account. Accounts live on Permissions › Users.
The list shows Name, Roles, Fleet, Email and Status. Use the picker beside the search box to search by Name, Email or Status. Pick Status and the box becomes a list – choose a status instead of typing. Click Name, Email or Status in the header to sort.
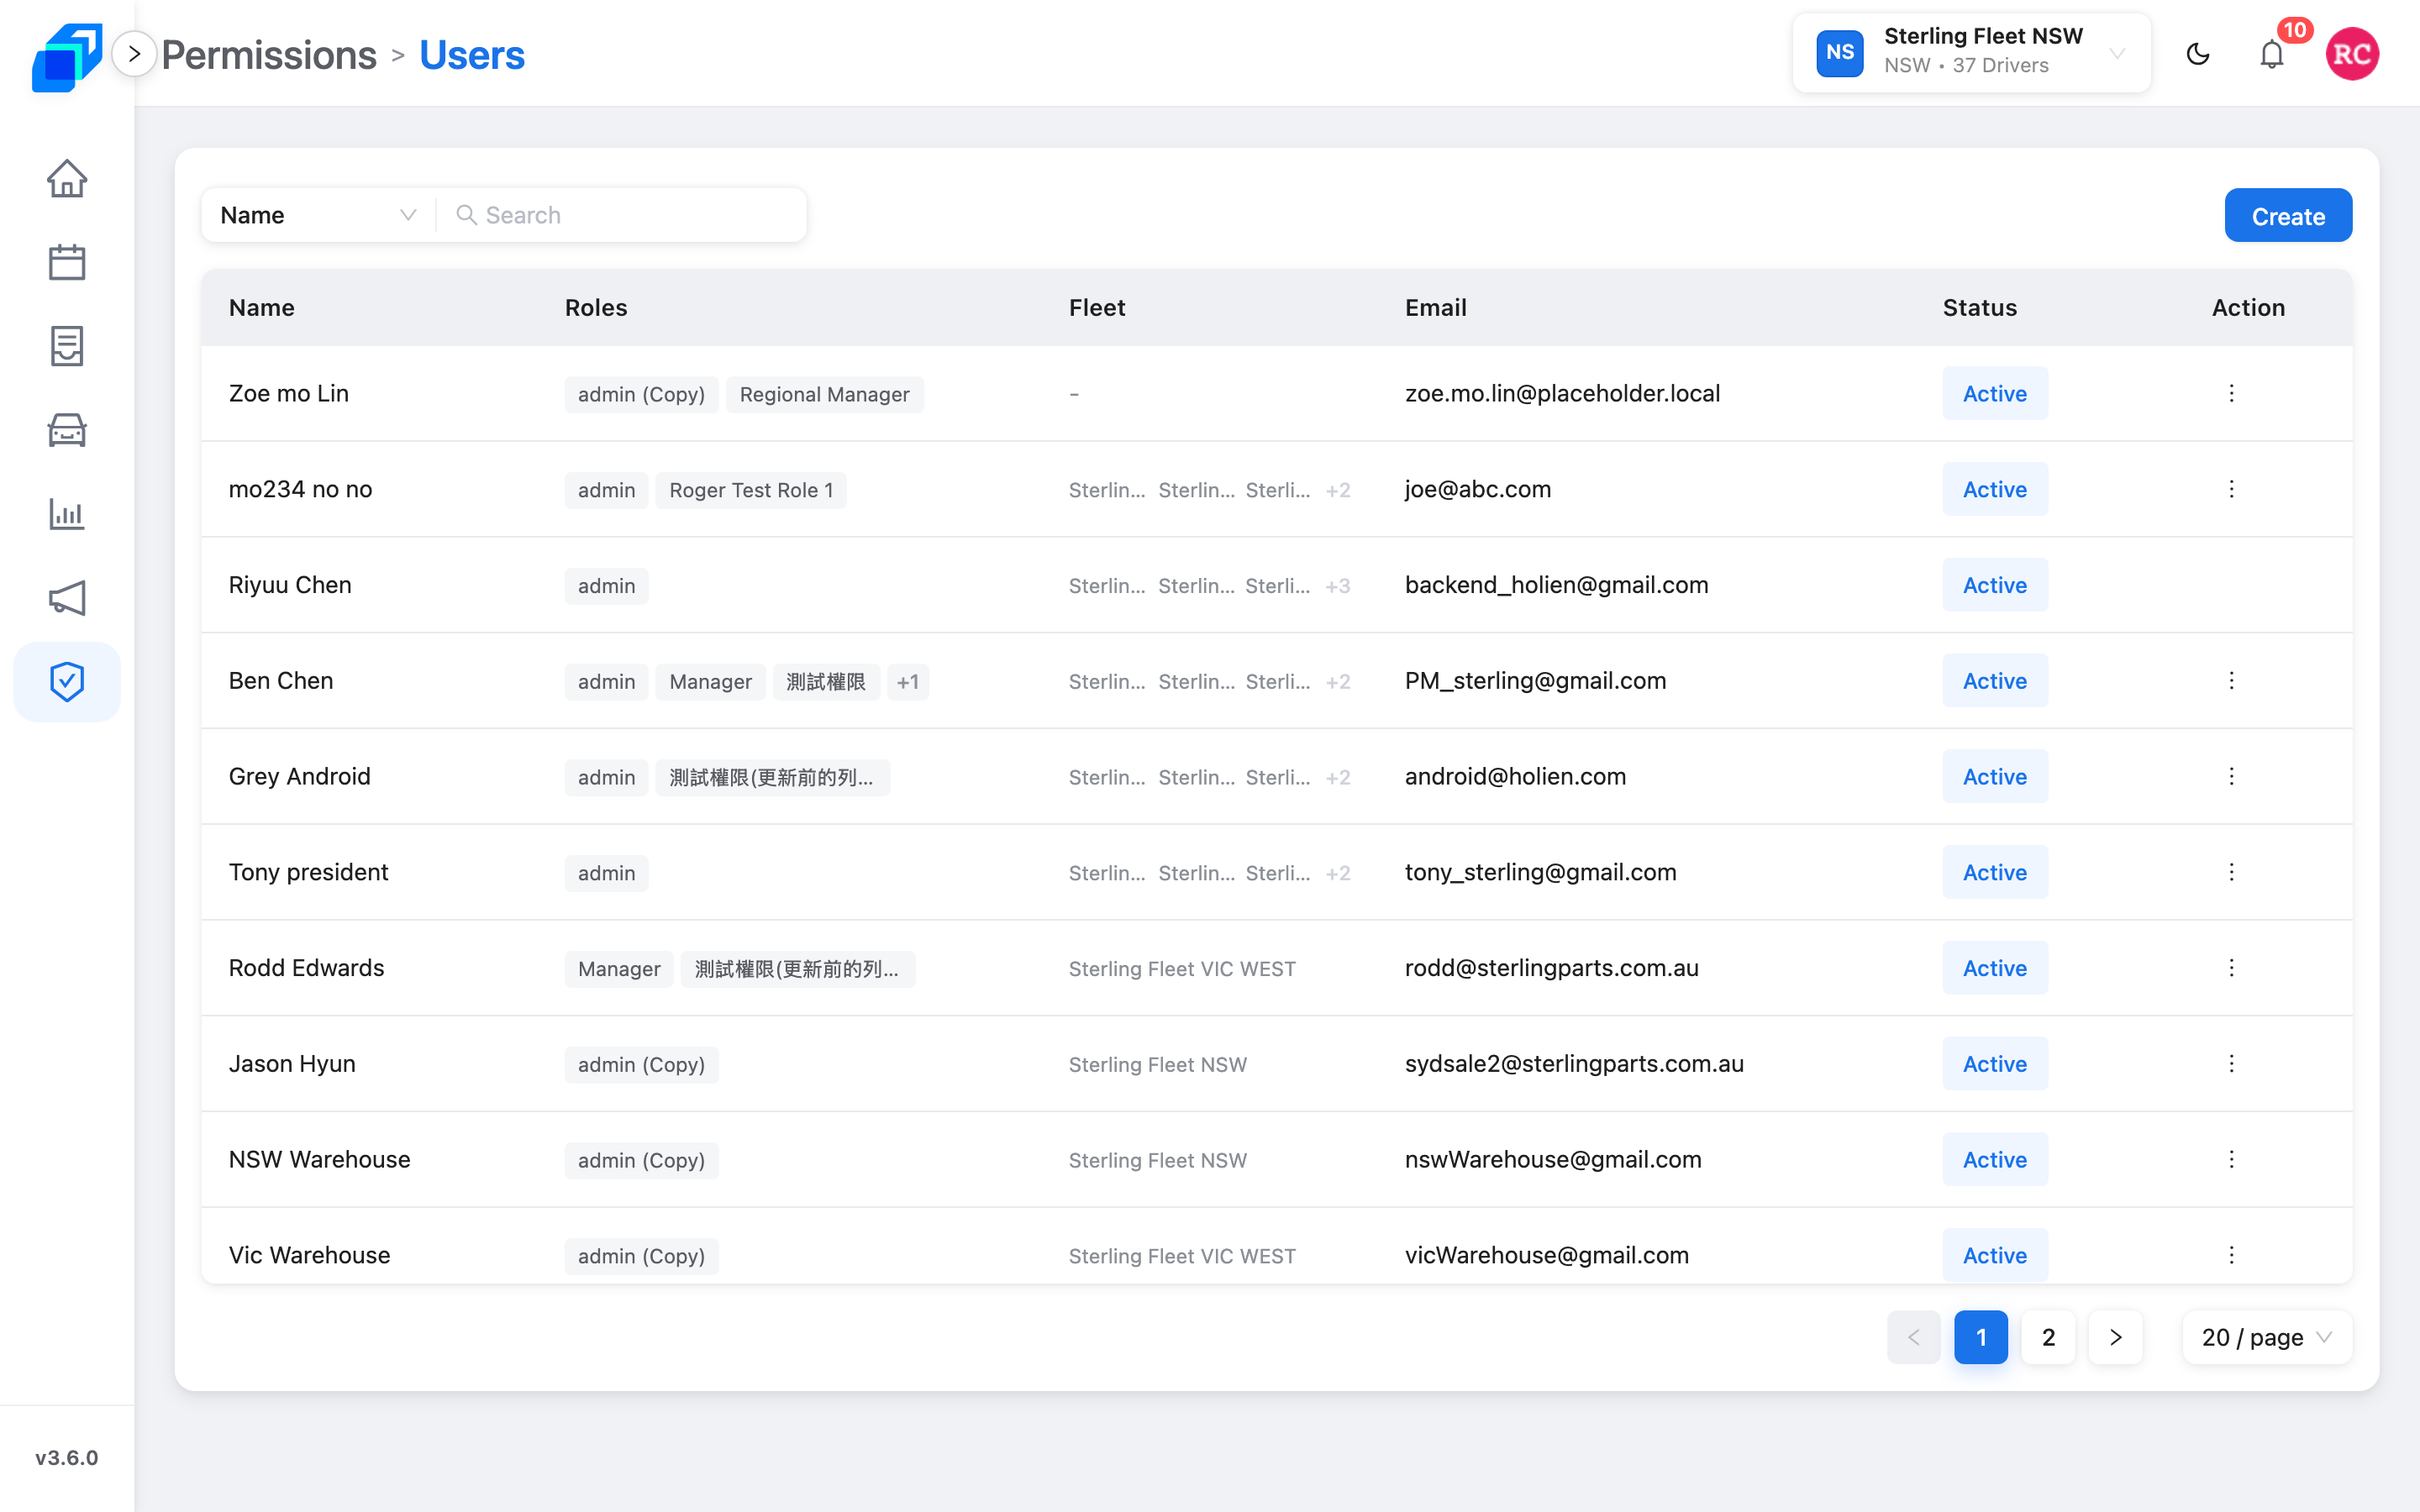
Create an account
- On Permissions › Users, click Create. Create User opens.
- Fill in Mobile, First name, Last name, Email, Title, Gender and Fleet. Middle name and Birthday are optional.
- Click OK. The person joins the list with no role yet.
Tick their name on a role next, as in section 4. Until you do, they have an account and no access.
Edit or deactivate an account
Click the three-dot menu at the end of a person's row. You see it only if your role has Edit Users or Enable / Disable Users. Create at the top needs Add Users.
- Edit opens Edit User – name, contact details, fleet, and a new Password with Confirm Password.
- Deactivate asks you to confirm, then Status reads Inactive. An inactive person cannot log in. The same menu item becomes Activate, so the account comes back.
Roles in Edit User is a read-only list, and the screen points you at the role instead. Change what a person can do on the role, not on the person. Clicking a role name there opens that role.
Your own row has no three-dot menu, so you cannot deactivate your own account here.
6. Compare every role – VIEW / UPDATE
Open Permission Matrix (grid icon in the left header). Roles are columns. Views are rows. A tick means that role has the view. A cross means it does not.
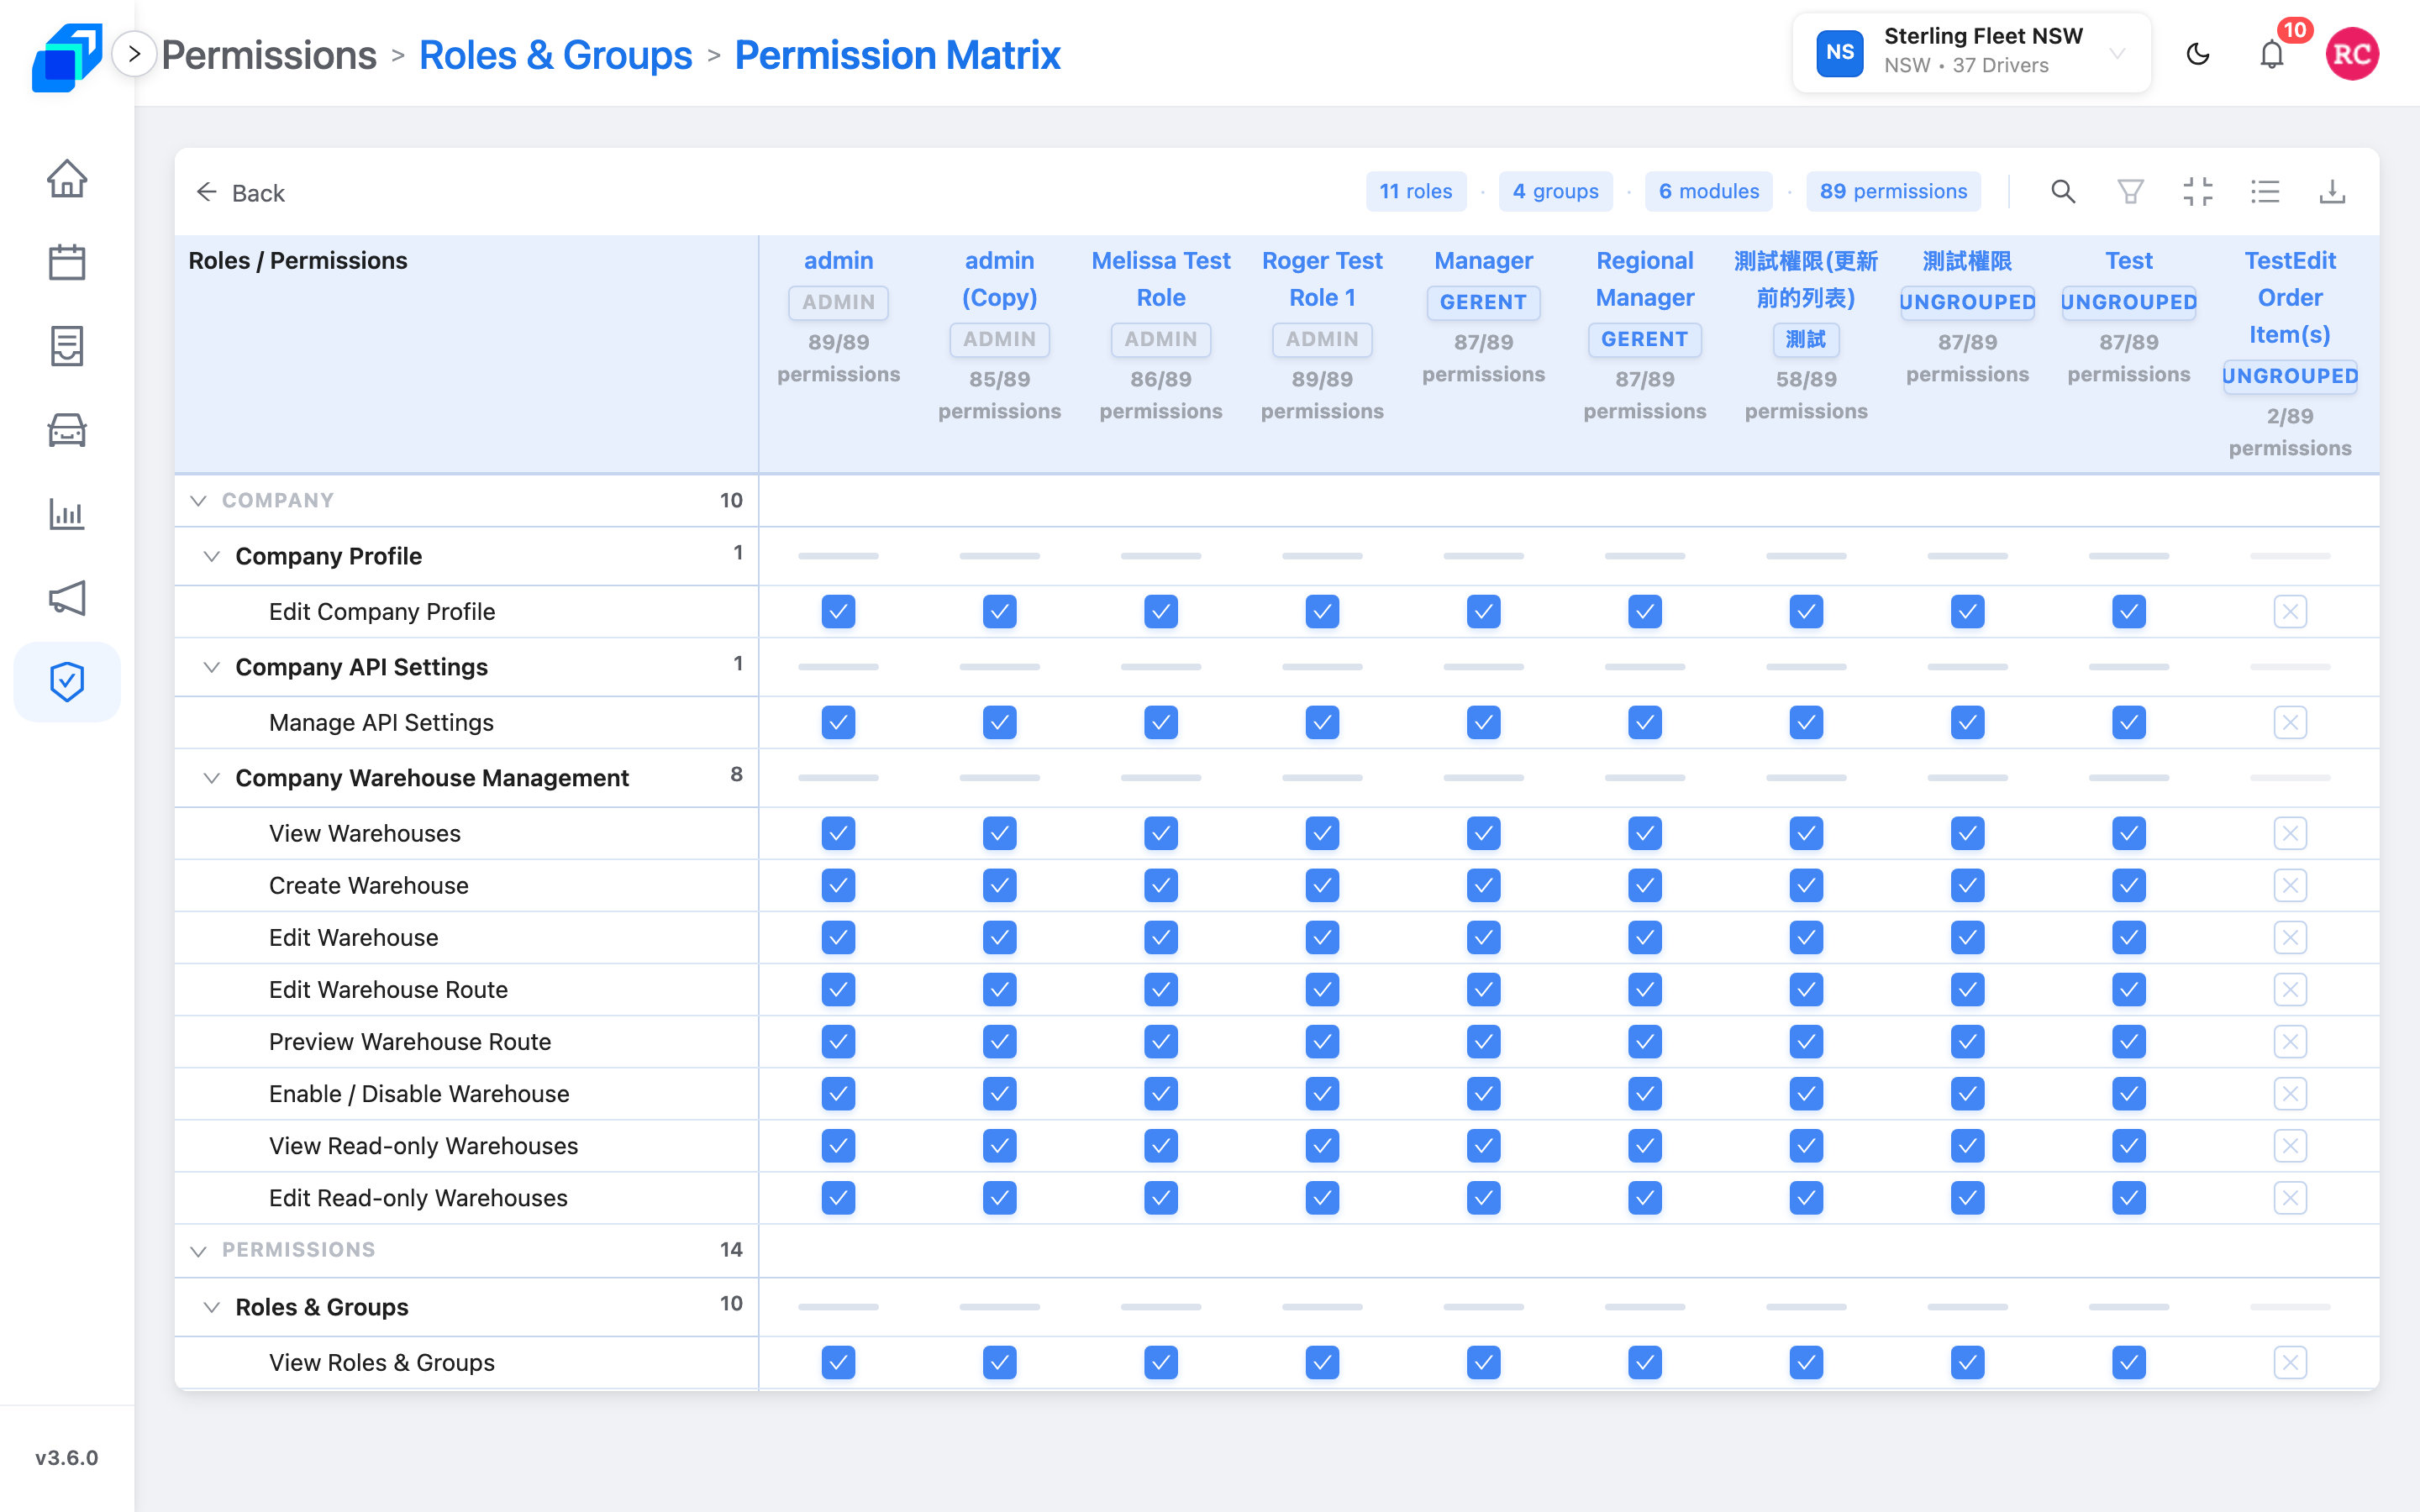
It opens in Detail View – every tick, with each area a section you can collapse. Click Module View for one row per area and a count for each role, for example 5/8. Click Detail View to come back.
The matrix is for comparing – use it to line up admin, Manager and a new dispatcher in one grid. To change a tick, open the role instead.
7. Copy a role – CREATE
Two ways, same idea: start from a role that is already right.
- Duplicate Role – three-dot menu on the role. Same ticks, new name.
- Copy Existing Role – in Create Role, pick Manager or admin. Field-by-field: Create a role.
Copy Manager for a general-manager variant. Copy admin only when the new job needs every view.
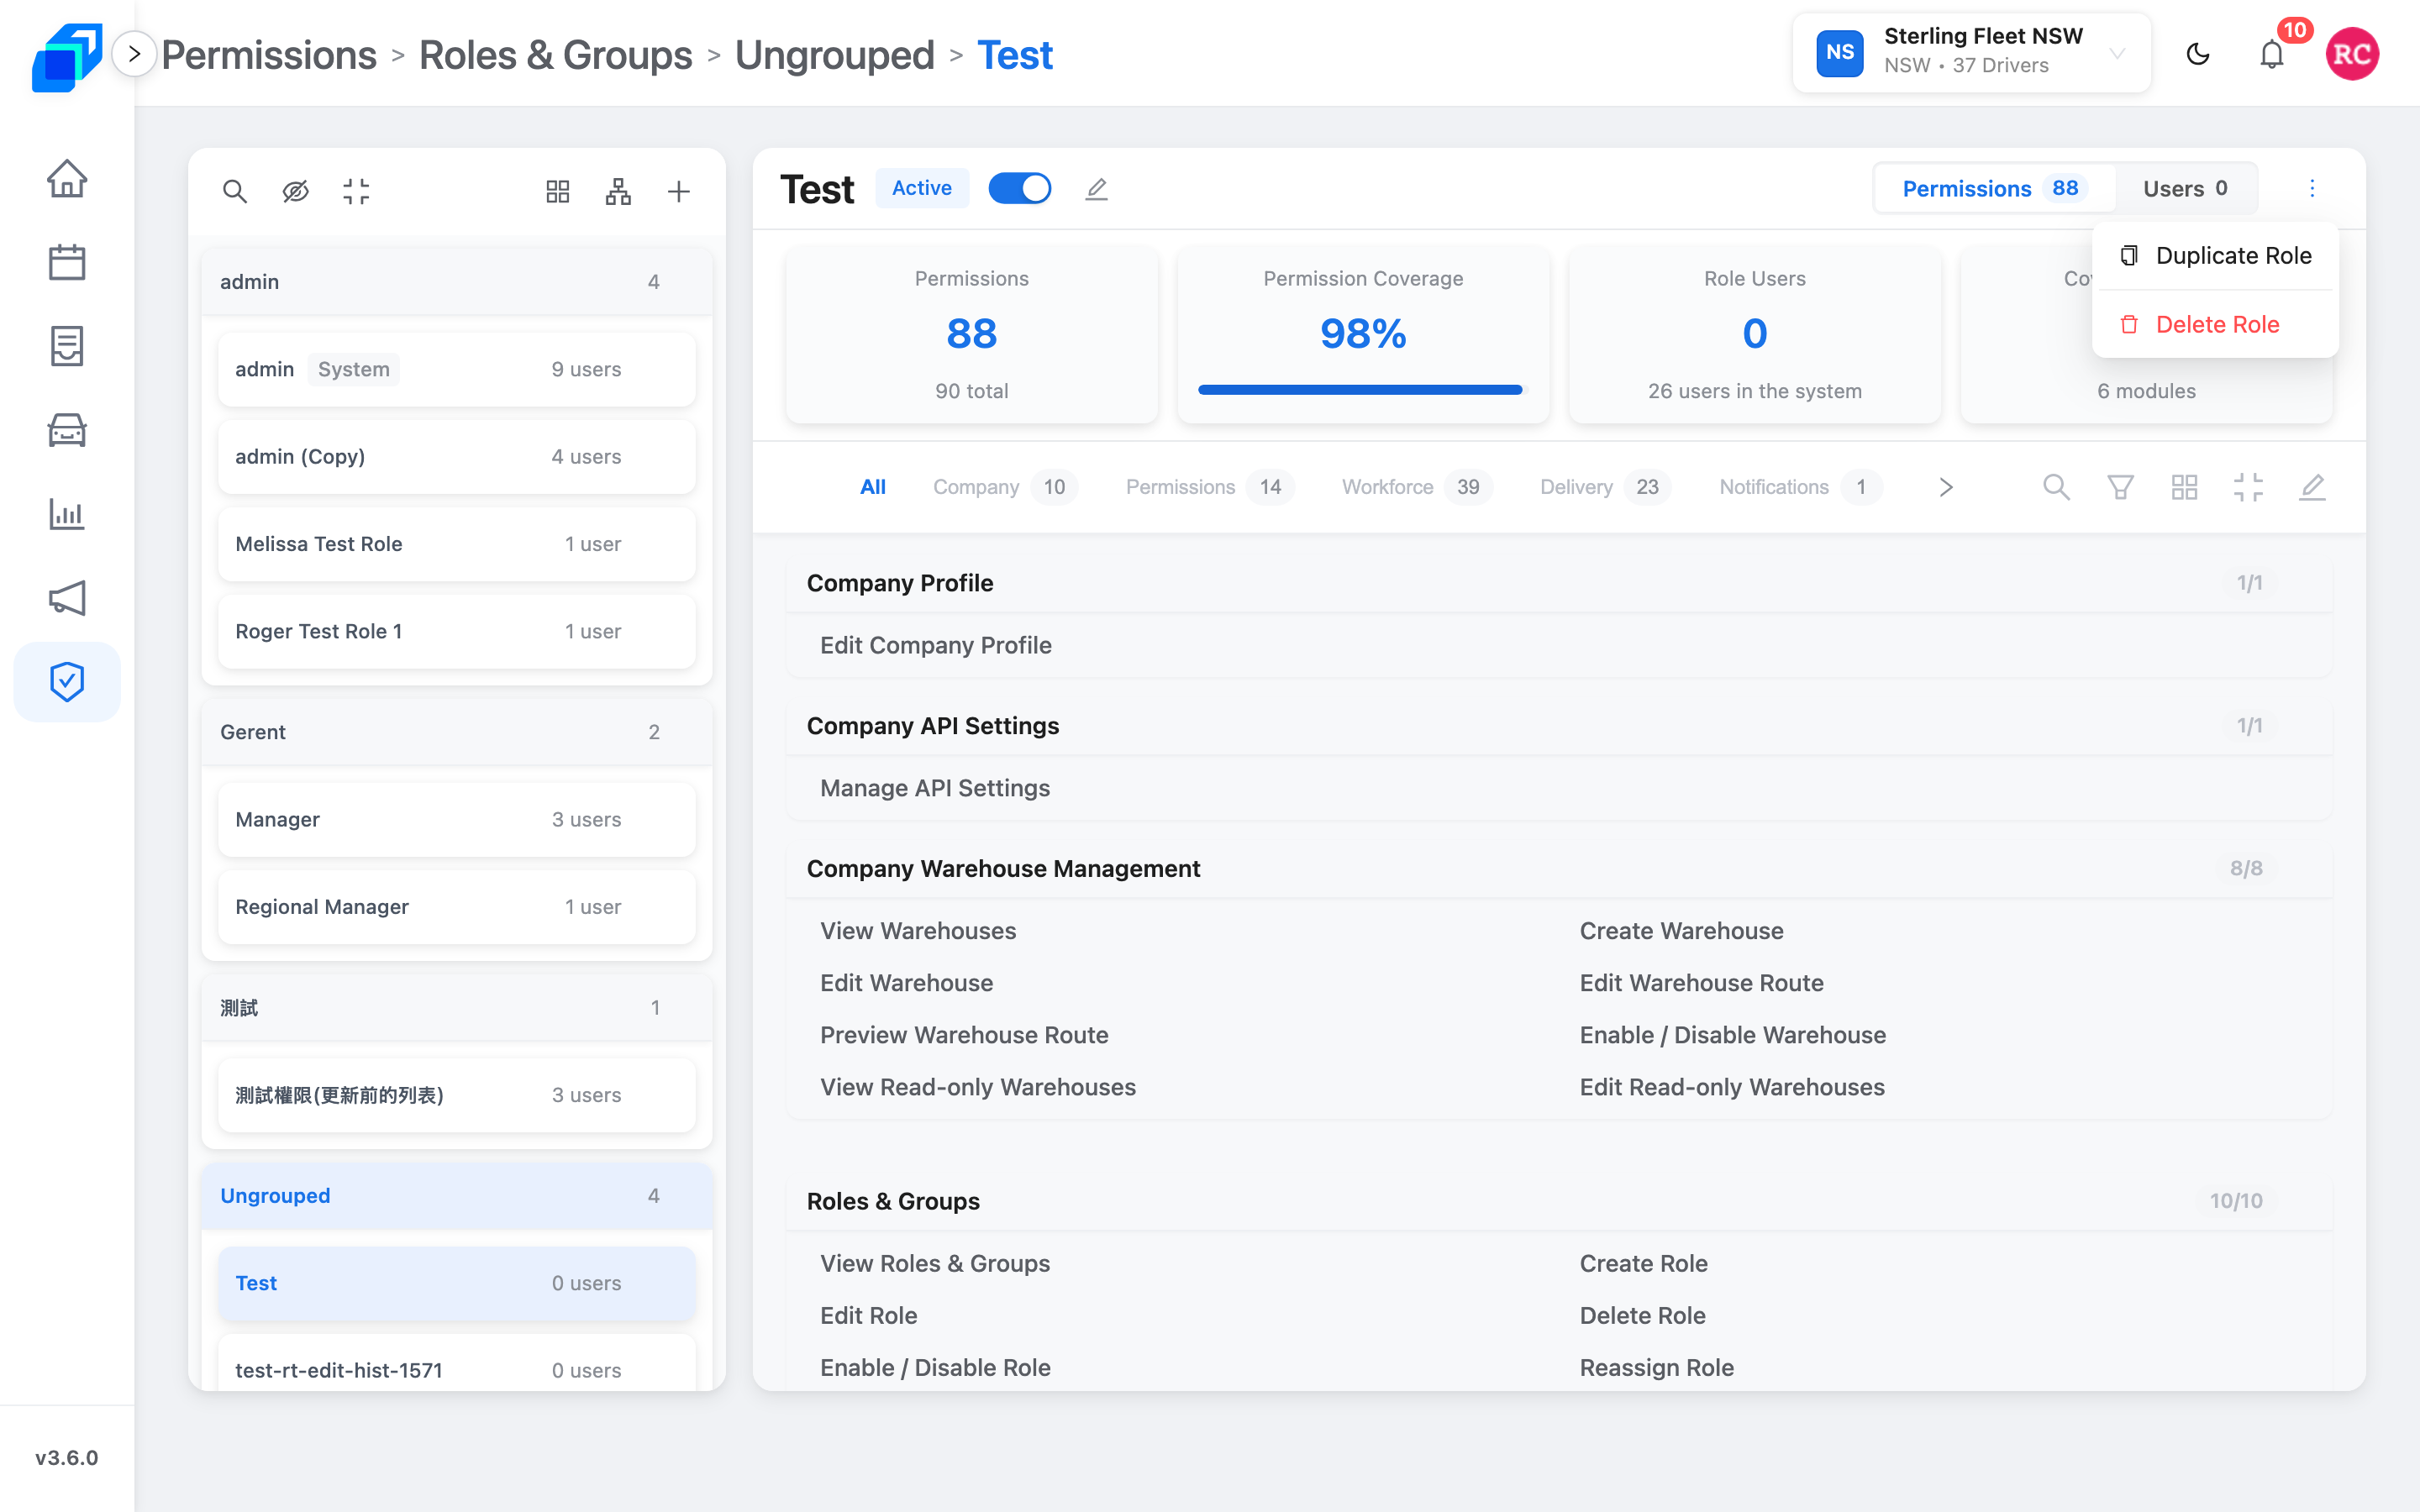
Edit Role (pencil) is for name, group, and ticks on a custom Active role. System roles have no pencil.
8. Deactivate and reassign – UPDATE
The Active switch turns the role off (Deactivate Role). New people cannot get it. Current people keep it until you move them.
- Open a custom role (not System).
- Click the Active switch.
- Read the Users count at the top of the dialog. It names them, so you can see who you are about to affect.
- Pick a role under Reassign to to move them somewhere first, for example Manager.
- Confirm Deactivate Role only when the move is right. Cancel if you opened this by mistake.
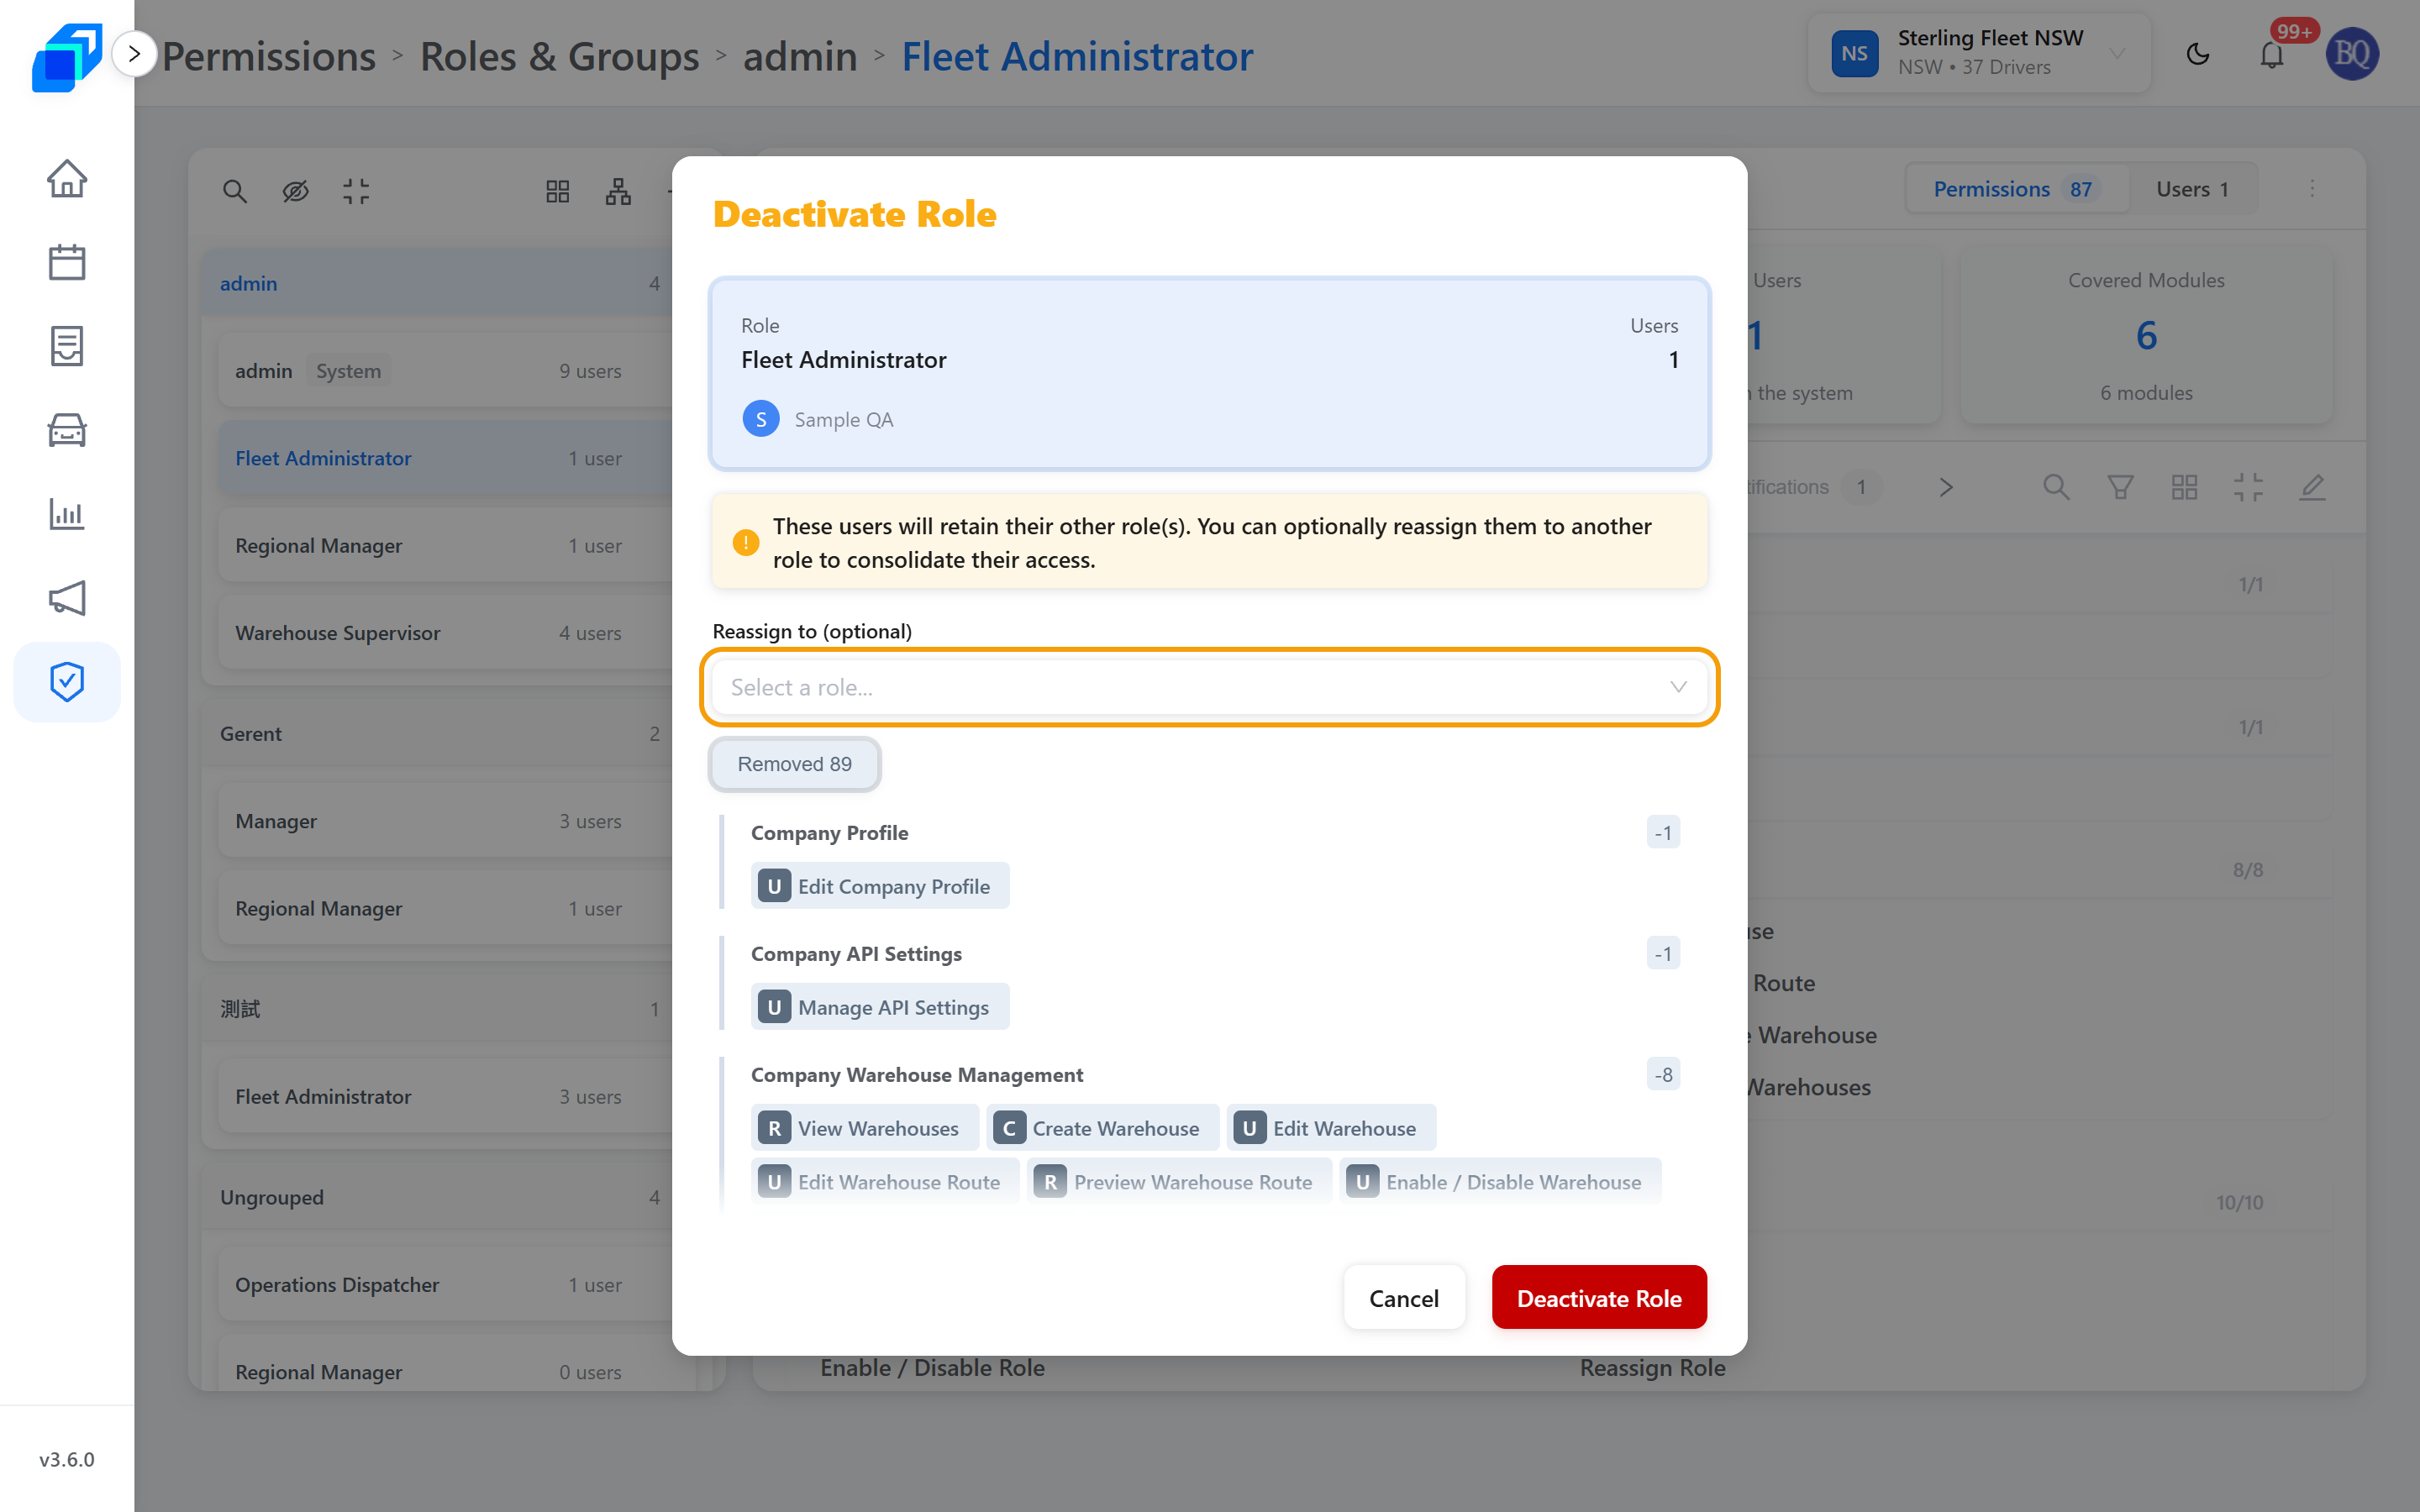
The label tells you whether the move is required. If everyone on the role also holds another one, it reads Reassign to (optional) and the banner says they keep their other access. If someone has only this role, it becomes a required Reassign to, because deactivating would otherwise leave them with nothing.
Below the picker the dialog lists every permission being removed – Removed, then each module with its count. Expect a long list on a broad role.
If the role has no people, that whole block is absent: no user count, no Reassign to, just the permissions and the confirm.
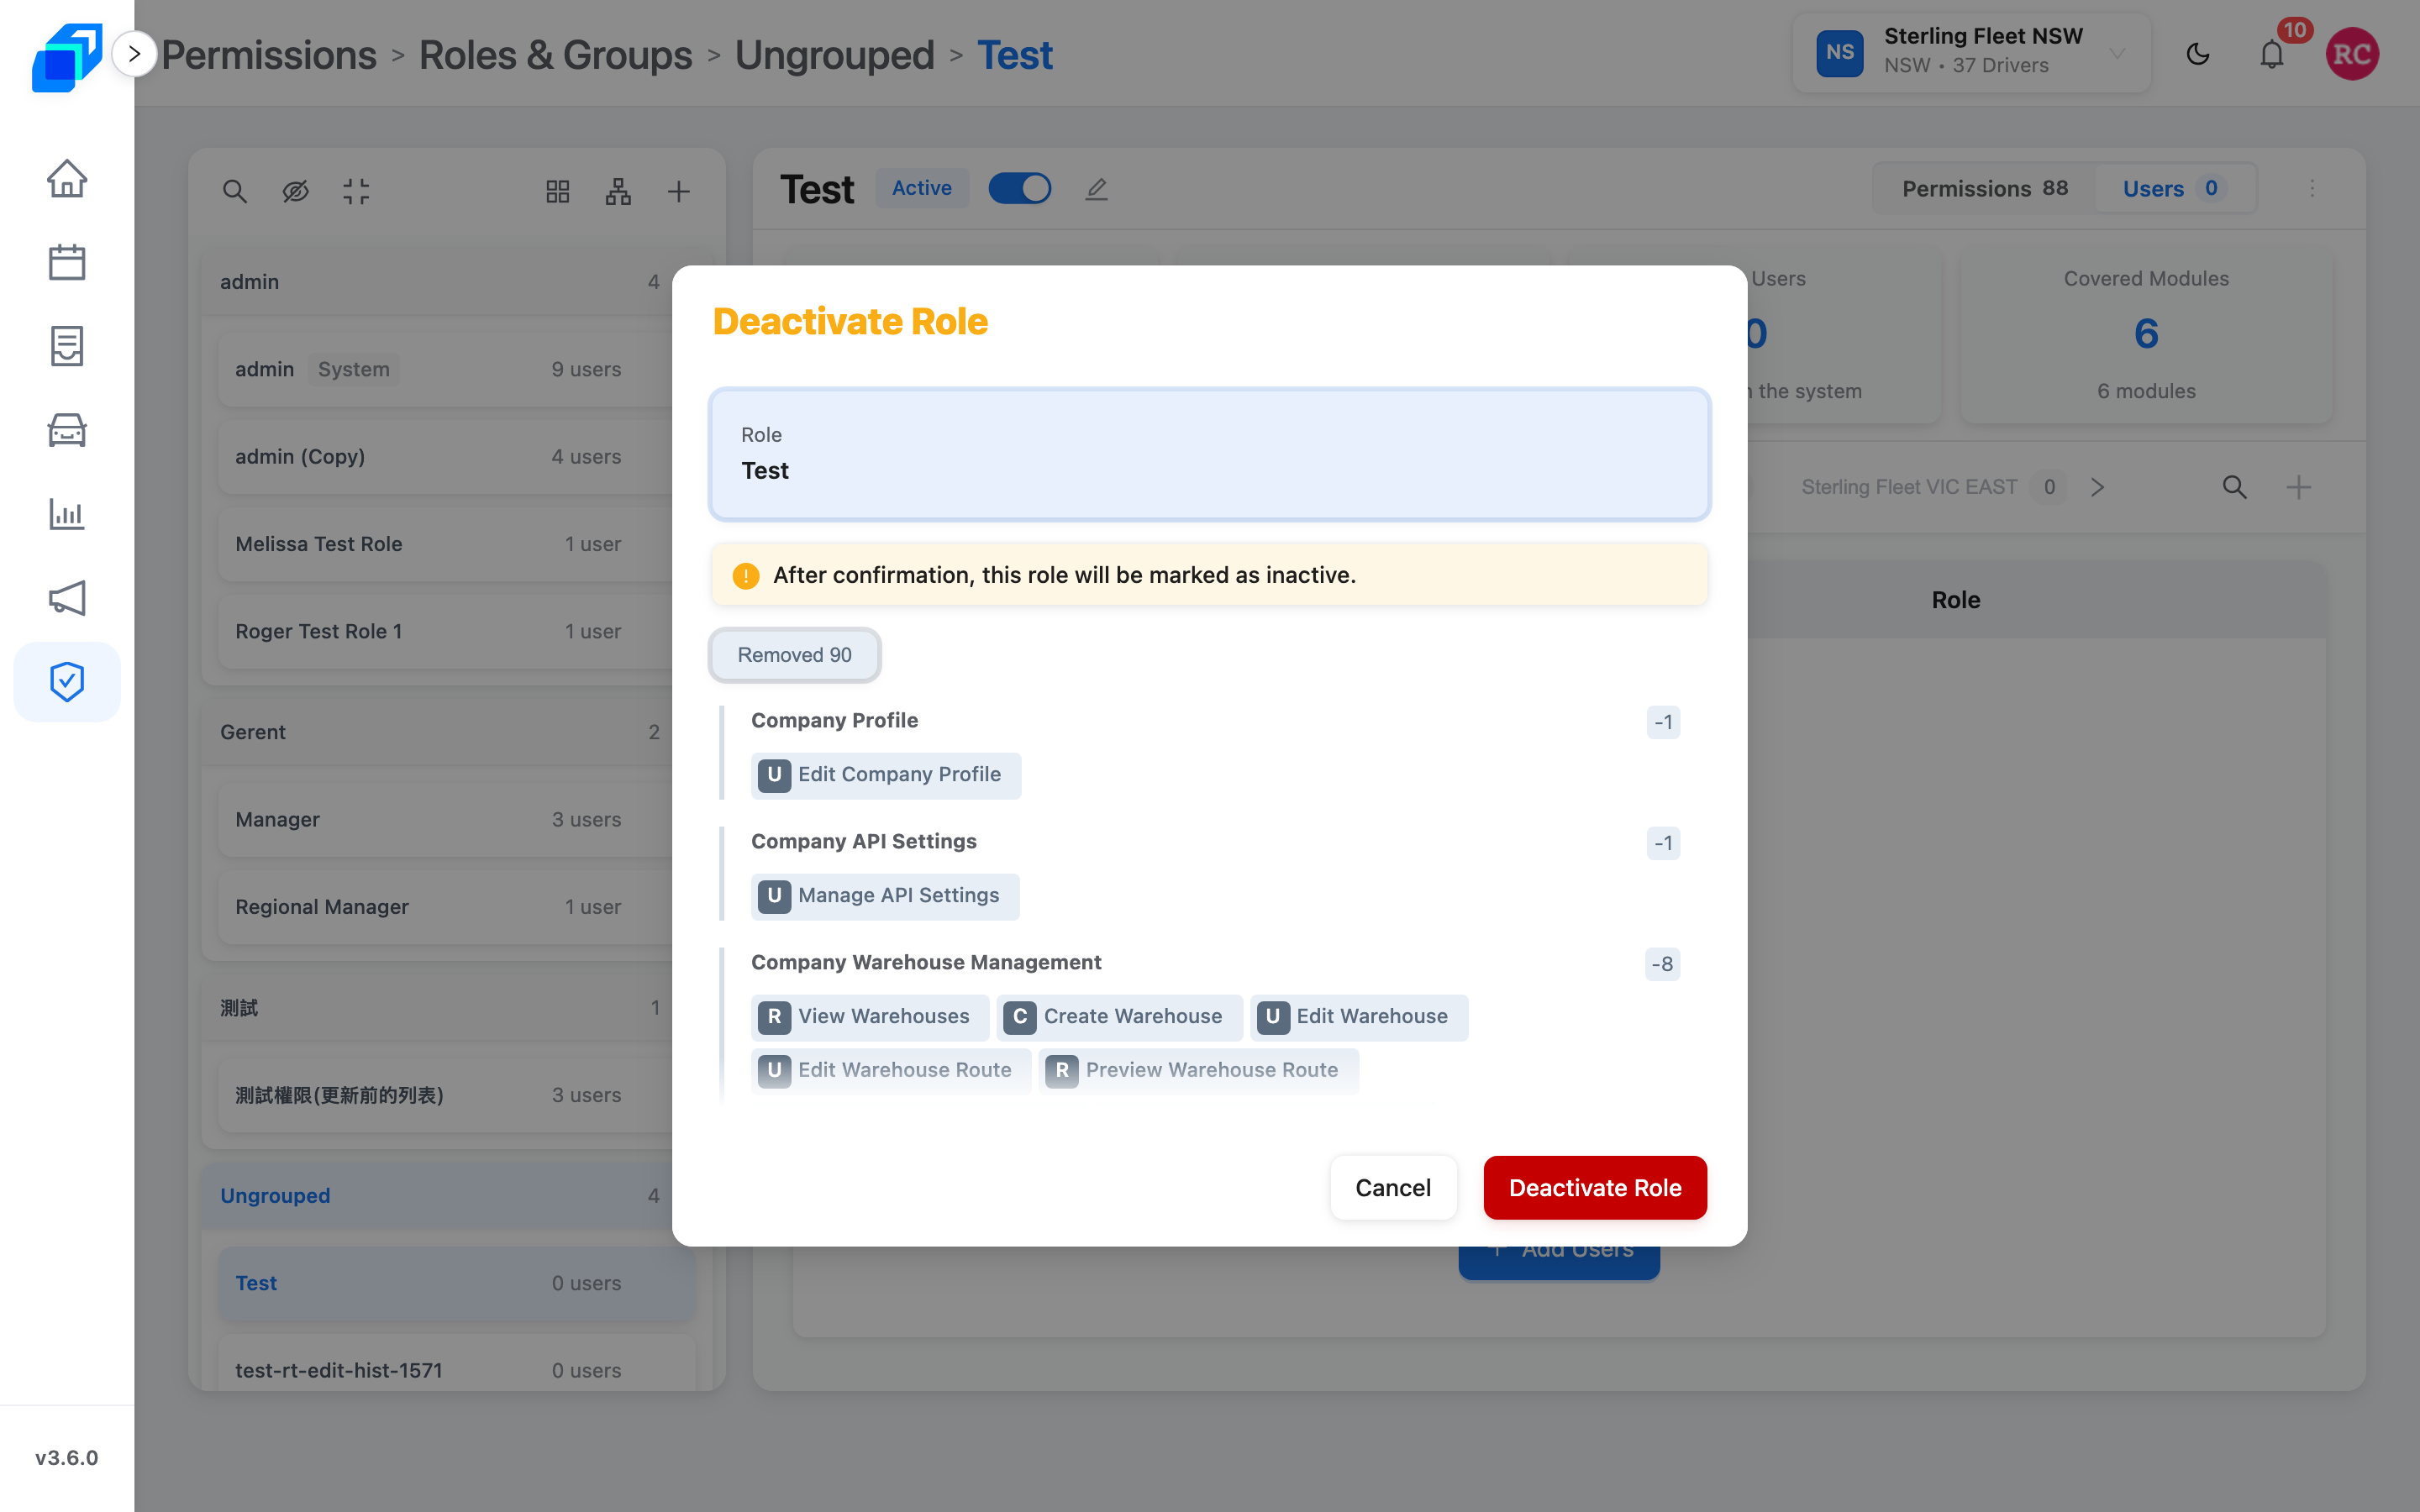
System roles cannot be deactivated. Activate Role turns a custom role back on.
9. Delete – REMOVE
Delete Role is permanent. If people are still on it, the dialog is Reassign and Delete – pick the target role first. Type the confirm word if the dialog asks.
Do not delete admin. Prefer Deactivate Role when you might need the job again.
Good to know
- Hidden menu = this login cannot use that view. Tick it on the role, then refresh.
- Changing ticks on Manager changes every Manager at once.
- View opens the menu. Create / Edit / Delete / Assign Route are extra – without them the buttons are hidden.
- A report your fleet has not switched on stays out of the menu however you tick it. A missing report is not a broken role.
Next steps
- Create a role – Start from Scratch or Copy Existing Role
- What you can see
- From dispatch to delivered