Managing vehicles
VIEW · CREATE · UPDATE · REMOVE
Put a vehicle on a fleet, keep its registration and insurance details current, and take it off the fleet when it goes.
Where to find it: Fleets › View Vehicles. View Vehicles is the button above the fleet list. One fleet's own vehicles are also on its Vehicles tab, at Fleets › your fleet › Vehicles.
Submit closes the form and puts you back on View Vehicles. The plate you typed is a new row there, with its Fleet, Brand and Model filled in.
What you need
The registration document and the compulsory insurance details for the vehicle, and the fleet it belongs to. Every field marked with an asterisk has to be filled before Submit will do anything.
1. Read the vehicle list – VIEW
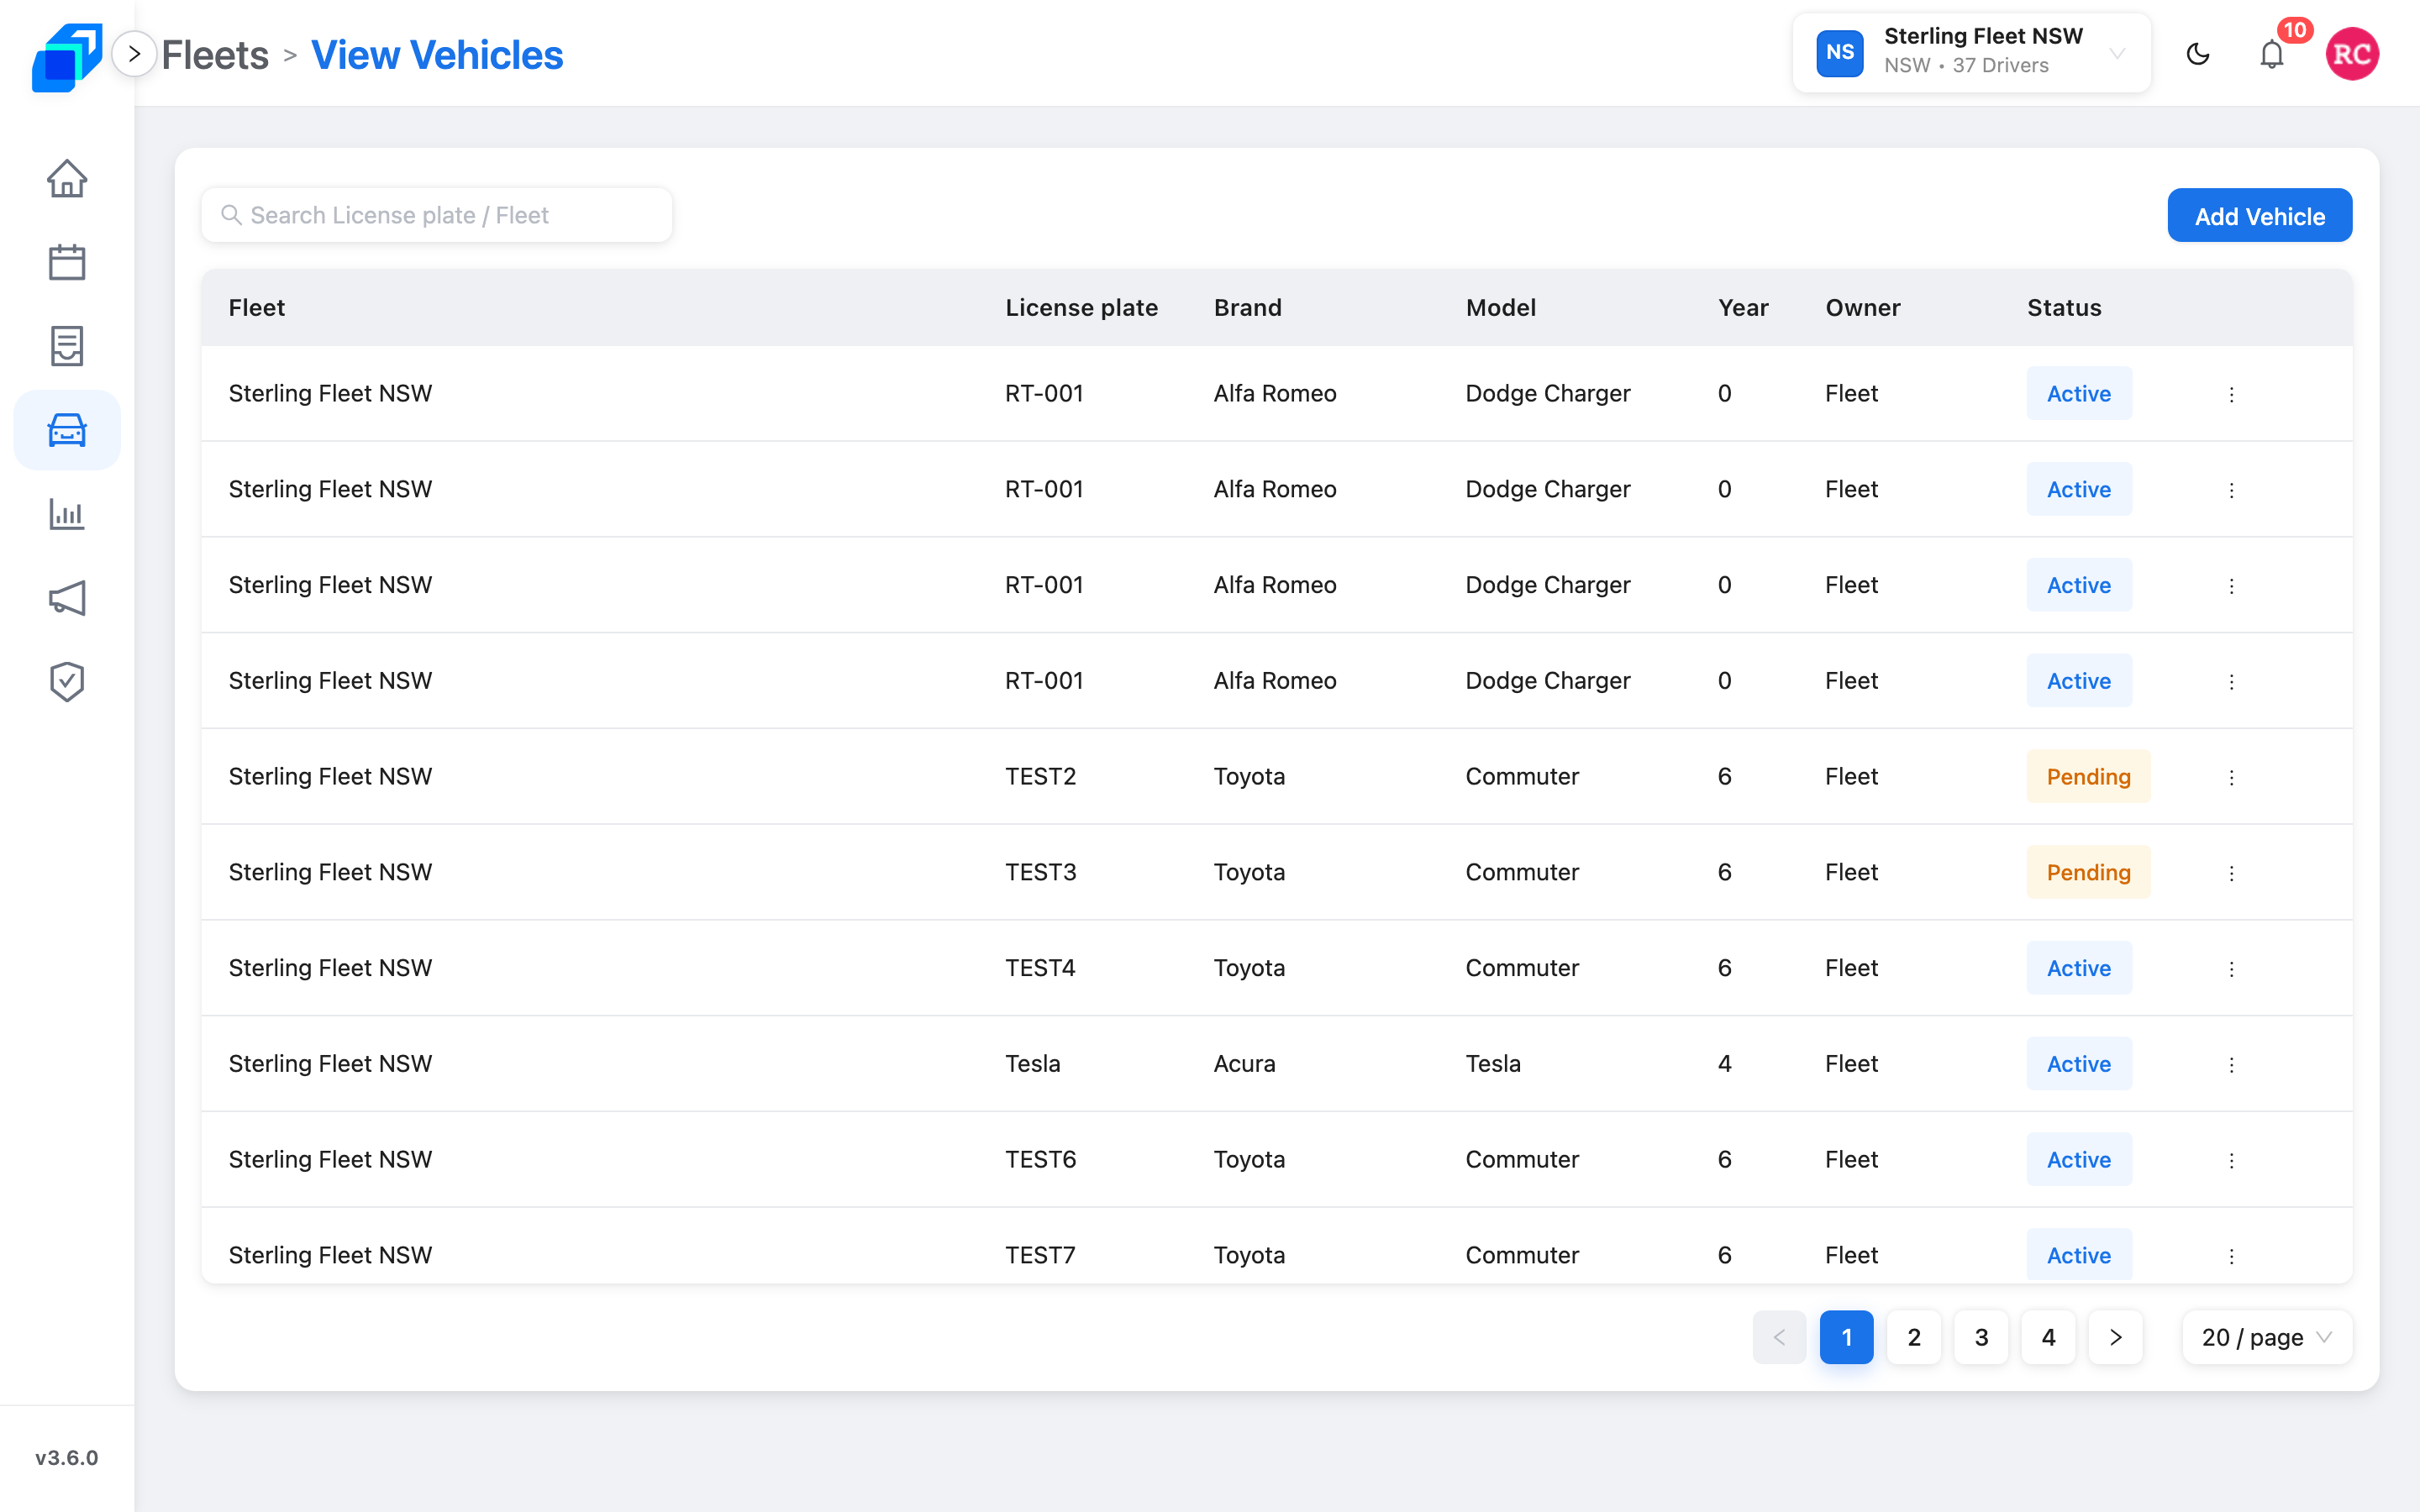
The list covers every fleet you are allowed to see, so start with the Fleet column when two vehicles look alike. The column beside it holds the vehicle's number plate.
What the rest of the columns show:
- Brand – the make, for example Toyota or Alfa Romeo
- Model – the model name
- Year – how many years old the vehicle is, counted from the manufactured date on its record. It is not the year the vehicle was built, so a new vehicle shows 0
- Owner – Fleet for a company vehicle, or Driver followed by that driver's name
- Status – Active or Pending
Find one vehicle
The search box above the list matches the number plate and the fleet name – not the brand and not the model. Results narrow as you type. Below the list, the pager moves through the results and the size control changes how many rows a page holds.
2. Add a vehicle – CREATE
- Click Add Vehicle at the top right. The Create Vehicle form opens.
- Work down the five sections below.
- Click Submit. Cancel leaves the form without saving.
Basic Info: the Fleet that will own the record, then the registered owner and the plate. Vehicle registration owner Name (Vehicle registration) is the person or business the registration is issued to. The plate field takes up to 12 characters – letters, digits and hyphens only.
Vehicle Detail: Vehicle Brand and Model, the Manufactured date from the registration document, and the vehicle's colour. Then the cargo area in centimetres – Vehicle Length (cm), Vehicle Width (cm) and Vehicle Height (cm). Load (kg) is the weight the vehicle may carry. Engine capacity and VIN finish the section, and a VIN is at most 17 characters. Two tick boxes follow: Lift for a cargo lift, Temperature for climate control.
Vehicle Owner: choose Fleet for a company vehicle, or Driver and then pick the person from the list that appears beside it. Only drivers on the fleet you chose above are offered.
Vehicle Picture: Click to upload adds one photo of the vehicle. Any image file is accepted.
License: three blocks, each with License ID, License Picture Upload and License Date. Vehicle Licence takes the registration, Compulsory Insurance takes the compulsory third-party policy, and Comprehensive takes the comprehensive policy where the vehicle carries one. The first two are required. Comprehensive is optional, but a part-filled block is rejected – fill all three of its fields, or leave all three empty.
3. Change a vehicle – UPDATE
- Find the vehicle in the list.
- Click the ⋮ button at the end of its row.
- Click Edit. The Edit Vehicle form opens with the same five sections, already filled.
- Change what you need, then click Submit.
Only company vehicles can be changed here. A driver-owned vehicle is the driver's own record. Its row carries no ⋮ button at all, so neither Edit nor Delete is offered on it. The driver keeps that record current from the driver app instead.
4. Remove a vehicle – REMOVE
Deleting a vehicle is permanent. The record goes, and the plate stops appearing in the list and in the vehicle choices on a driver's record.
- Find the vehicle in the list.
- Click the ⋮ button at the end of its row.
- Click Delete, which is shown in red.
- The Fleet Vehicle Delete box names the plate and asks you to confirm.
- Click Delete to remove the vehicle, or Cancel to keep it.
A short Delete Success message appears and the row leaves the list. A vehicle that is still in use cannot be removed: SenditGo refuses the delete and shows an error instead. Take the vehicle off its driver first, then delete it.
What the status badge means
- Active – the vehicle is in use. A vehicle in use is not offered when someone assigns a vehicle to a driver.
- Pending – the vehicle is not in use, so it appears in the choices when someone assigns a vehicle to a driver.
Only company vehicles on the same fleet are ever offered there, along with the one that driver already holds.
Four separate ticks cover this screen: View Vehicles opens the list, Create Vehicle shows Add Vehicle, Edit Vehicle shows Edit, and Delete Vehicle shows Delete. A control your role does not hold is hidden rather than greyed out, so ask your fleet admin if Add Vehicle or the ⋮ menu is missing.
Next steps
- Register a Driver – assign one of these vehicles while you set the driver up
- A driver's record – the Vehicle and REGO & Insurance tabs on the driver side
- Update your vehicle information – how a driver keeps their own vehicle current