Manage Driver Leave
Create leave for a driver, approve it, revoke an approved leave, and delete a revoked record – all in one place.
Where to find it: Roster in the left menu, then Driver Leave.
Step 1: View the driver leave list
Open Roster in the left menu, then click Driver Leave. The page lists every leave request for your fleet, most recently updated first.
On this step: Roster → Driver Leave.
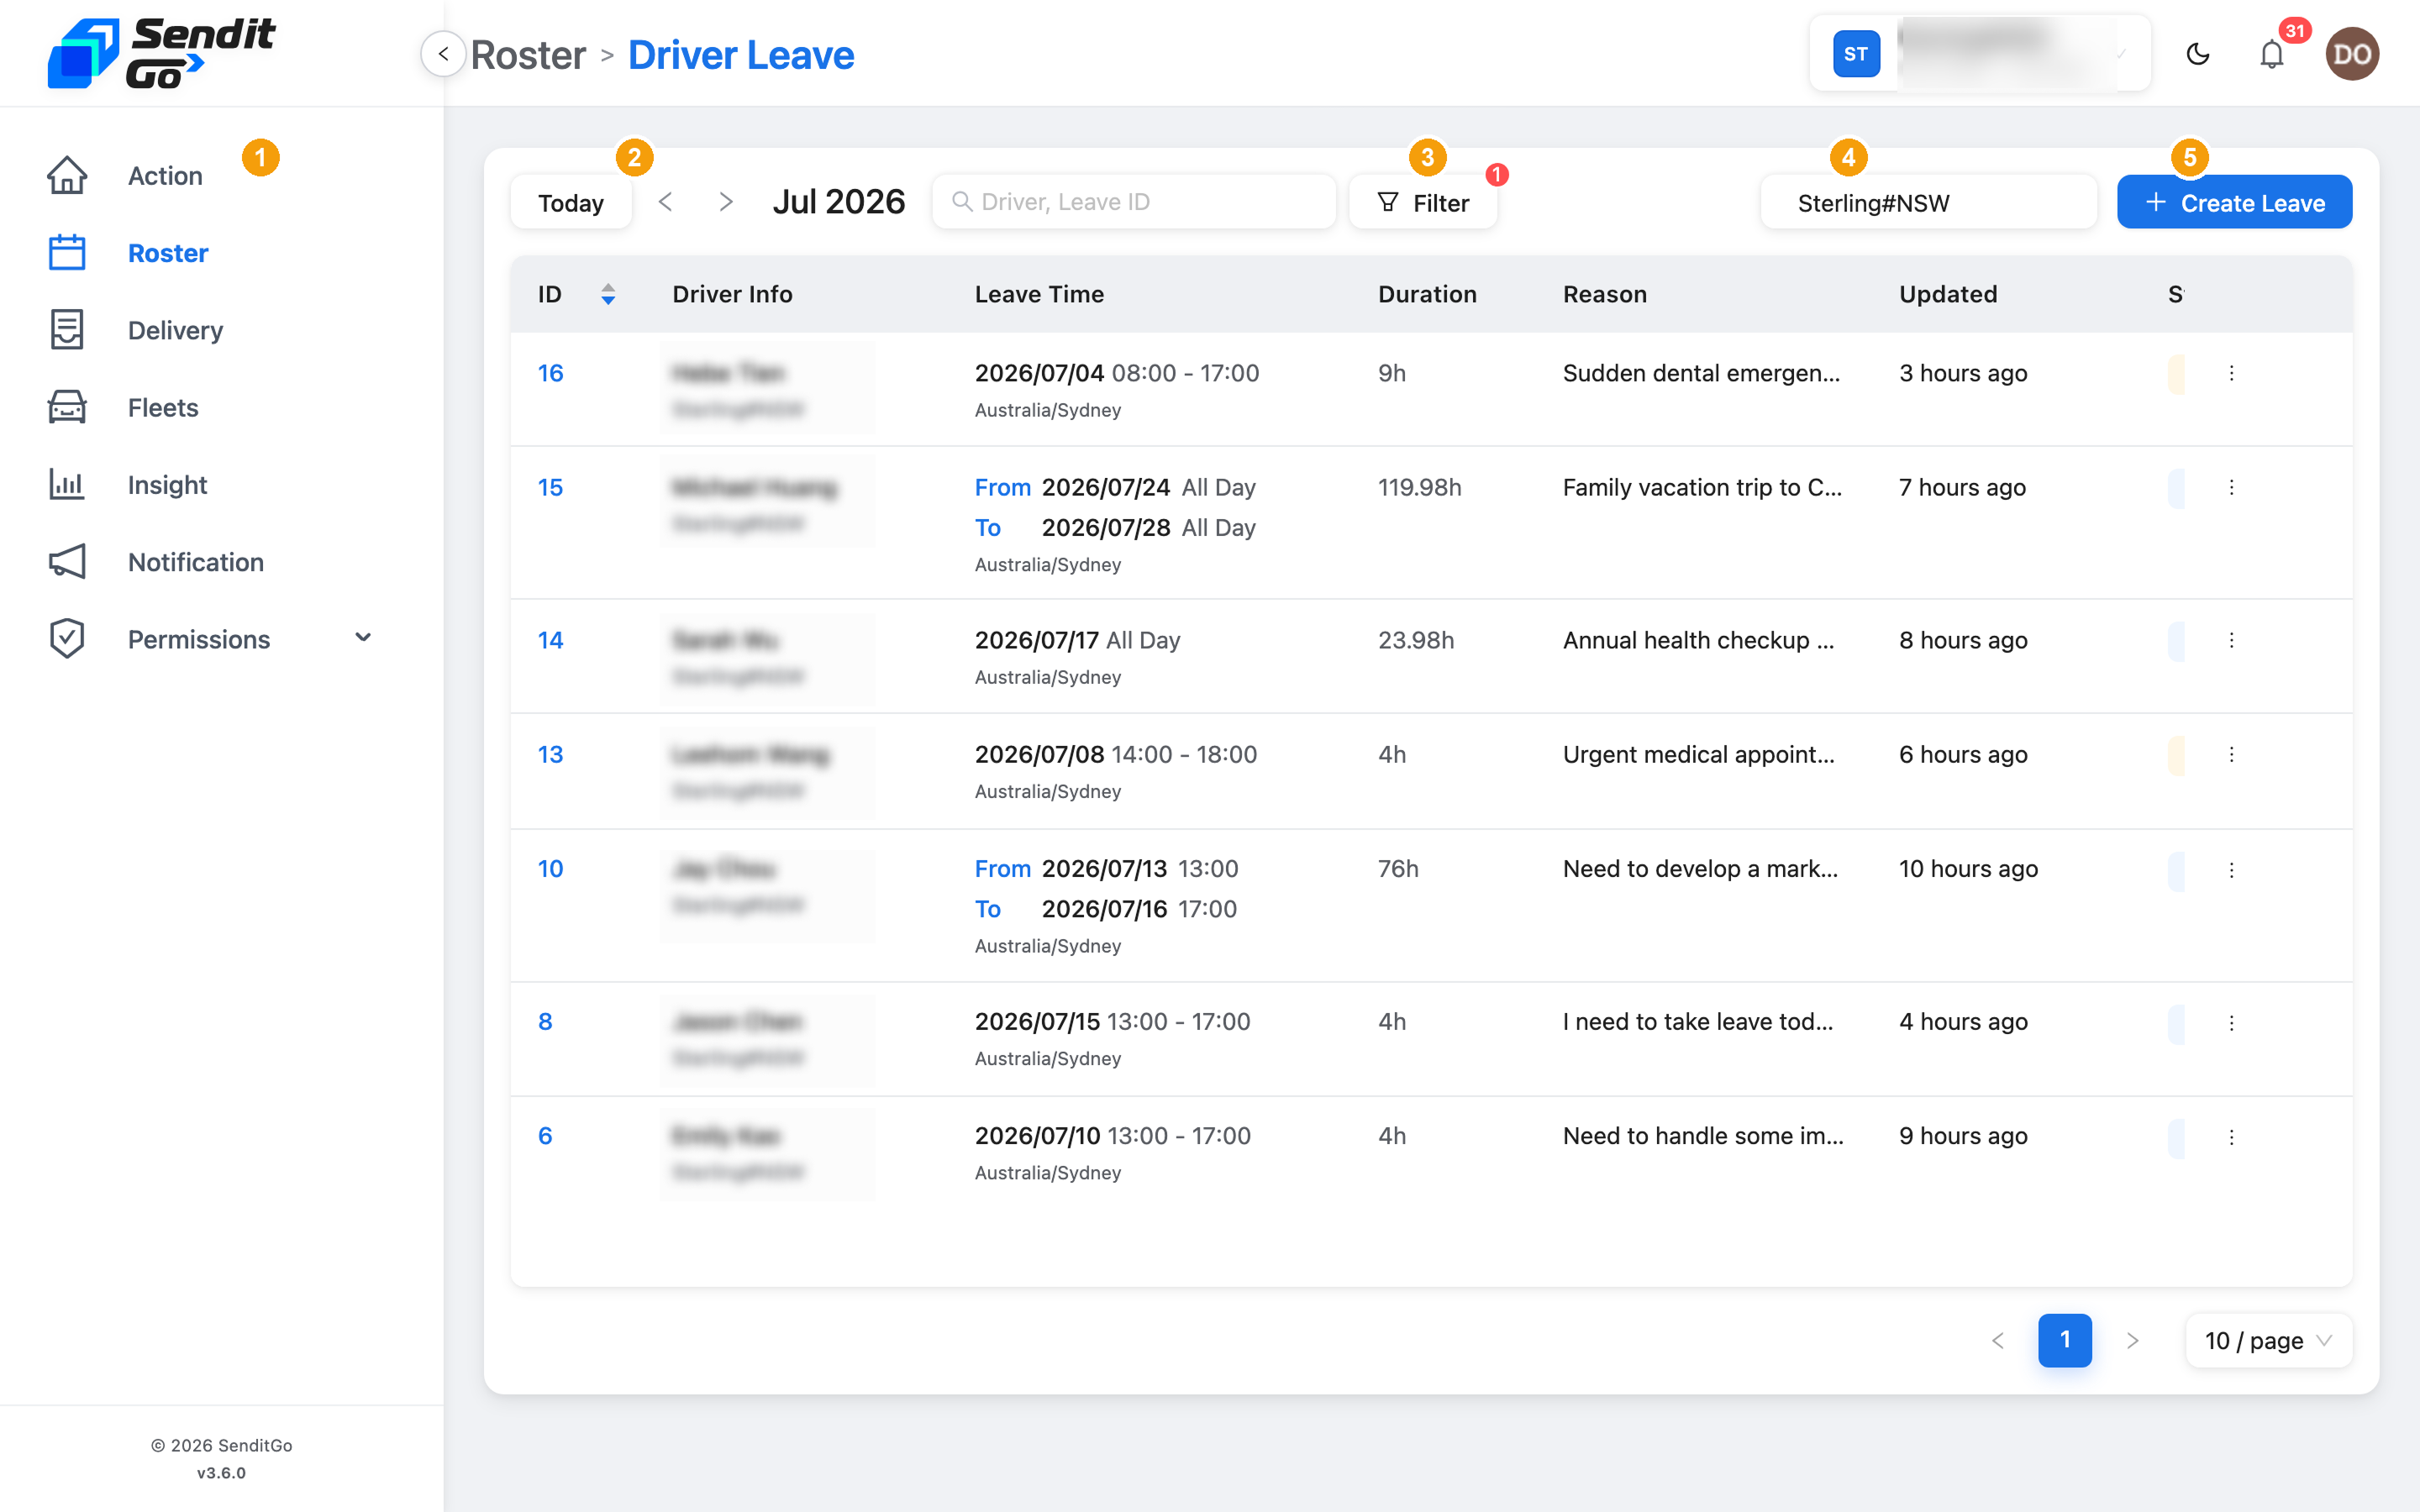
The numbered marks on this picture are:
- Action in the sidebar.
- The date switcher.
- Filter.
- The fleet.
- Create Leave.
The search box has no number.
The table below the header lists every leave request. This section explains what each column means, so you can read any single row at a glance:
| Column | Meaning |
|---|---|
| ID | System-assigned running number for each leave request. |
| Driver Info | Driver name and the fleet they belong to. |
| Leave Time | Start and end date-time of the leave, plus the timezone. |
| Duration | Total hours this leave consumes (for example 1.5h). |
| Reason | The reason submitted with the request. |
| Updated | Relative time since the record last changed (for example "a day ago"). |
| Status | Current state – Submitted (blue), Short Notice (orange), Revoked (red on this list). Deleted was not on this list. |
Full details: for what each status means and what you can do about it, see the Leave status reference further down this page.
Step 2: Create a leave request for a driver
You need the Create leave request permission. Without it, the Create Leave button is hidden.
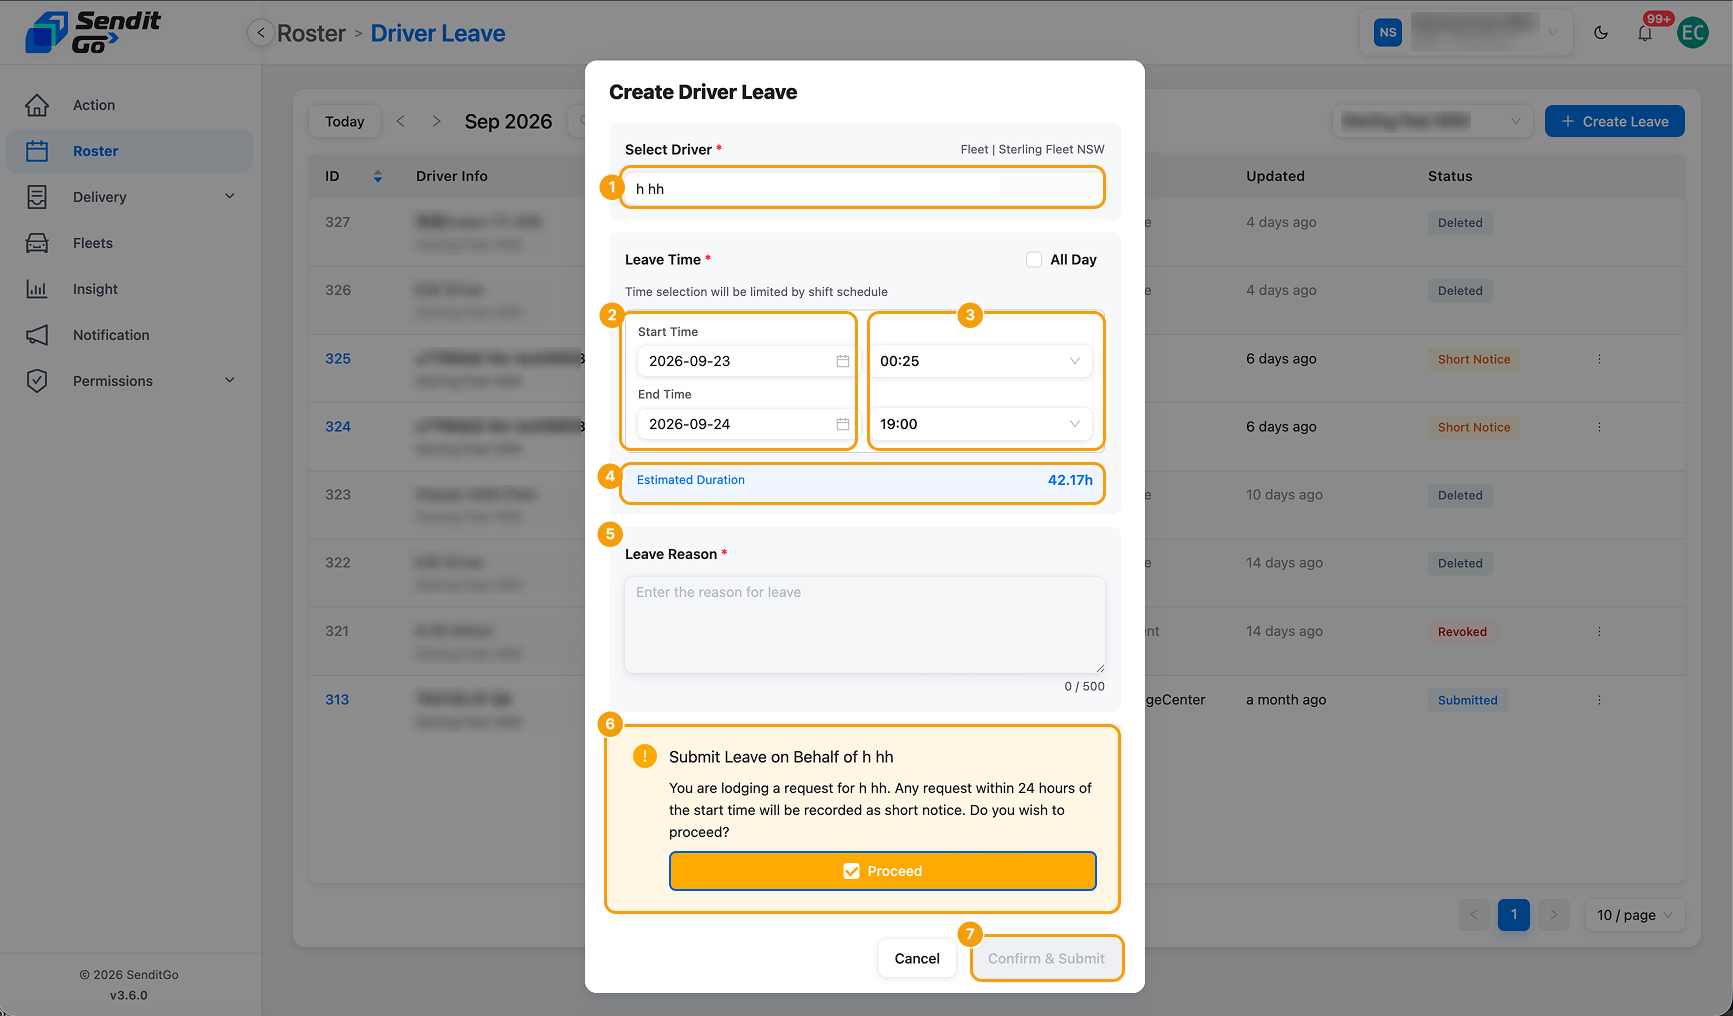
Click Create Leave at the top-right of the table. The form opens; fill in the fields:
On this step: The Create Leave button at the top-right of the Driver Leave list.
- Driver: pick the driver from the list. Only drivers in the currently selected fleet appear.
- Leave Period: pick a start date and end date on the calendar.
- Start / End Time: pick a time from the lists. The times match your fleet's shift settings.
- Estimated Duration: calculated for you from the driver's roster and shift setup. This field is read-only.
- Leave Reason: required, up to 500 characters. A character count sits next to the field.
- Short notice: a request that starts within 24 hours asks you to Proceed before you submit.
- Confirm & Submit: at the bottom of the dialog. This sample did not click it, so a new leave was not saved.
Full details: for how the shift schedule feeds these hours, see Plan Your Weekly Roster.
Step 3: View leave details and change history
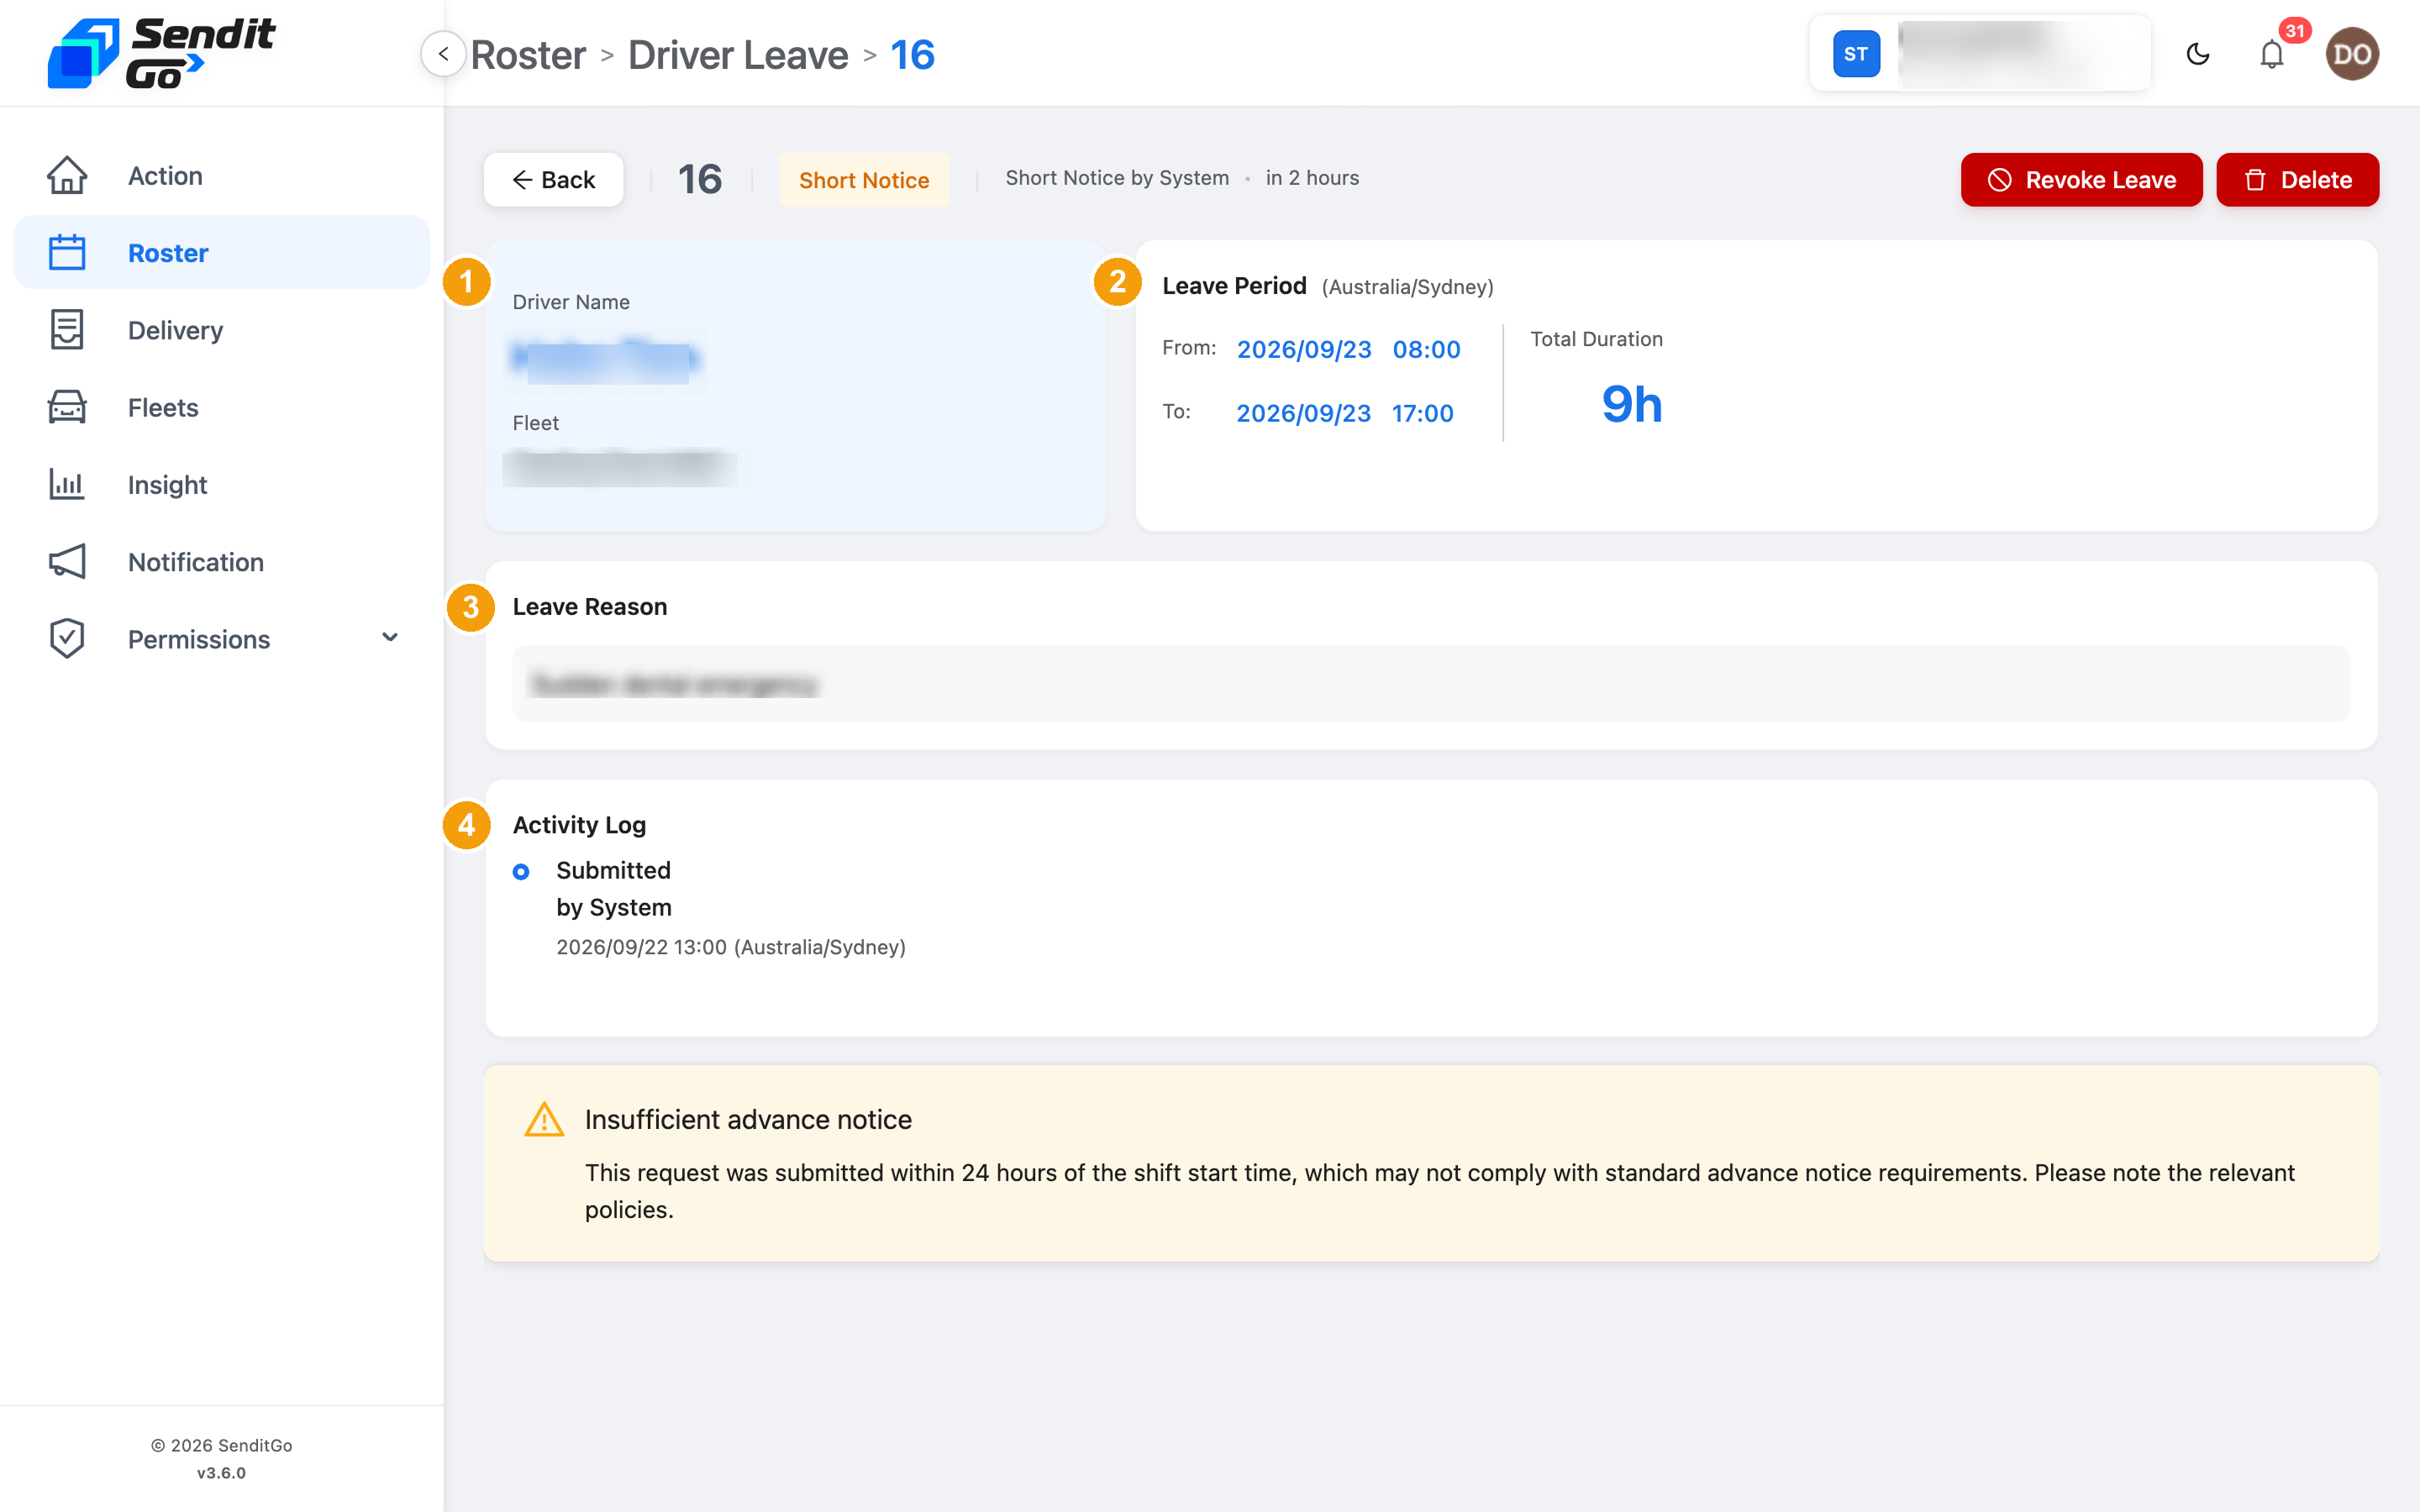
Click any row on the list to open that leave's detail drawer, which shows the full record and every action ever taken on it.
On this step: Driver Leave list – click any row to expand its detail drawer.
The detail drawer contains:
- Driver profile card: name, fleet, and current driver status (On Duty / Idle / On Leave).
- Leave period: start, end, and total hours.
- Reason: the full text as submitted.
- Activity Log: who did what, and when.
Step 4: Approve a leave
You need approval permission. Without it, the Approve button is greyed out or hidden.
While a leave is in Submitted status, an Approve button sits at the top-right of the detail drawer. Click it to approve – the status turns to Approved (green tick), and the driver is marked On Leave for that period.
On this step: Driver Leave → click any Submitted leave → the Approve button at the top-right of the detail drawer.
Step 5: Revoke an approved leave
Revoking an approved leave cannot be undone. The driver goes back on the roster immediately, and even if you recreate the same leave later the original change history won't return.
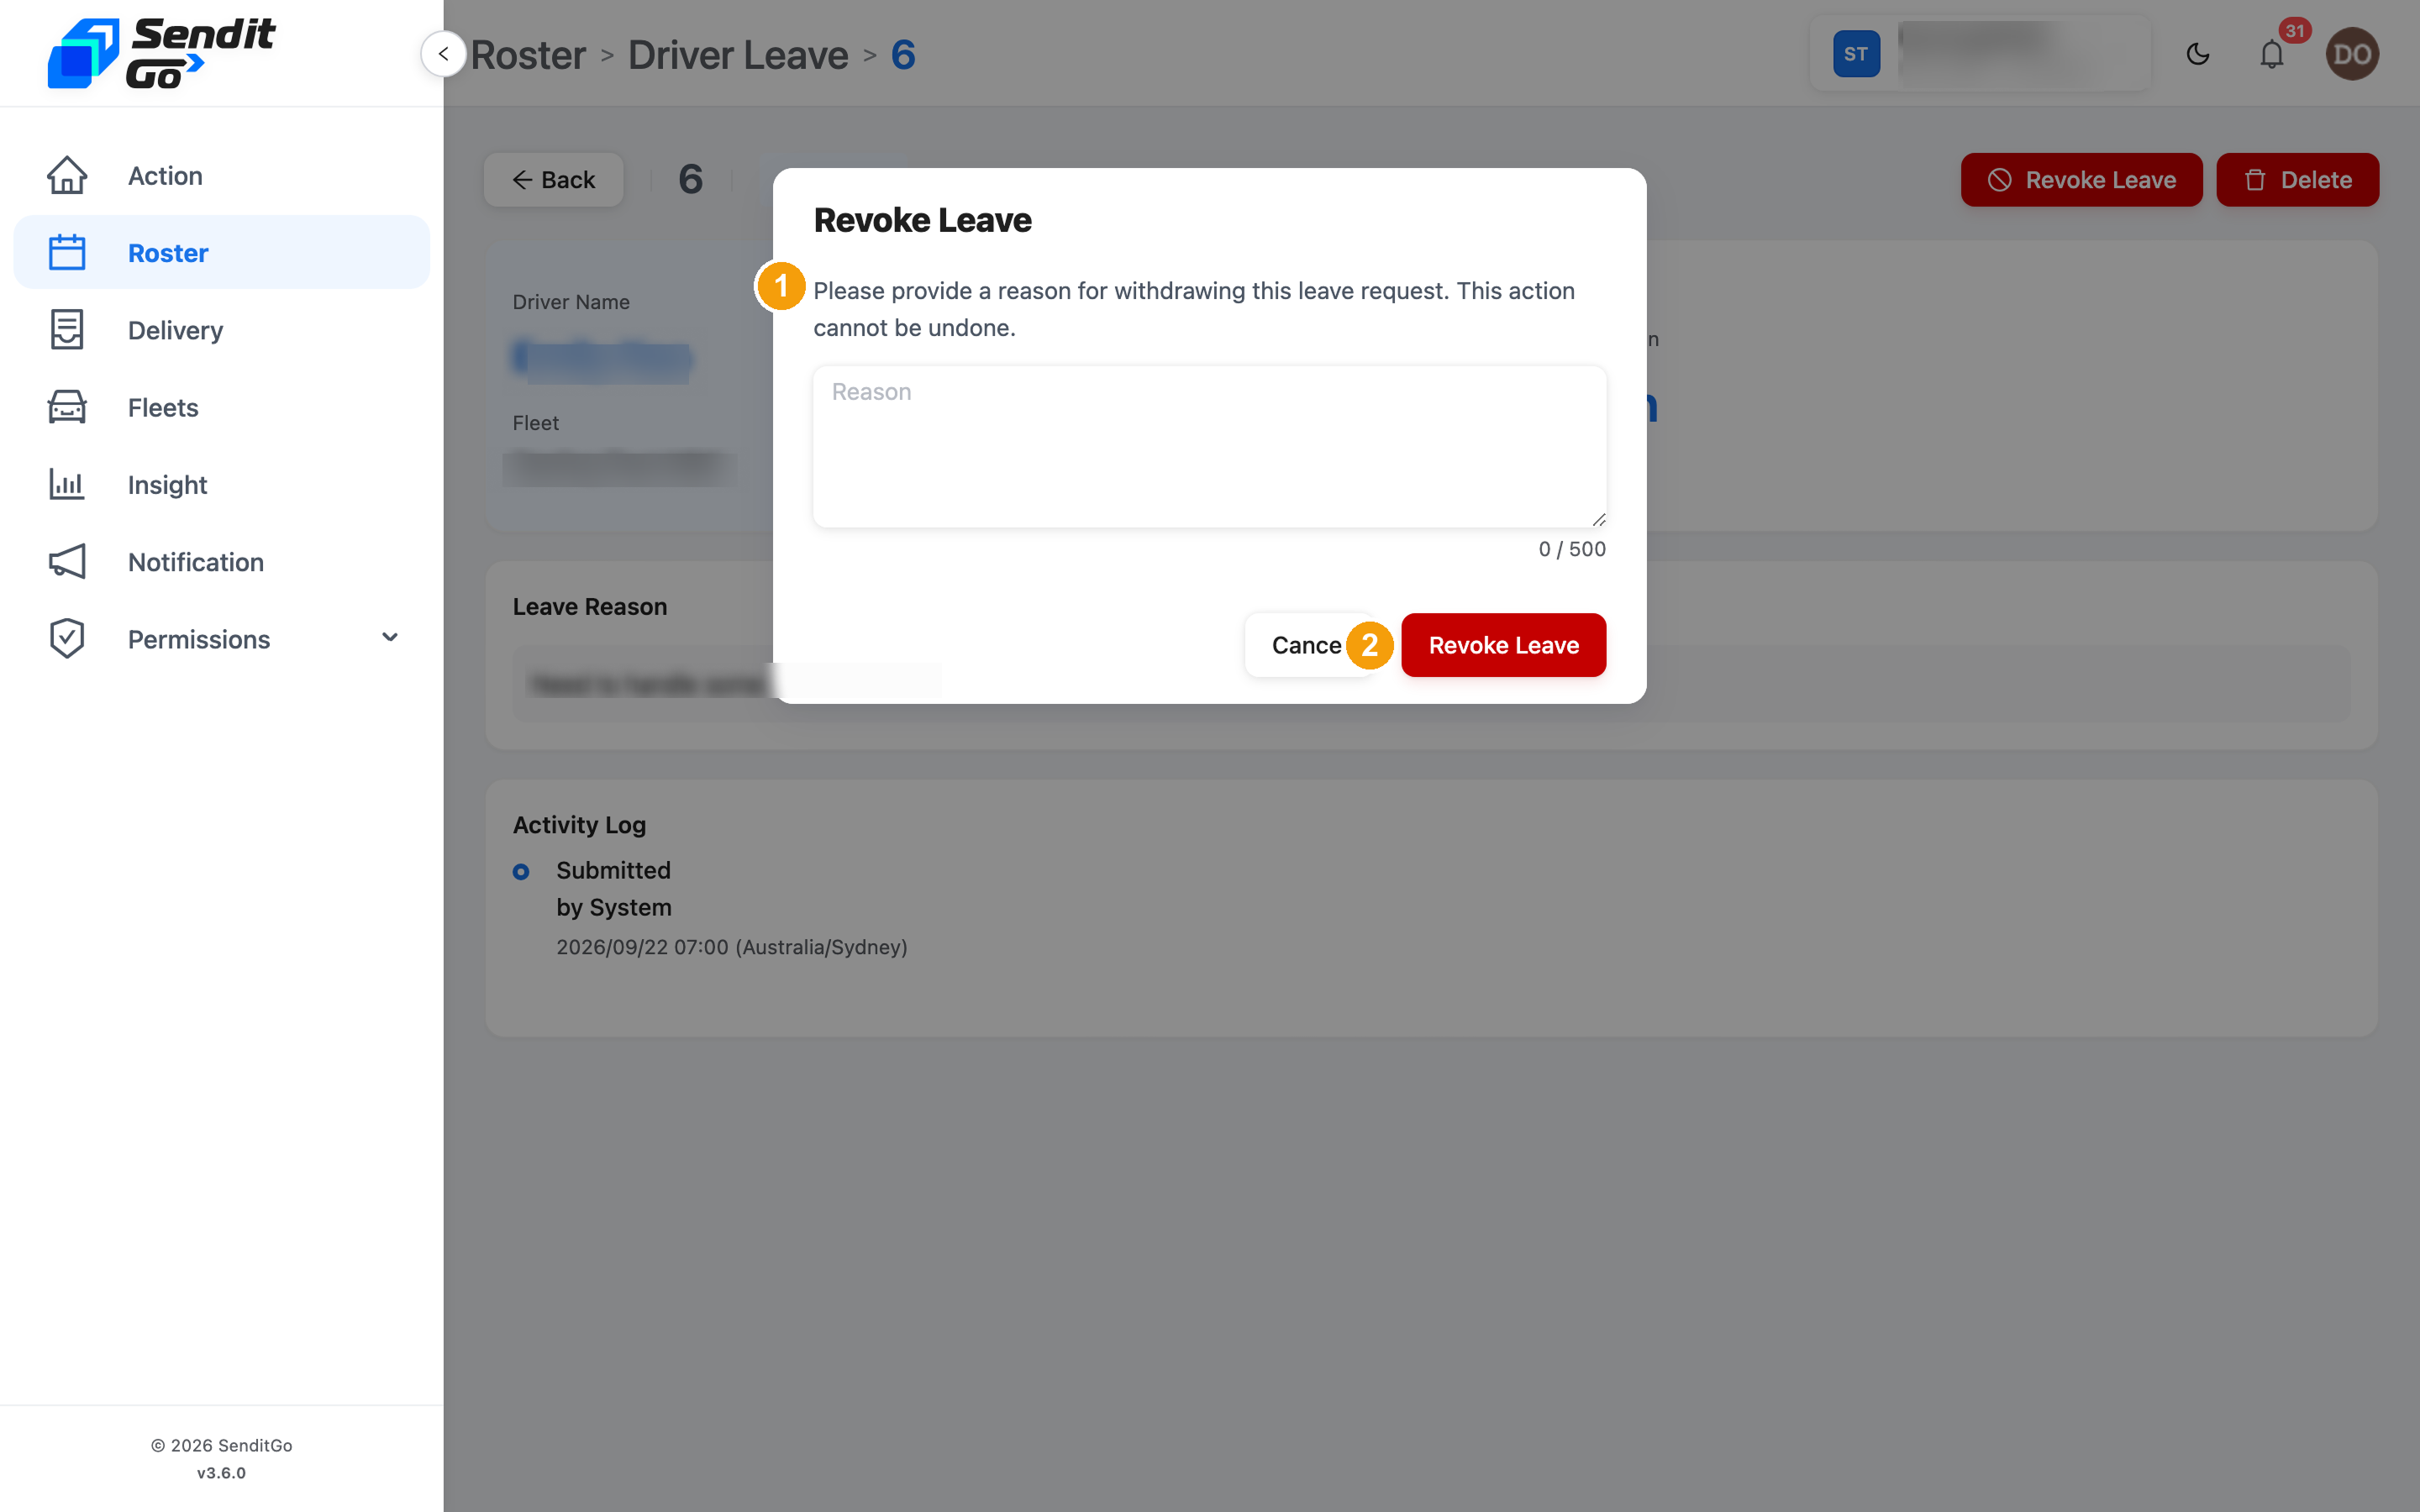
While a leave is Approved, a red Revoke button appears at the top-right of the detail drawer. To revoke:
On this step: Driver Leave → click any Approved leave → the red Revoke button at the top-right of the detail drawer.
- Click Revoke – the Revoke Leave dialog opens.
- Fill in Revocation Reason (for example, "urgent delivery assignment" or "business need"). Required, up to 500 characters.
- Click Revoke Leave inside the dialog to confirm.
You'll see Leave successfully revoked; the status flips to Revoked. On the list that badge is red. This pass did not click revoke, so that success message was not shown. The driver coming off leave was not rechecked.
Step 6: Delete a revoked leave record
Permanent deletion removes the record entirely and cannot be undone. The button appears only on records that are safe to delete.
When a leave is Revoked, a red Delete control may appear at the top-right of the drawer. The confirm box reads Delete Leave. Cancel keeps the record. Delete was not clicked, so this sample did not remove a record.
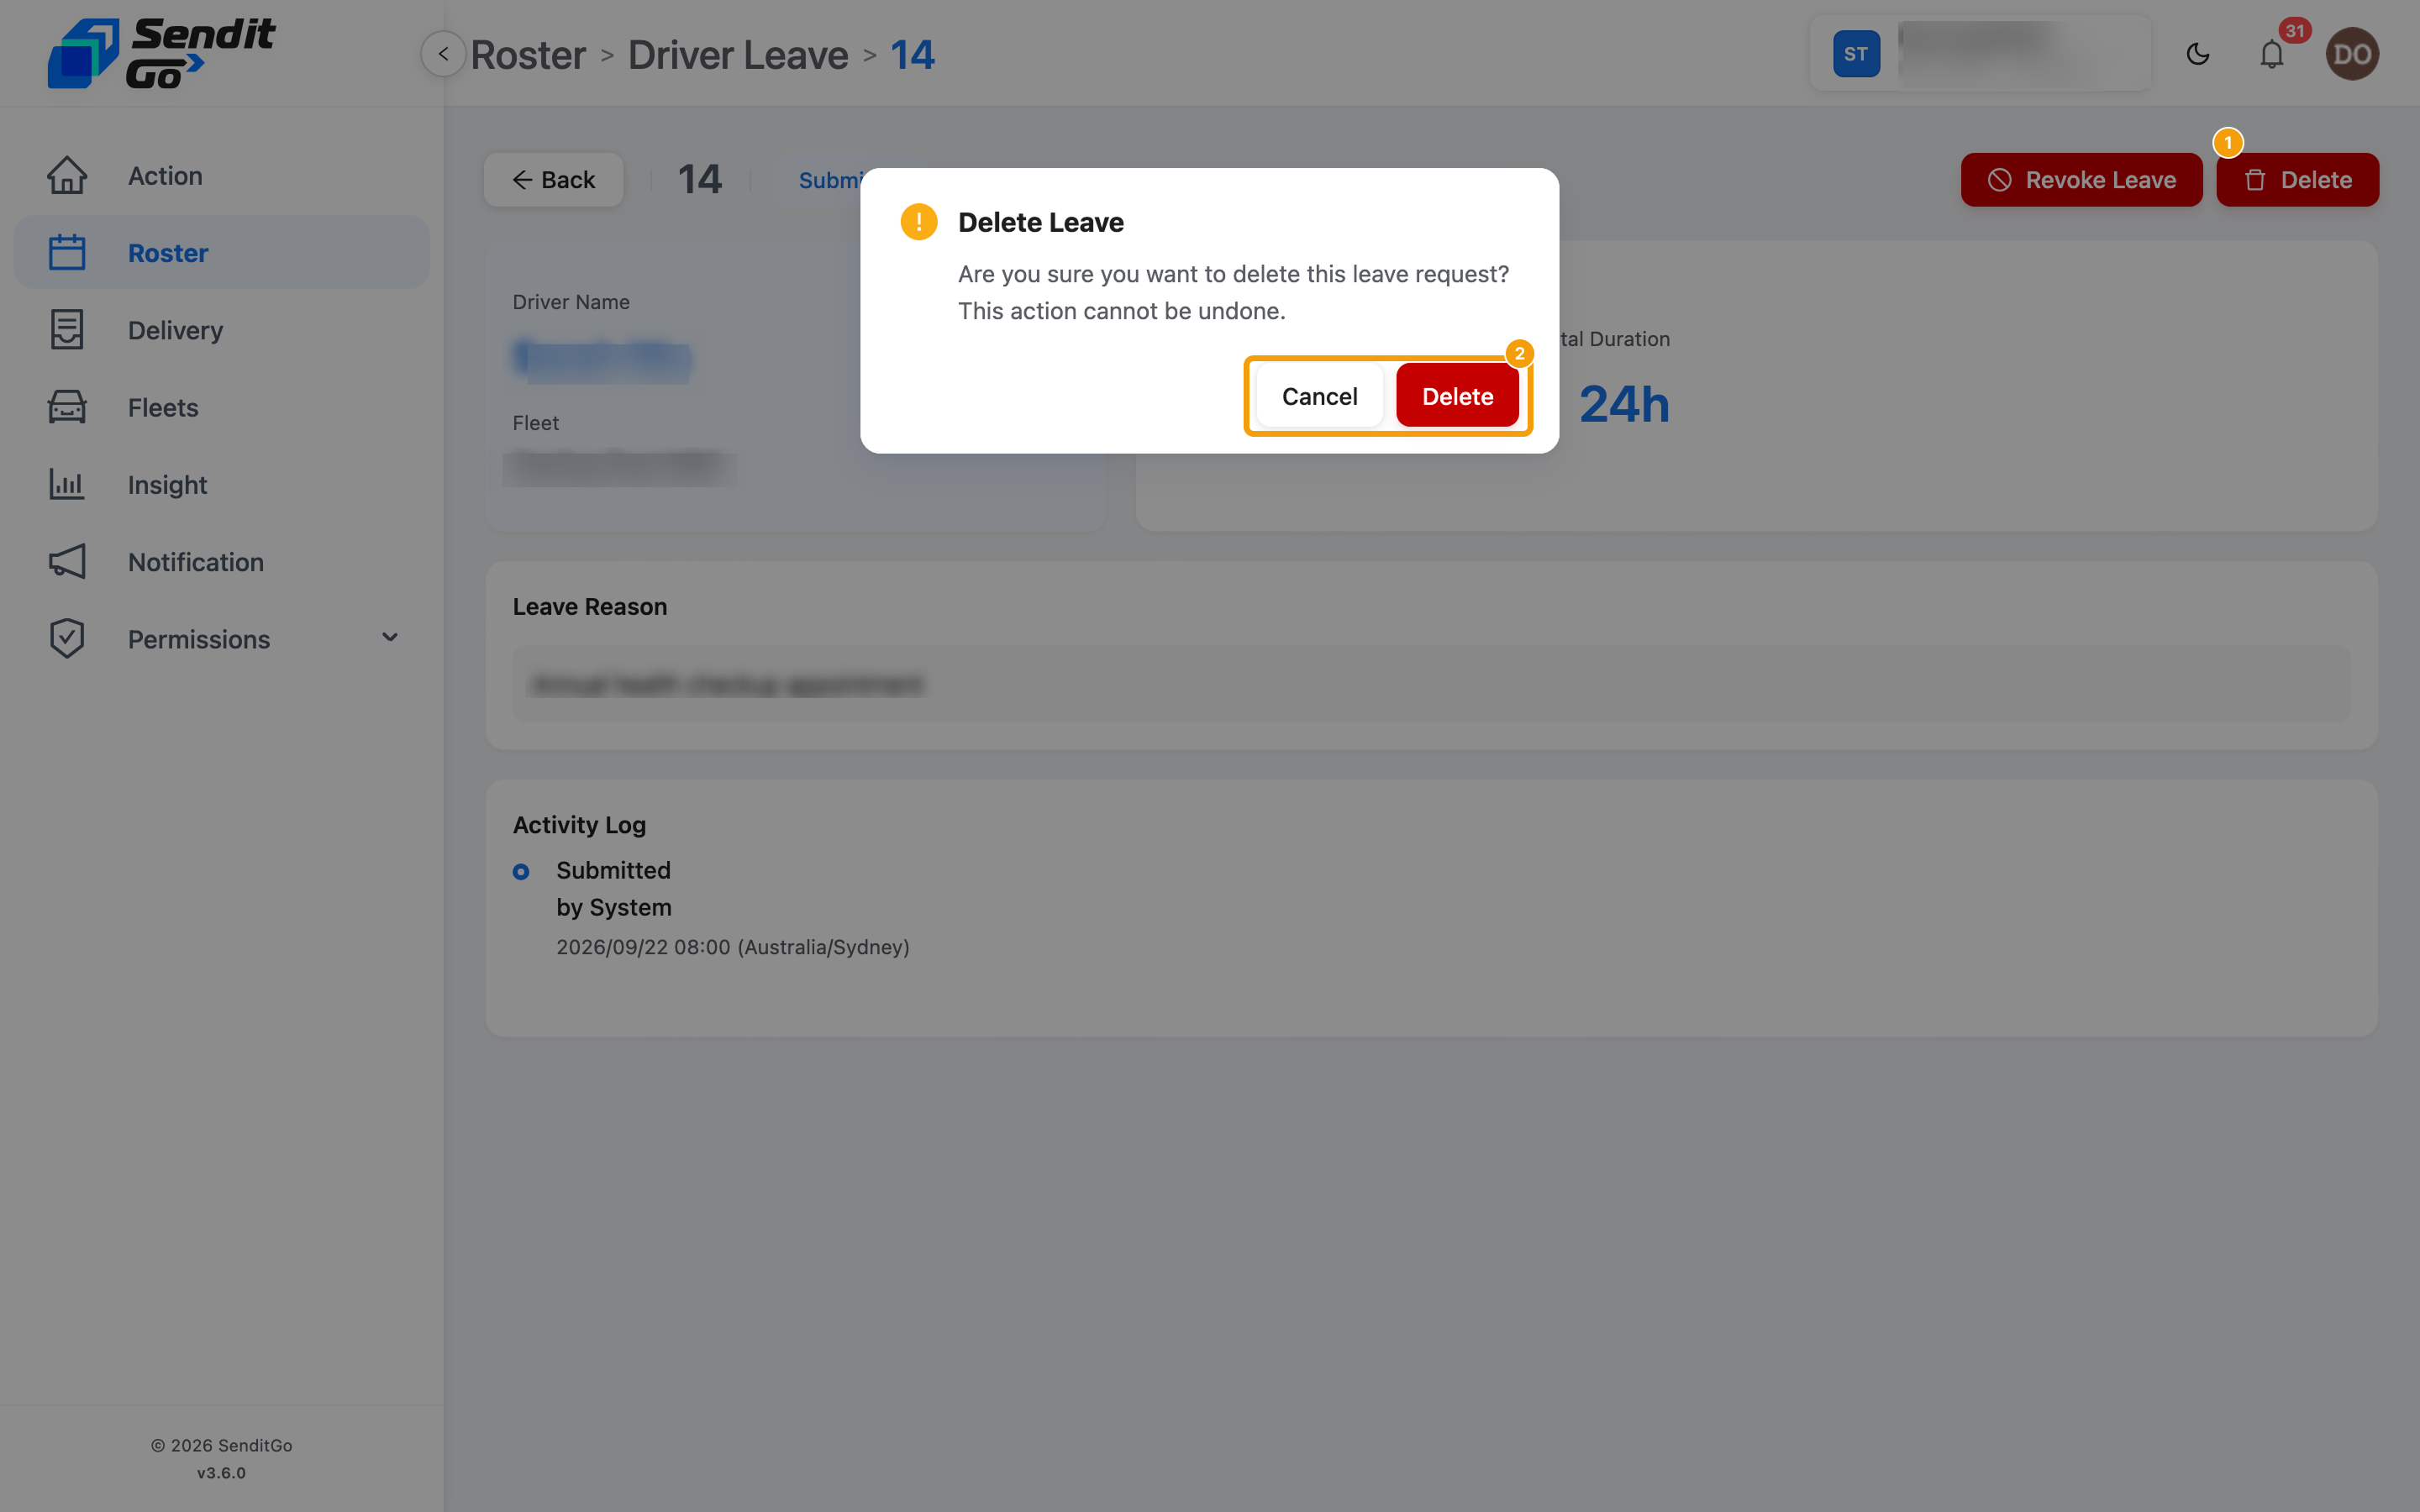
On this step: Driver Leave → click any Revoked leave → the red Delete icon at the top-right of the detail drawer.
Leave status reference
This table is a quick lookup for what each status looks like, what it means, and whether you can approve or revoke it. The first column is the status name, the second is the visual marker on the list, and the last three tell you what the status means and what you can do about it right now:
| Status | Icon | Meaning | Can approve | Can revoke |
|---|---|---|---|---|
| Submitted | Blue dot | Waiting for approval | Yes | – |
| Short Notice | Orange warning triangle | Sent within 24 hours of the start time | Yes | – |
| Approved | Green tick | Driver is on leave for that period | – | Yes |
| Revoked | Grey dot | Leave has been revoked | – | – |
| Deleted | Greyed text | Record has been permanently removed | – | – |
Permissions and button visibility
What you can do with leave depends on your role. This table lists the visual location of each action, and what the screen looks like when your role lacks that permission:
| Action | Where it appears | If you don't have permission |
|---|---|---|
| View the leave list | Driver Leave menu and the table rows | The menu itself is hidden |
| Create a leave | Create Leave button, top-right of the table | Button is greyed out or hidden |
| Approve a leave | Approve button on the detail drawer | Button is greyed out |
| Revoke a leave | Revoke button on the detail drawer | Button is hidden |
| Delete a record | Delete icon on the detail drawer | Button is hidden |
A missing button means you don't have permission for that action – ask your fleet admin to adjust your role.
Common tasks
- See who's on leave next week: move the date switcher to next week, open Filter and set the status to Submitted or Approved, and scan for the driver's name. Click the row to see exact times.
- Show every short-notice request: open Filter and set the status to Short Notice – the list narrows to leave submitted within 24 hours of the start time.
- Change an already-approved leave: approved leave can't be edited directly. Open the detail drawer, click Revoke with a reason, then create a new leave with the correct dates and times.
The leave you requested is in the list as Submitted, or as Short Notice if it starts within 24 hours. Clear the filters if you cannot see it.
Next steps
- Plan Your Weekly Roster: read the week calendar, manage shift lists, use drafts and scheduled publishes.
- Create a Shift: create a new shift, draw the delivery area, and set the driver pool.
- Weekly records: verify actual hours and distance against the planned figures.