Import orders
CREATE · UPDATE · VIEW
Bring in a whole spreadsheet of orders in one pass, instead of typing them one at a time.
Where to find it: Delivery › Order, then the ▾ beside Order Management → Import Orders.
1. Upload – CREATE
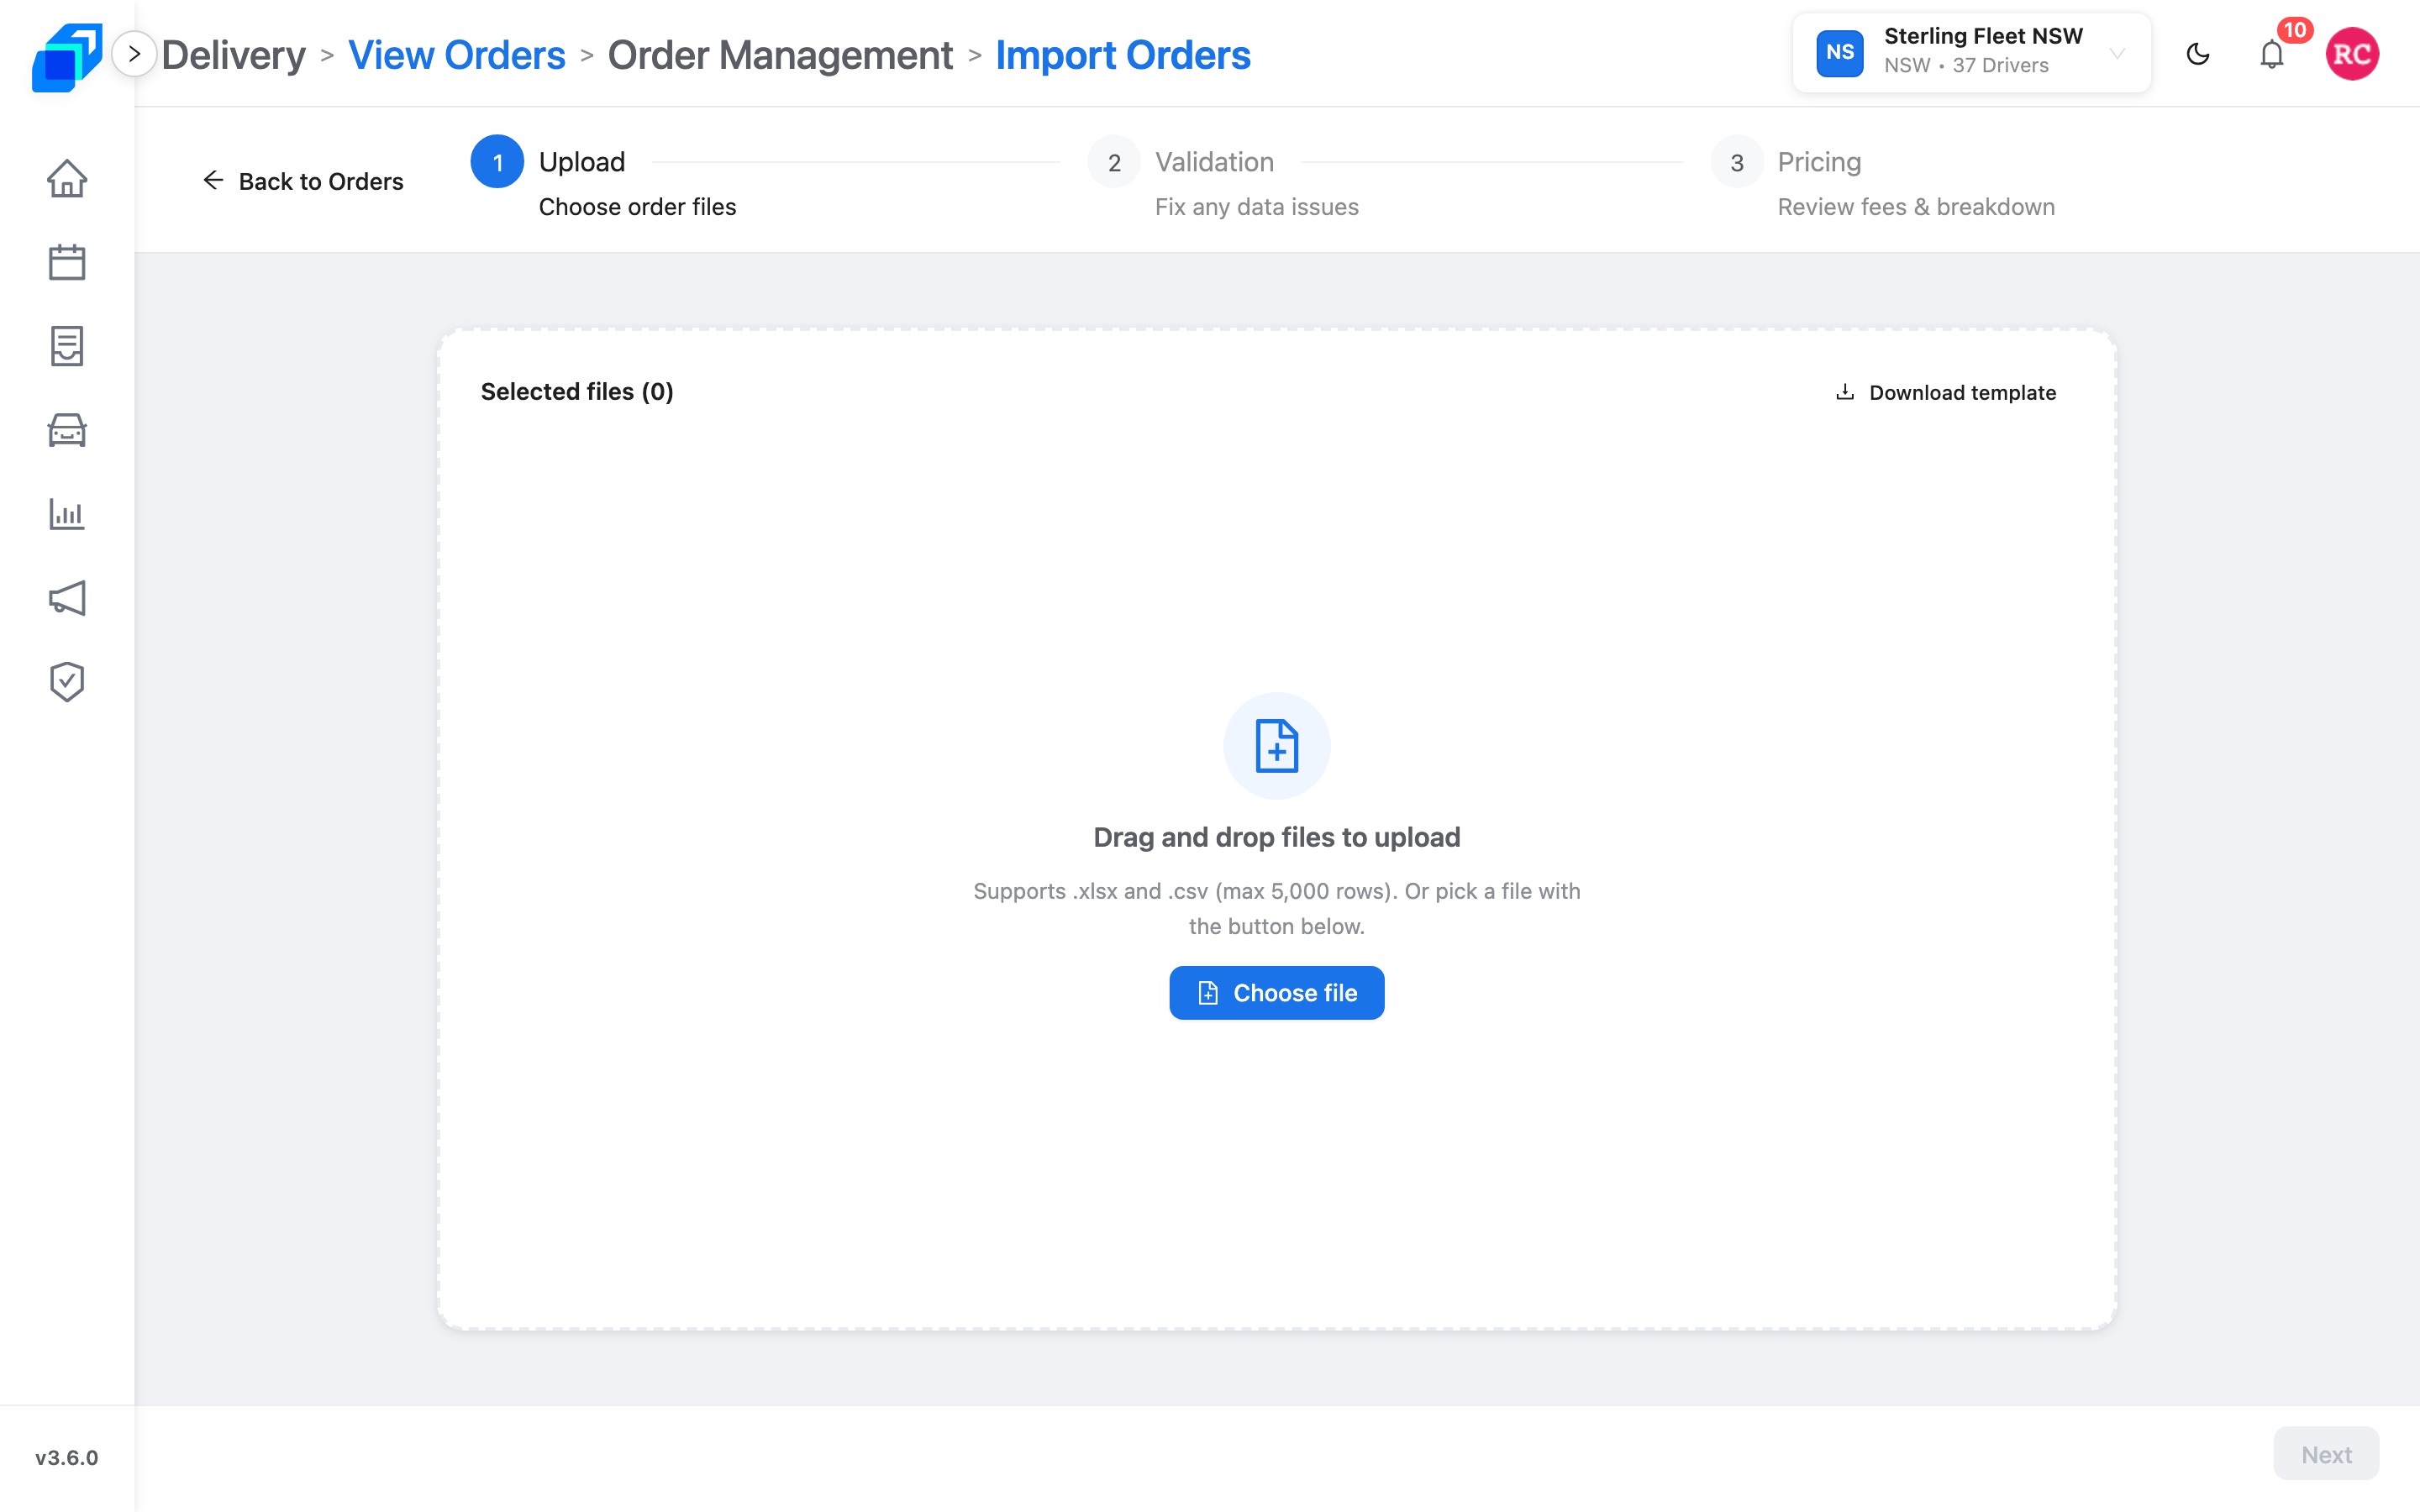
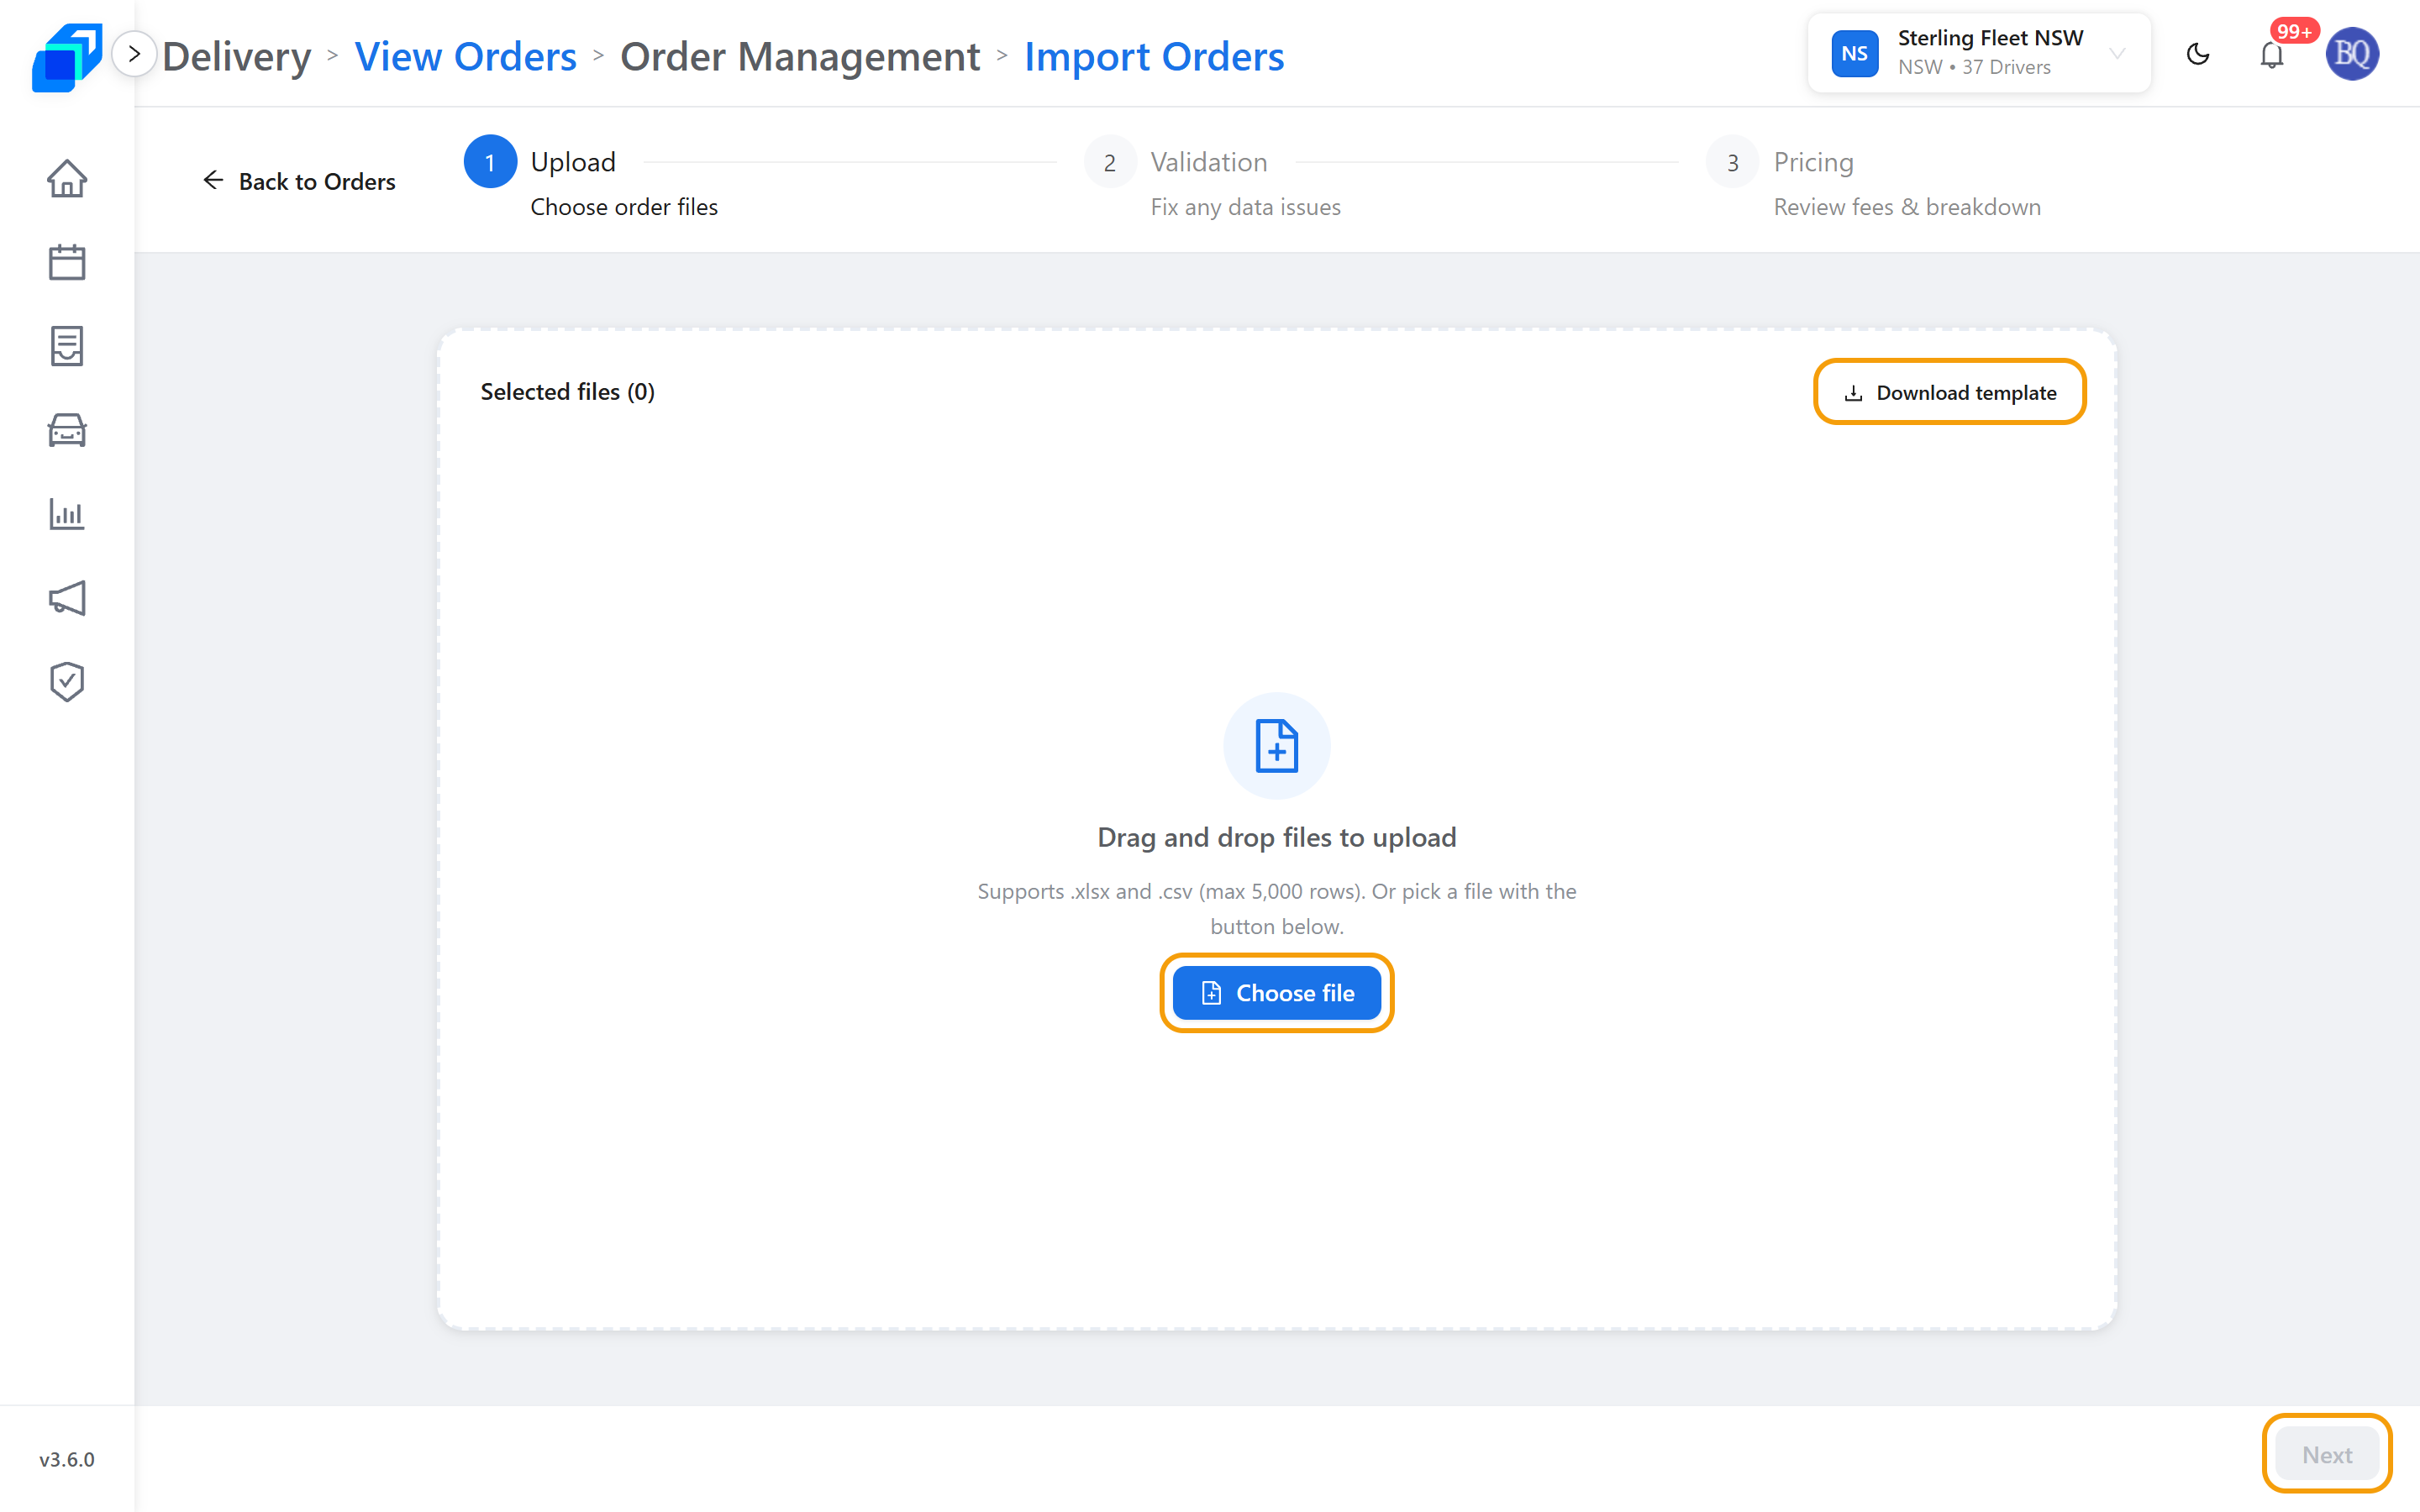
The wizard has three steps across the top: Upload (Choose order files), Validation (Fix any data issues), Pricing (Review fees & breakdown).
Download template gives you the file with every column already named. Fill it in and keep each column heading exactly as the template names it.
Drag a file onto Drag and drop files to upload, or click Choose file. The panel takes .xlsx and .csv files of up to 5,000 rows. Your file appears under Selected files (1). Next stays disabled until you have chosen a file and SenditGo has read its rows.
If SenditGo cannot take the file, a red banner appears at the top of the step, with a cross to close it. The message tells you what to do:
- Unsupported file type. Please upload .csv or .xlsx. – save the spreadsheet in one of those two formats.
- File unreadable or exceeds 10 MB. Check the file or split it. – the file is damaged, or over the 10 MB limit.
- Too many rows. Maximum is 5,000 per import — please split the file. – split the spreadsheet and import each part.
- You already have 3 active import jobs. Cancel or finish one before starting another. – finish or cancel an earlier import first.
Anything else shows as Upload failed with the reason after it.
Picked the wrong spreadsheet? Click its row – Click to replace this file appears as you point to it – and choose another. The new file replaces the old one, and SenditGo reads it again. The cross at the end of the row removes the file instead, and Remove all clears the shelf. Upload one file per import.
2. Validation – UPDATE
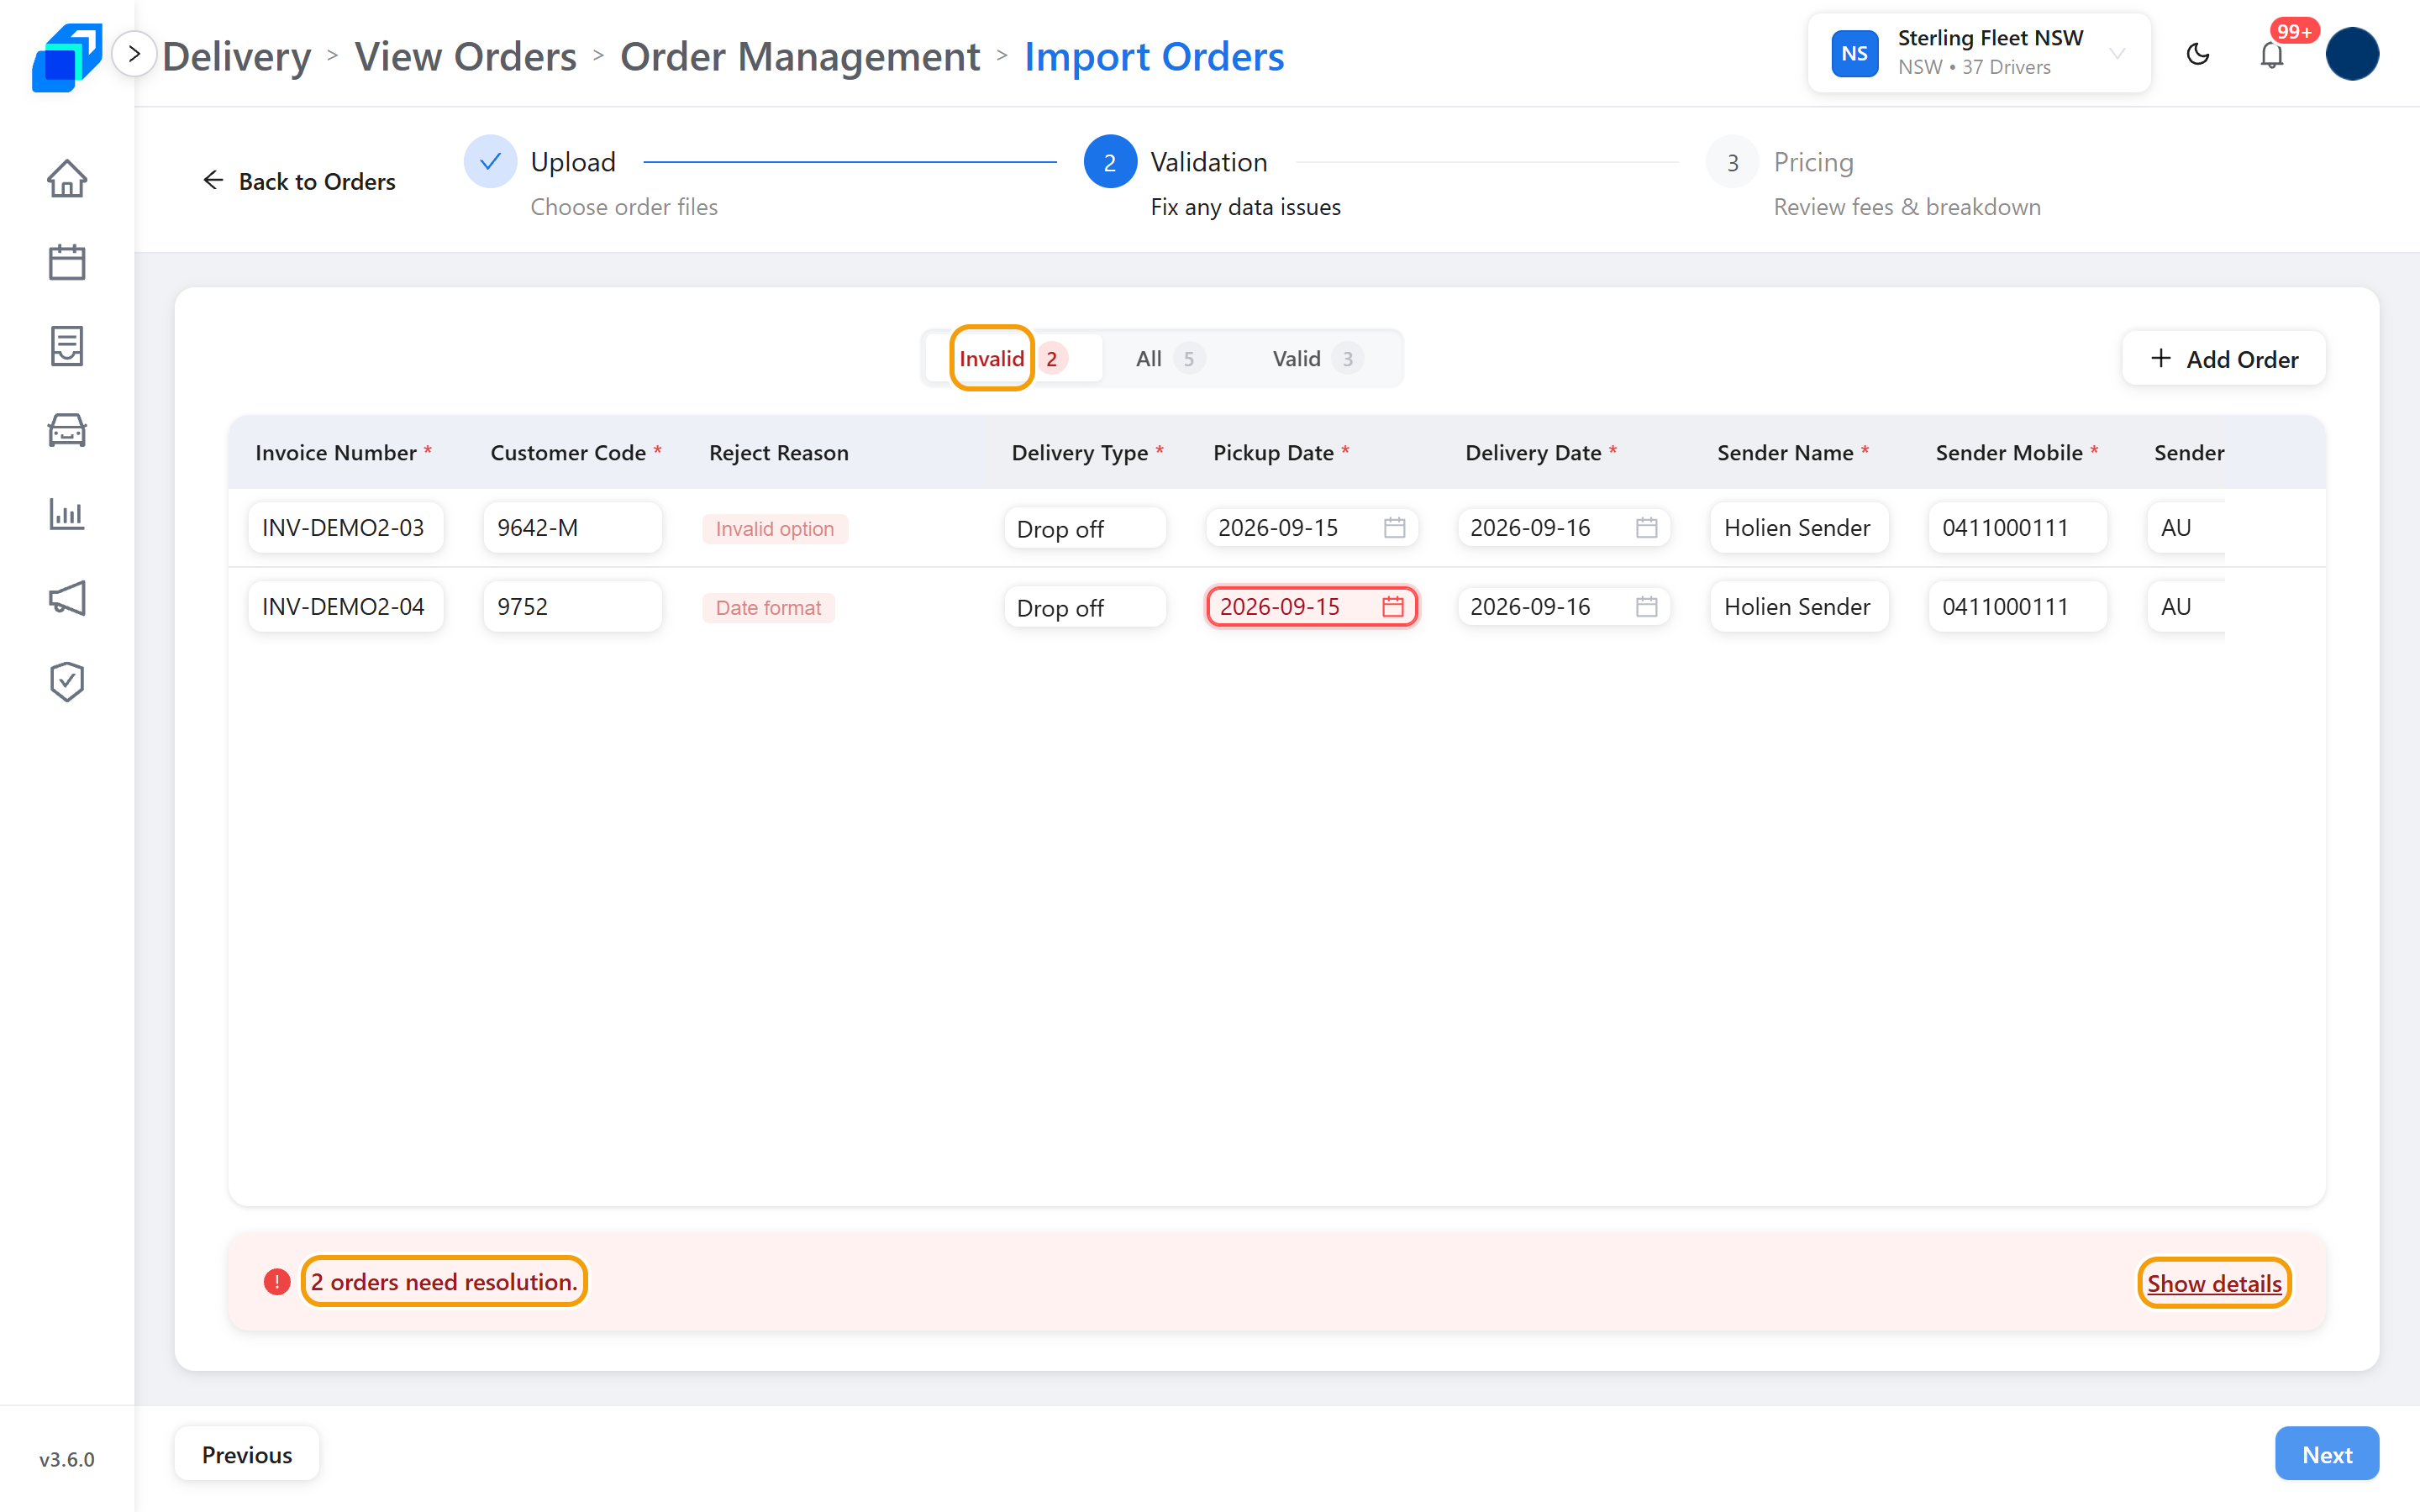
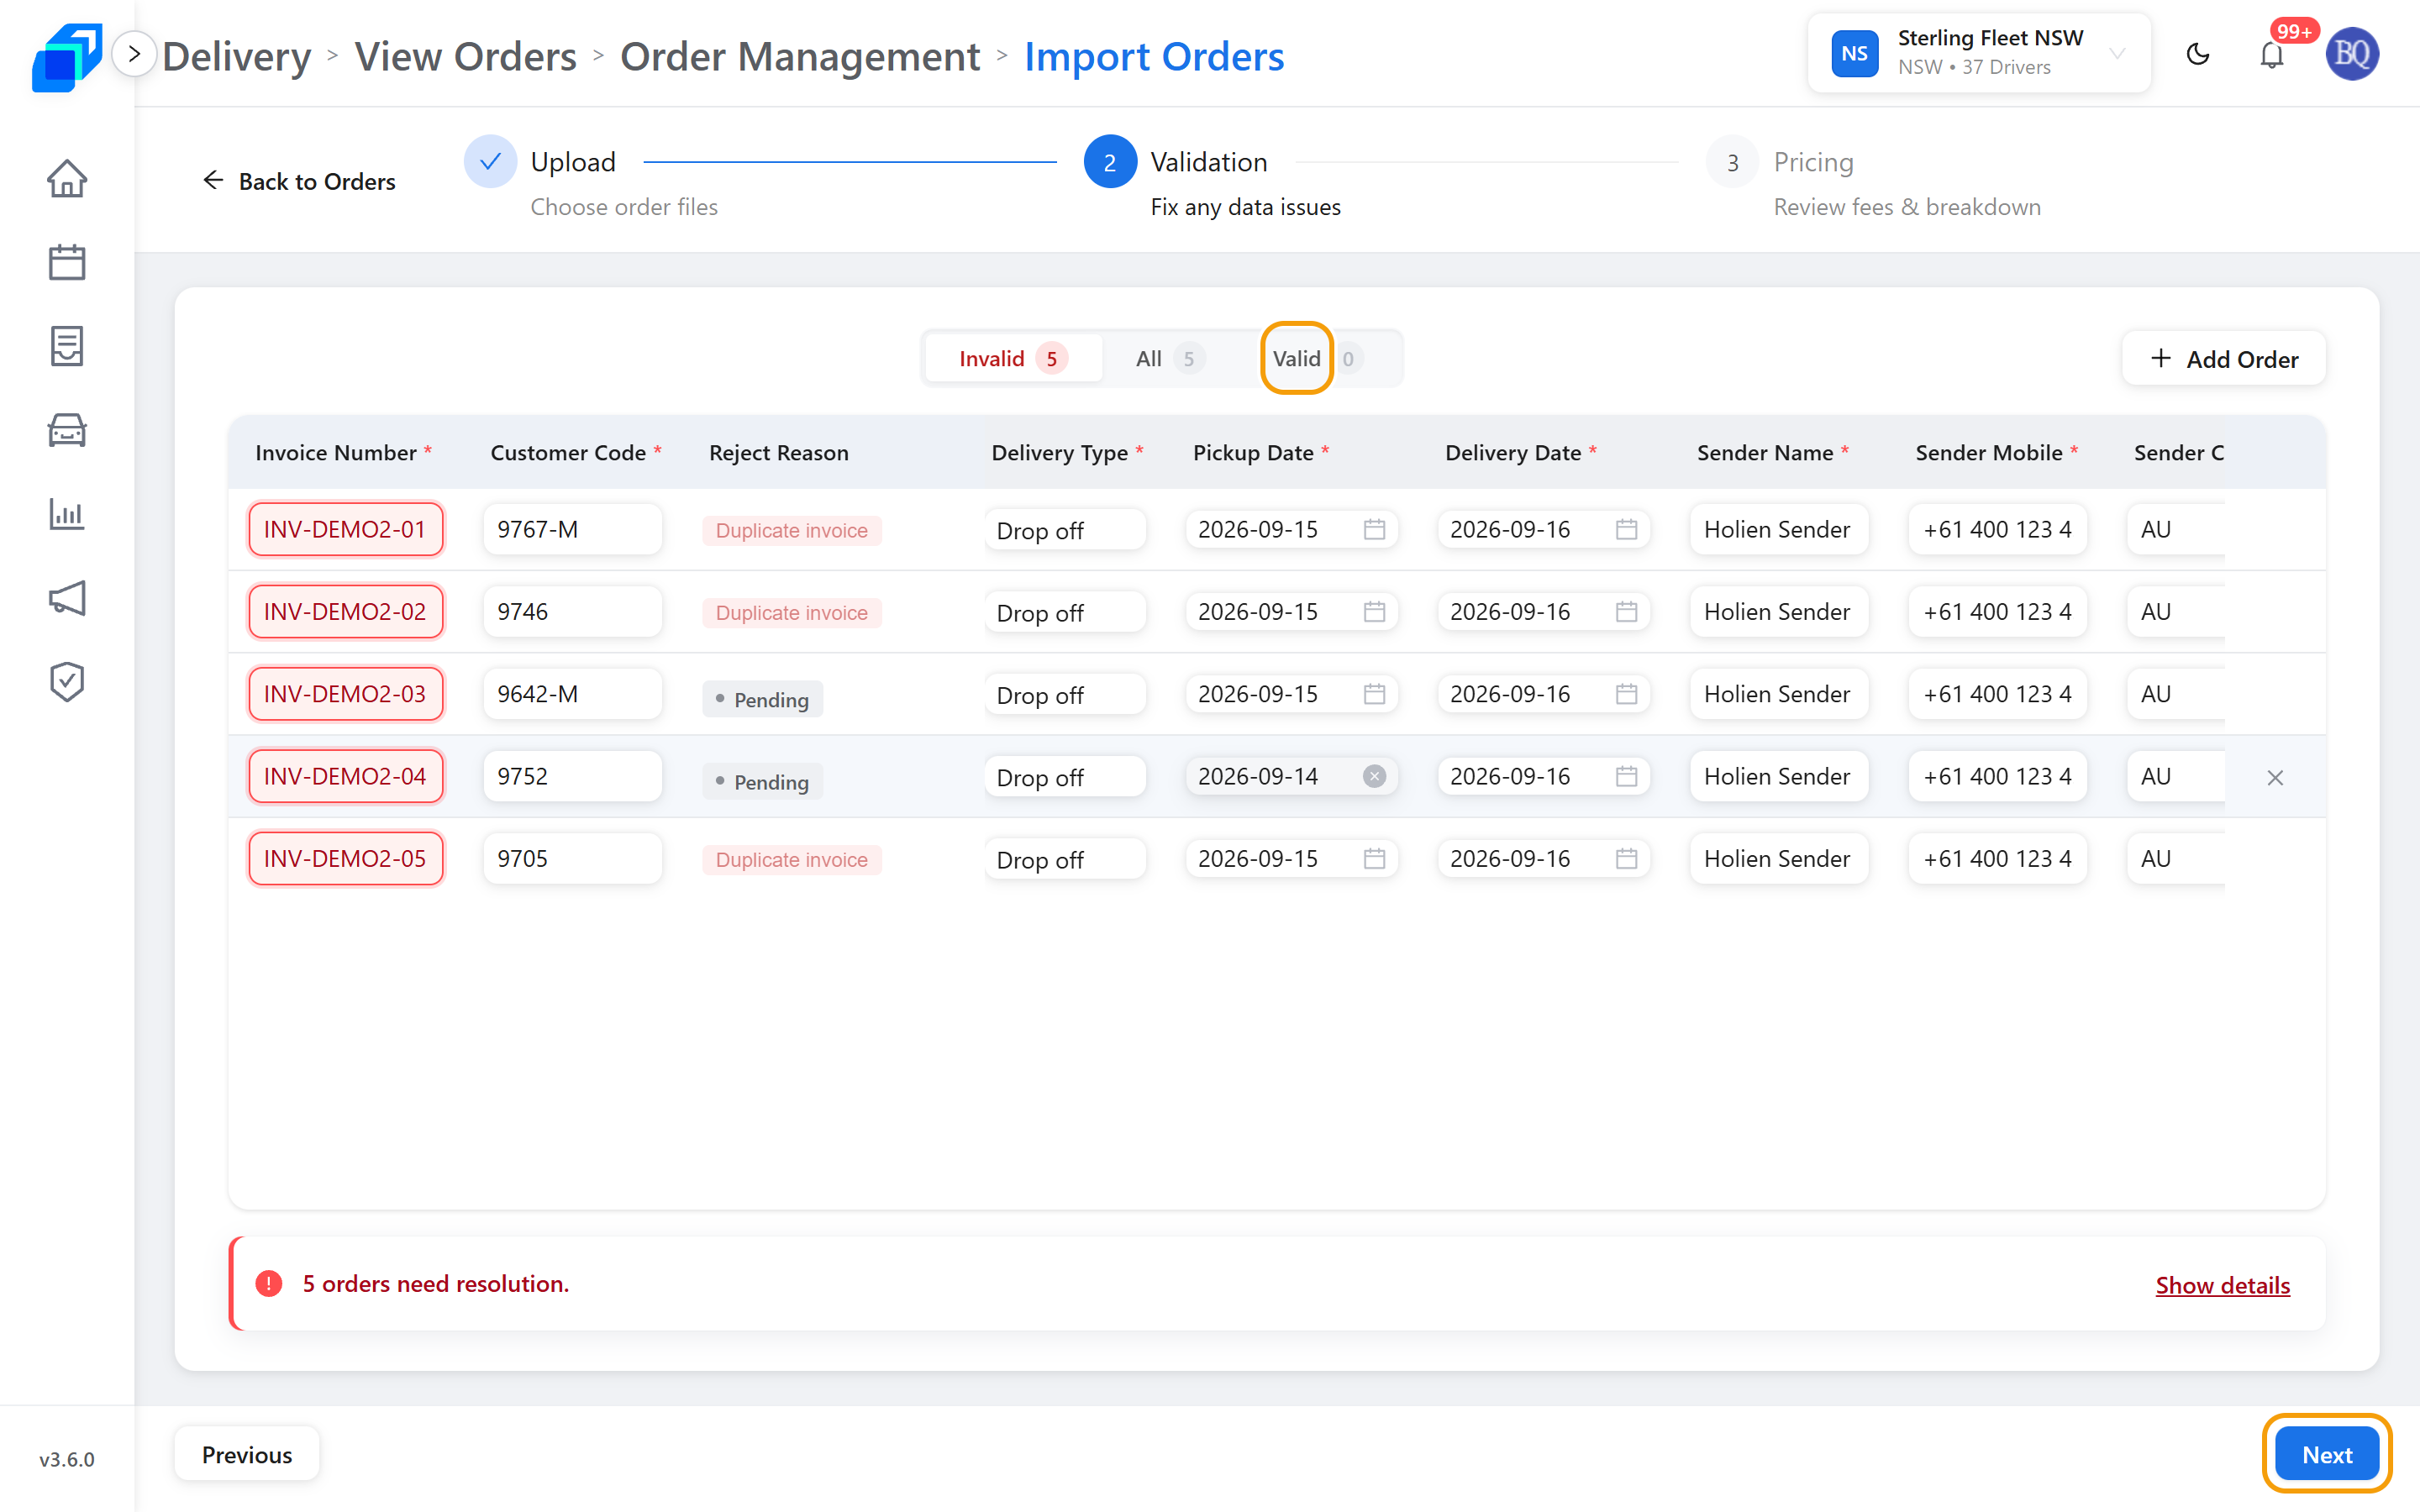
Three tabs count your rows. Invalid holds the rows you still have to fix and All shows every row in the file. Valid is the rows ready to import.
The Reject Reason column says what is wrong in plain words – Invalid option, Date format – and the cell itself is outlined red. Fix it in the grid; you do not need to go back and change the file.
The banner at the bottom counts what is left, like 2 orders need resolution. Show details opens the full Error Summary. Next stays clickable here. Click it while a row is still red and SenditGo re-checks your edits, then drops you back on Invalid with the banner flashing.
Names you will meet in the Error Summary, and the fix for each:
- Invalid Address: the suburb or the postcode is not recognised. Correct Recipient City and Recipient Postcode on that row.
- Address Not Found: the address could not be placed on the map. Complete Delivery Address, then check it against the suburb and postcode beside it.
- Outside Service Area: the postcode is outside the area the warehouse's fleet serves, so the order cannot be imported. Correct the red postcode cell on that row – Recipient Postcode or Sender Postcode. Or click the cross at the end of the row to leave the order out.
- Vehicle Capacity Exceeded: the order is too large to carry. Lower Qty, Weight (kg) or the L (cm), W (cm) and H (cm) dimensions, or split the load across two orders.
- Required: a required cell is empty. Point to it to read Required field is empty, then type the value straight into the red cell.
When nothing is left to fix, the rows move to Valid and Next takes you to pricing.
3. Pricing – VIEW
Five cards total the batch: Base Fee, Distance, Fuel, GST and Estimated Total. Below them, each order has its own row – Order Number, Invoice Number, Product, then Base Fee, Distance Fee, Fuel Surcharge, Tax (GST) and Total. The table fills as you scroll: Scroll down to load more at the foot becomes All loaded at the end. Check the totals, then click Import Orders.
Import Orders stays greyed out while any row needs a manual quote. An amber banner under the table says so – Includes Manual Quote Orders. The line beneath it reads Some orders exceed weight, dimension, or distance limits and must be removed to proceed. Those are the long trips and the oversized or heavy loads. Click the cross at the end of each of those rows, then import the rest.
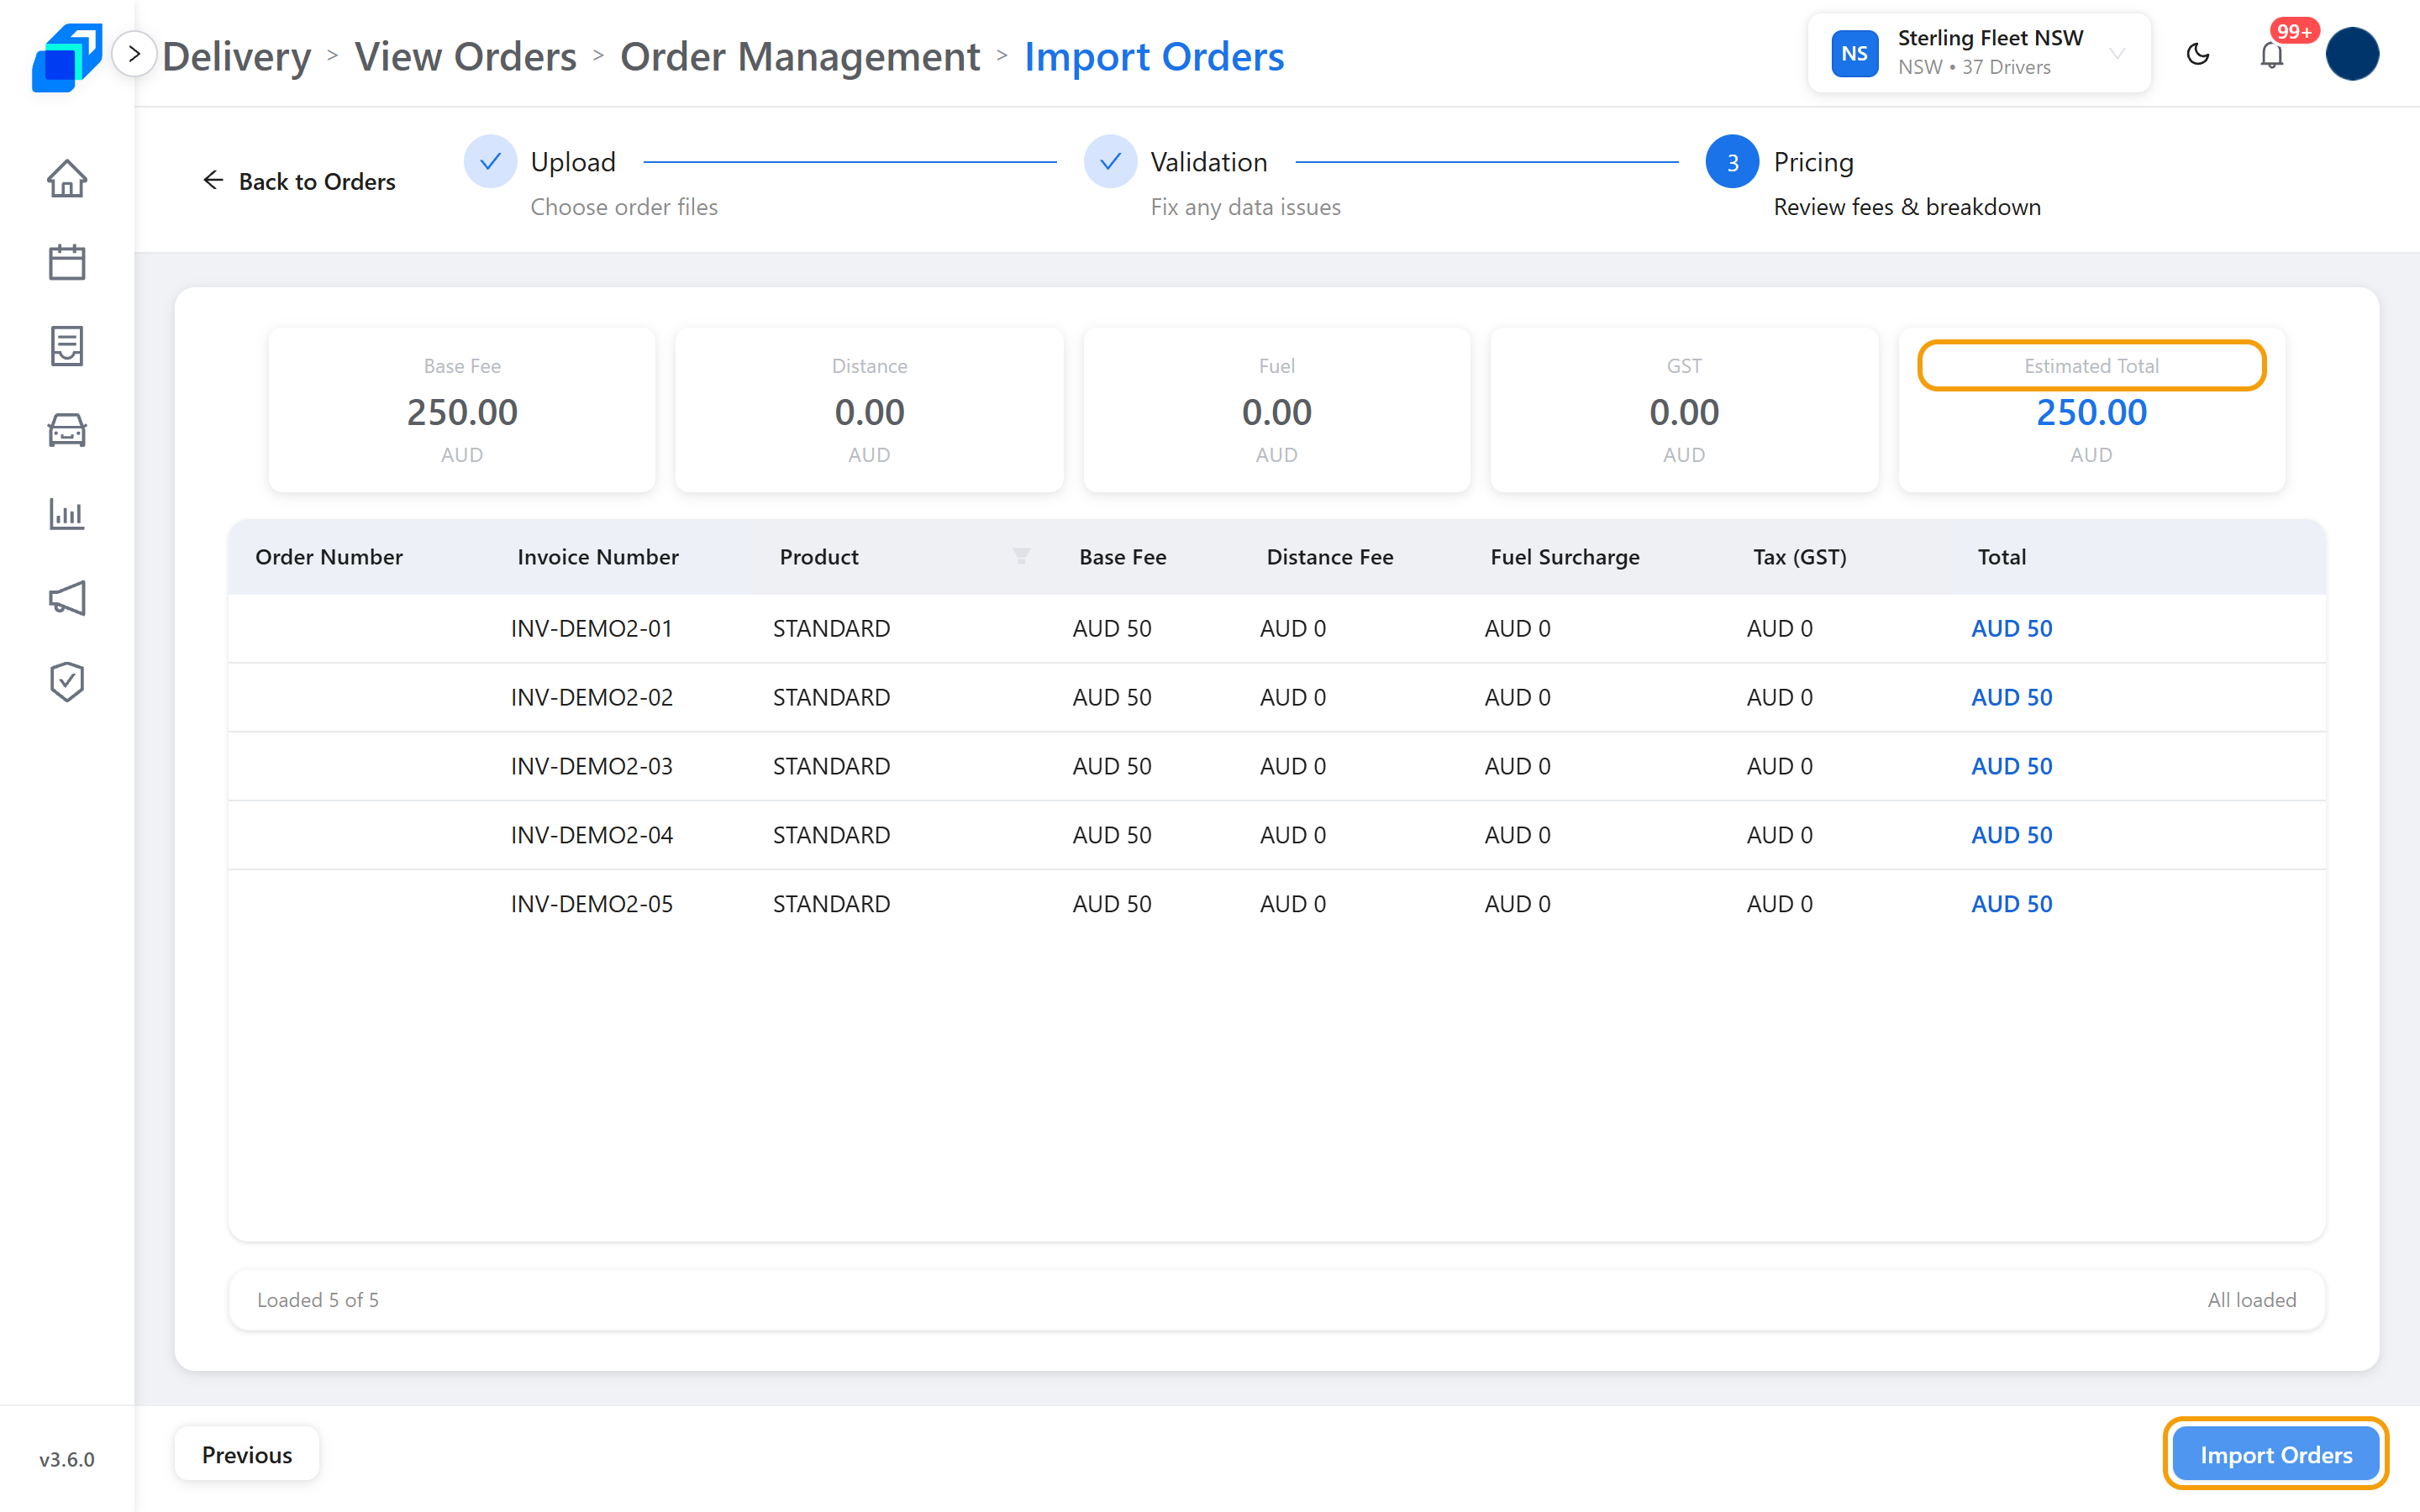
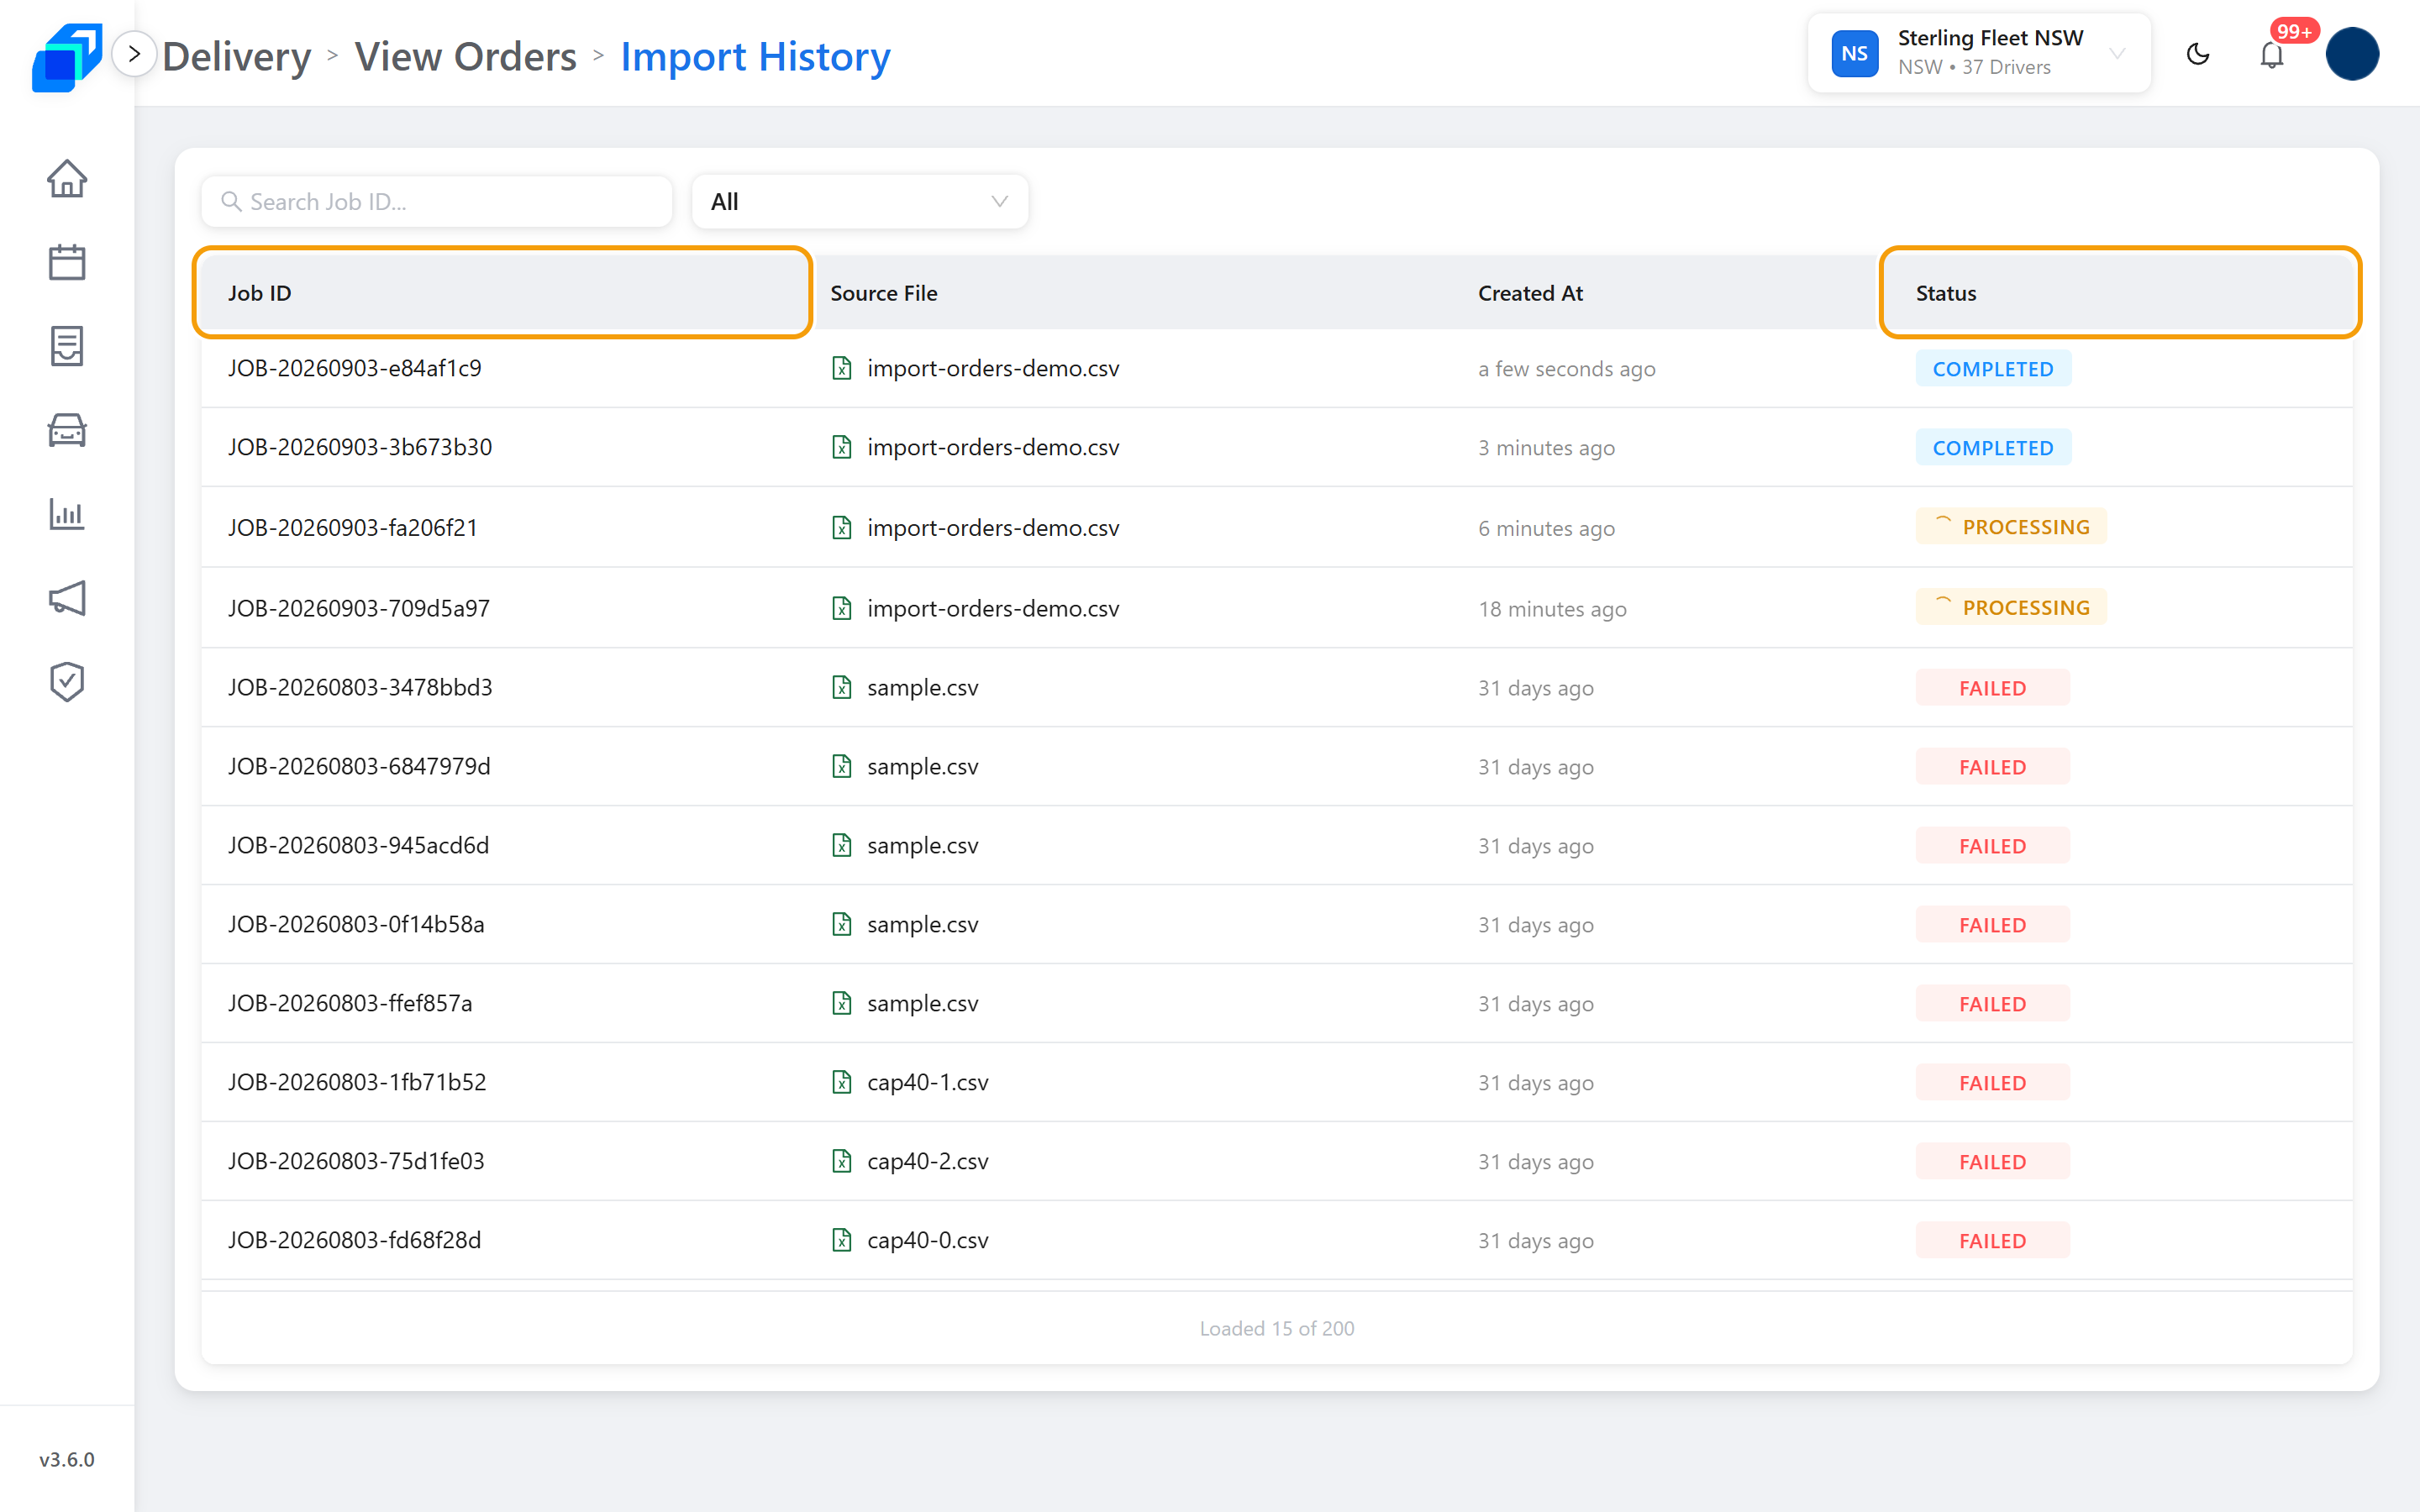
Orders imported successfully appears and SenditGo takes you straight to Import History, with your new job at the top of the list and its Job ID beside it.
4. Import History – VIEW
Open Import History to see past jobs. Status shows PROCESSING with a spinner while the job runs, then COMPLETED when it finishes. FAILED and EXPIRED are job results too, not a broken list. EXPIRED means the draft sat idle and SenditGo discarded it, so upload the file again.
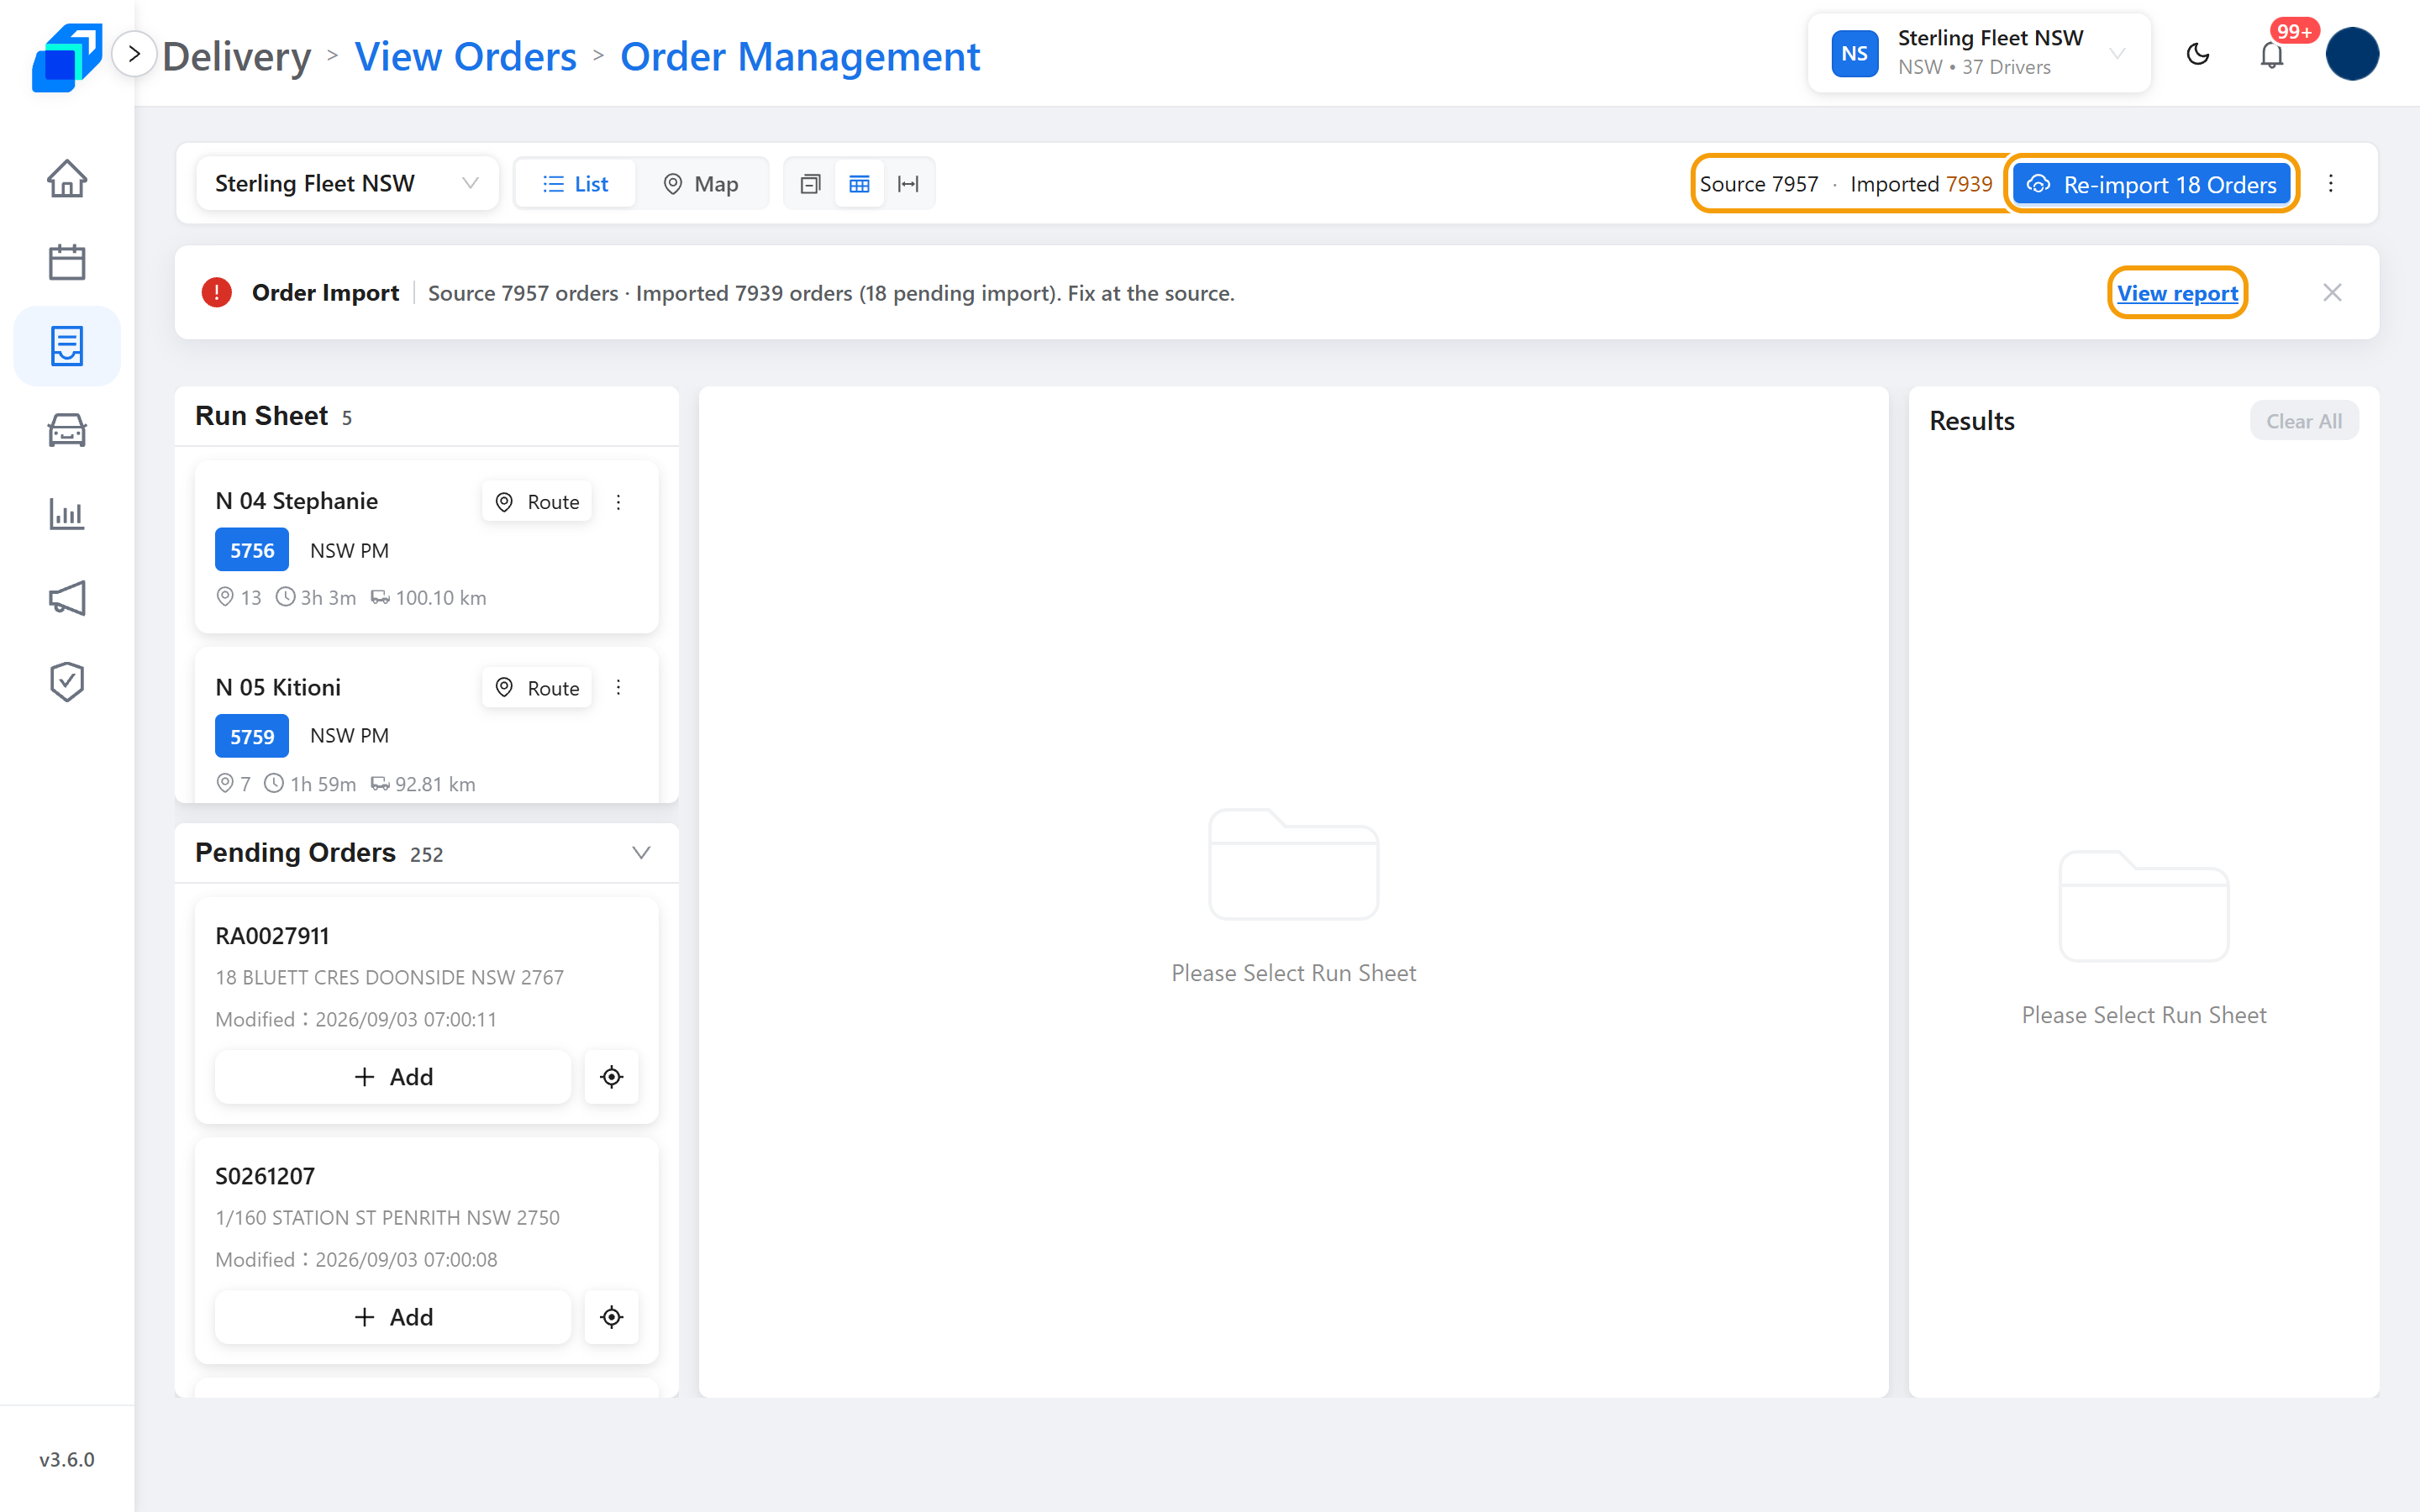
GOOD TO KNOW: If orders never arrived from the source system, Order Management shows a count and a red banner. The button beside the count names how many are missing – Re-import 3 Orders, or Re-import 1 Order for a single one. When nothing is missing, none of that is there.
View report lists each document that did not come in, and why.
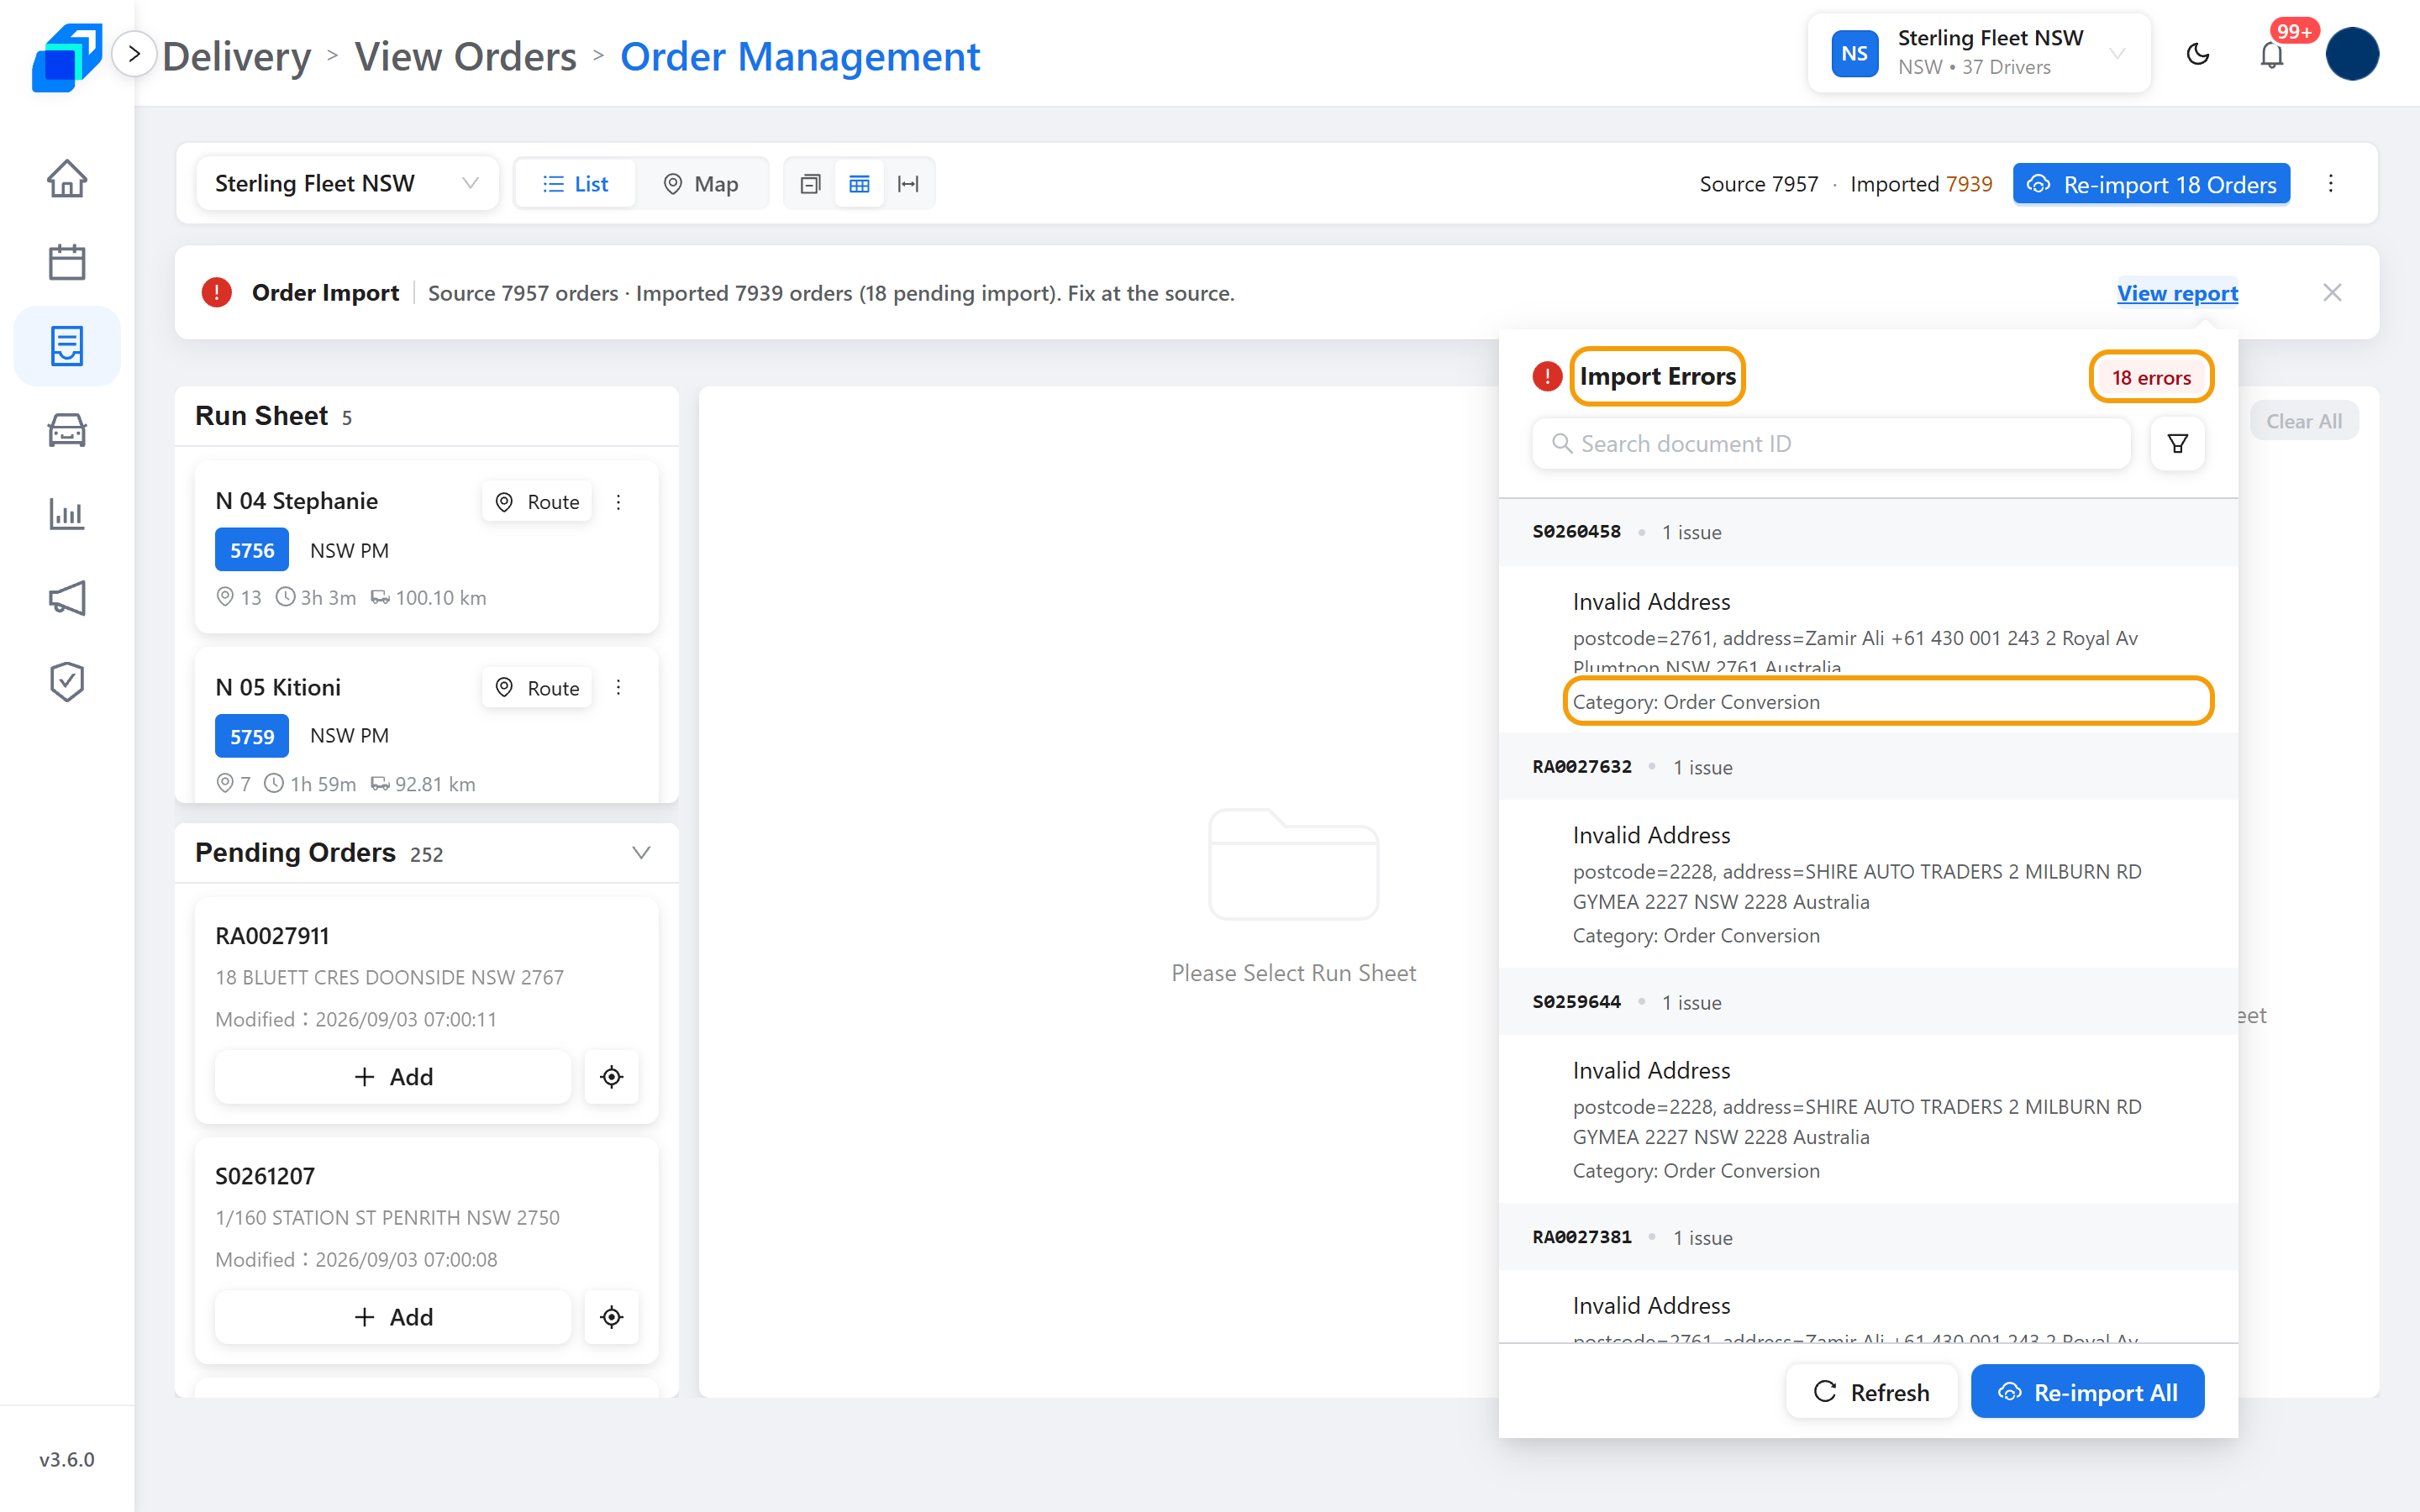
Fix them where they came from, then import again.