Plan the week on Roster
VIEW · UPDATE · CREATE · REMOVE
Read the week, open a shift, copy it as a draft, change priority or the driver pool, and redraw the delivery area.
Where to find it: Roster in the left menu.
The calendar shows the shift colour on the right days, Roster Management lists it as Active, and people in the driver pool can take that day's work.
1. Calendar – VIEW
Click Roster. You land on the week calendar.
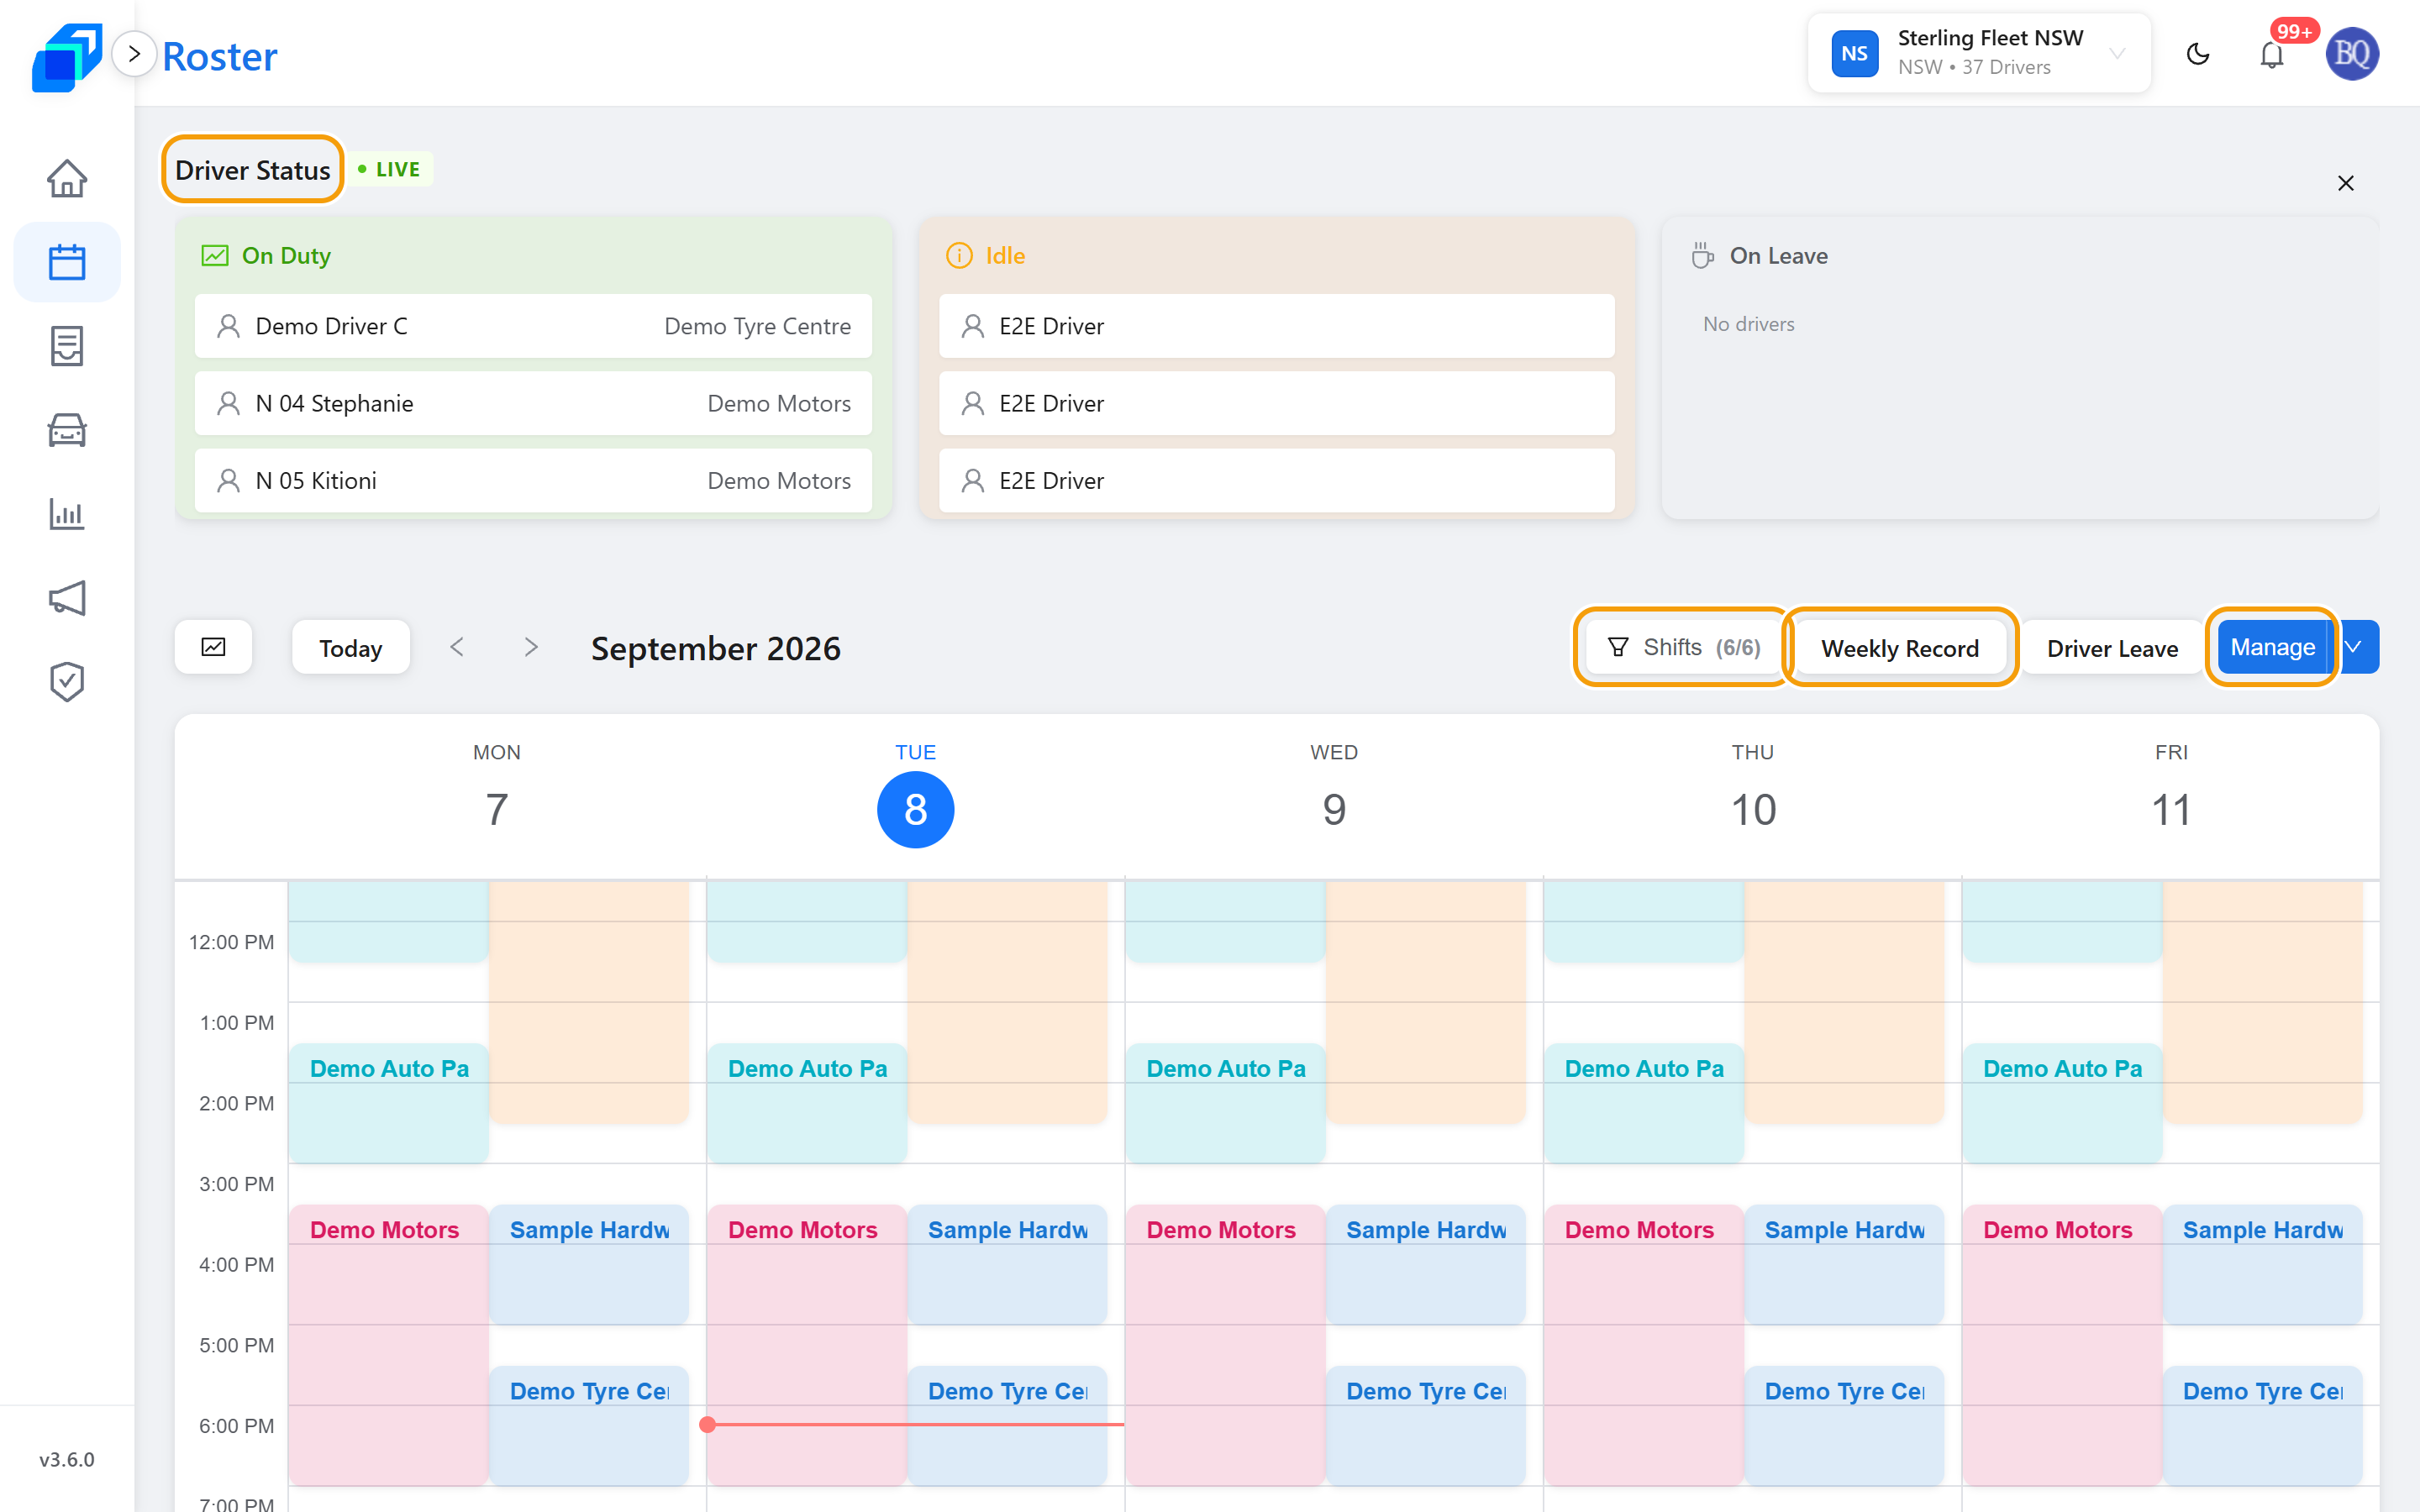
- Driver Status – On Duty, Idle, On Leave.
- Each block is a shift. Click a block to open that shift page.
- Shifts filters which colours show. Weekly Record, Driver Leave, and Manage sit on the right.
- Manage opens the list (Roster Management).
2. Shift list – VIEW
Open Roster Management (from Manage, or Roster › Roster Management).
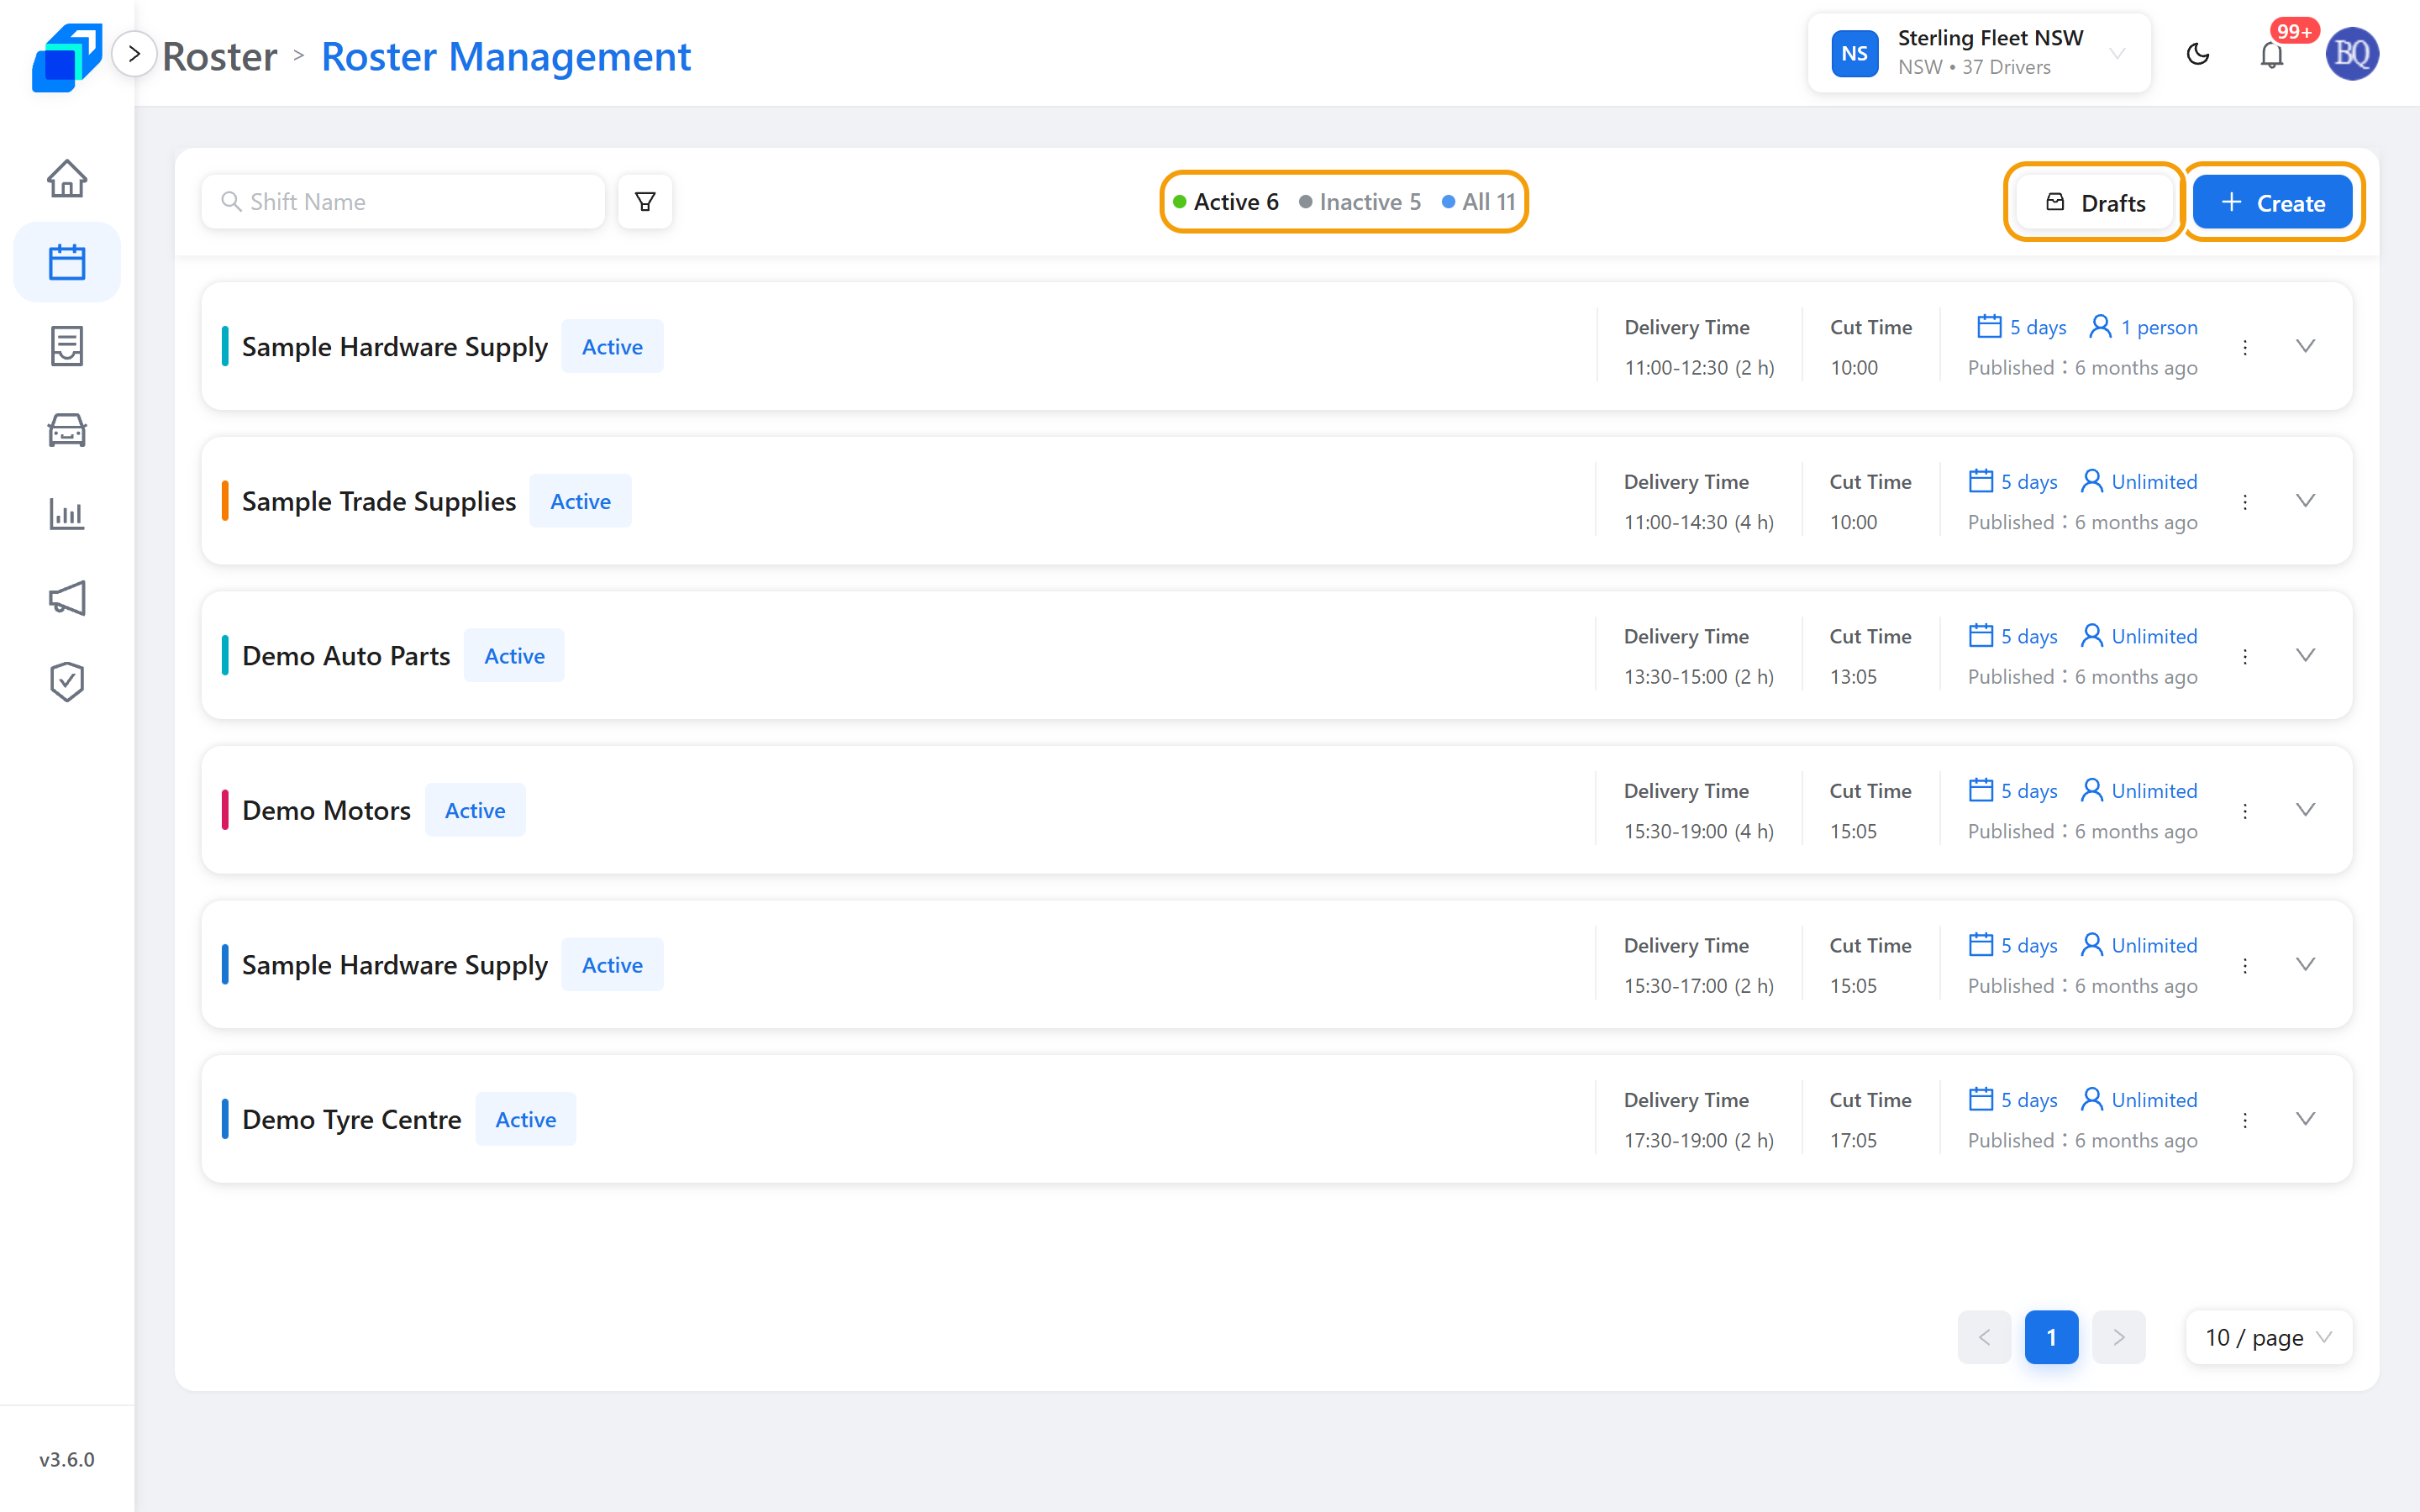
Each card shows Delivery Time, Cut Time, days, and how many people. Active / Inactive / All sit in the header.
To narrow the list, click the funnel icon beside the Shift Name search box. Tick days under Applicable Weekdays. Under Drivers in Shift pick Has Drivers, No Drivers or All. Under Status pick Active, Inactive or All – the same switch as the header. Click Apply. Reset on a block restores its default; Cancel closes without changing the list.
- + Create – new shift wizard: Create a shift.
- Drafts – unfinished copies. Only you see them.
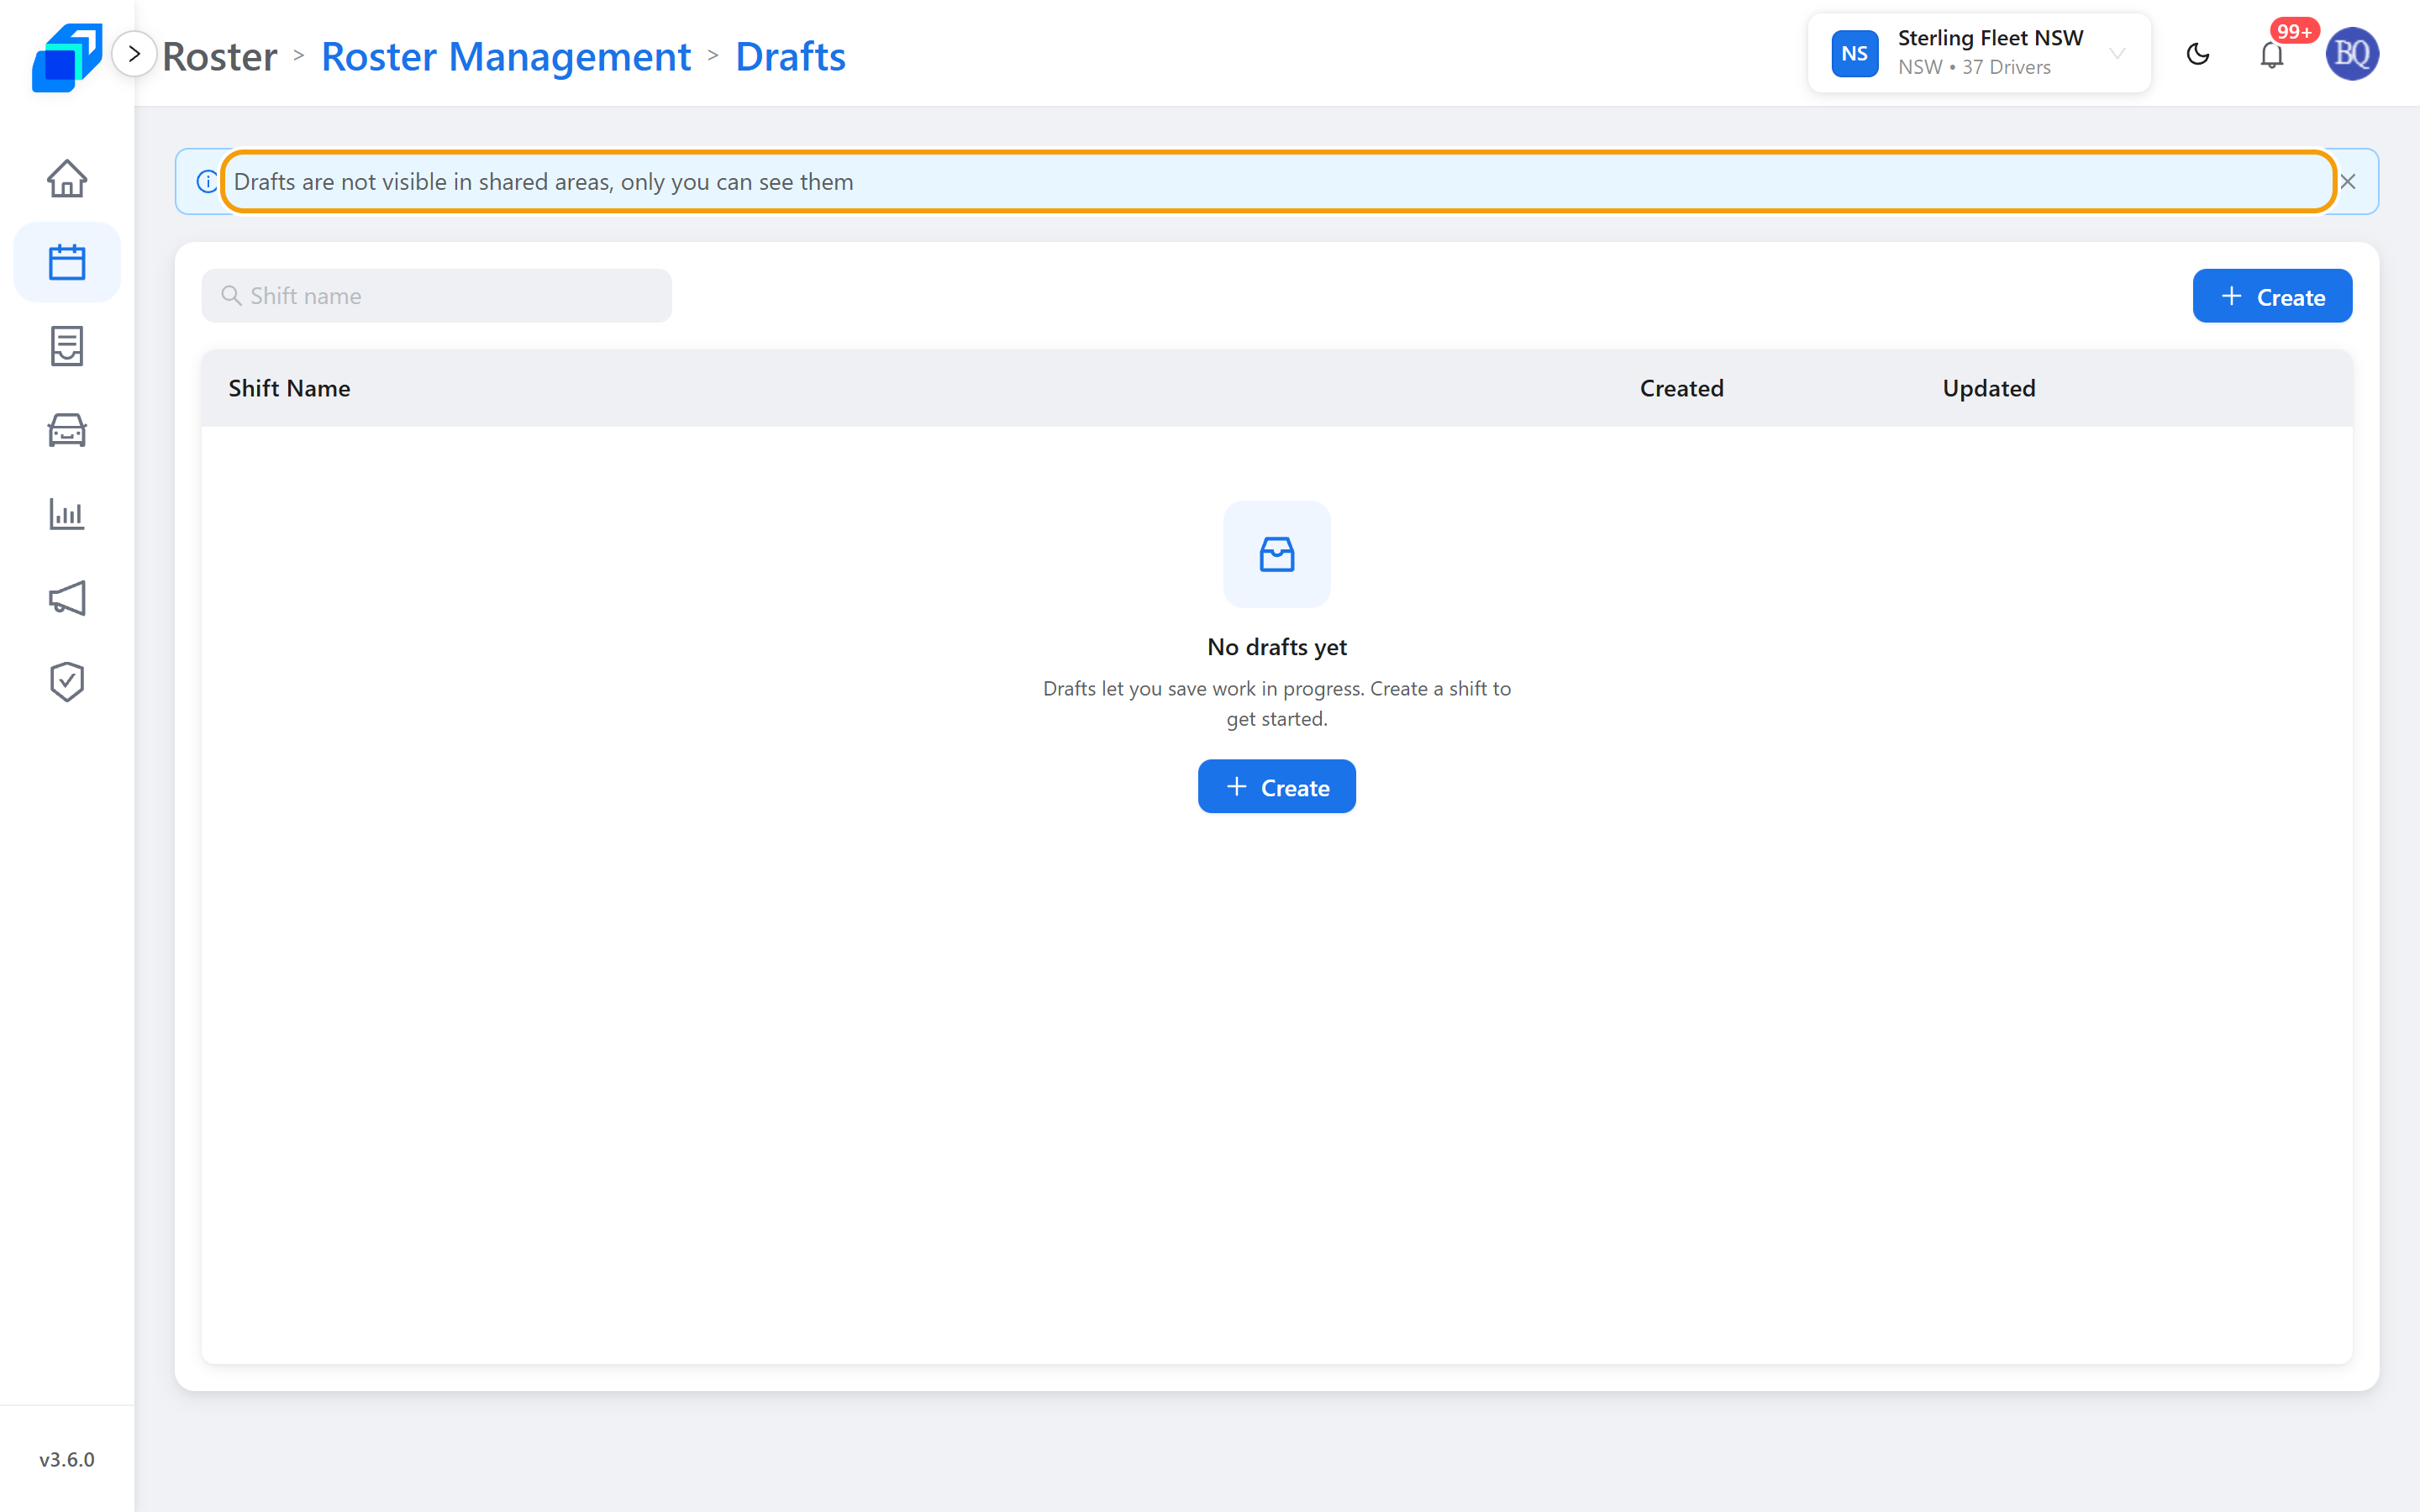
The banner says Drafts are not visible in shared areas, only you can see them. Each row shows Shift Name, Created and Updated.
To discard a draft, open the three-dot menu on its row and click Delete. A dialog asks you to confirm – click Delete again. The toast says Draft deleted. The draft page has the same Delete in its header.
3. Open a shift – VIEW
Click the shift name (for example NSW AM1). You stay on that shift page.
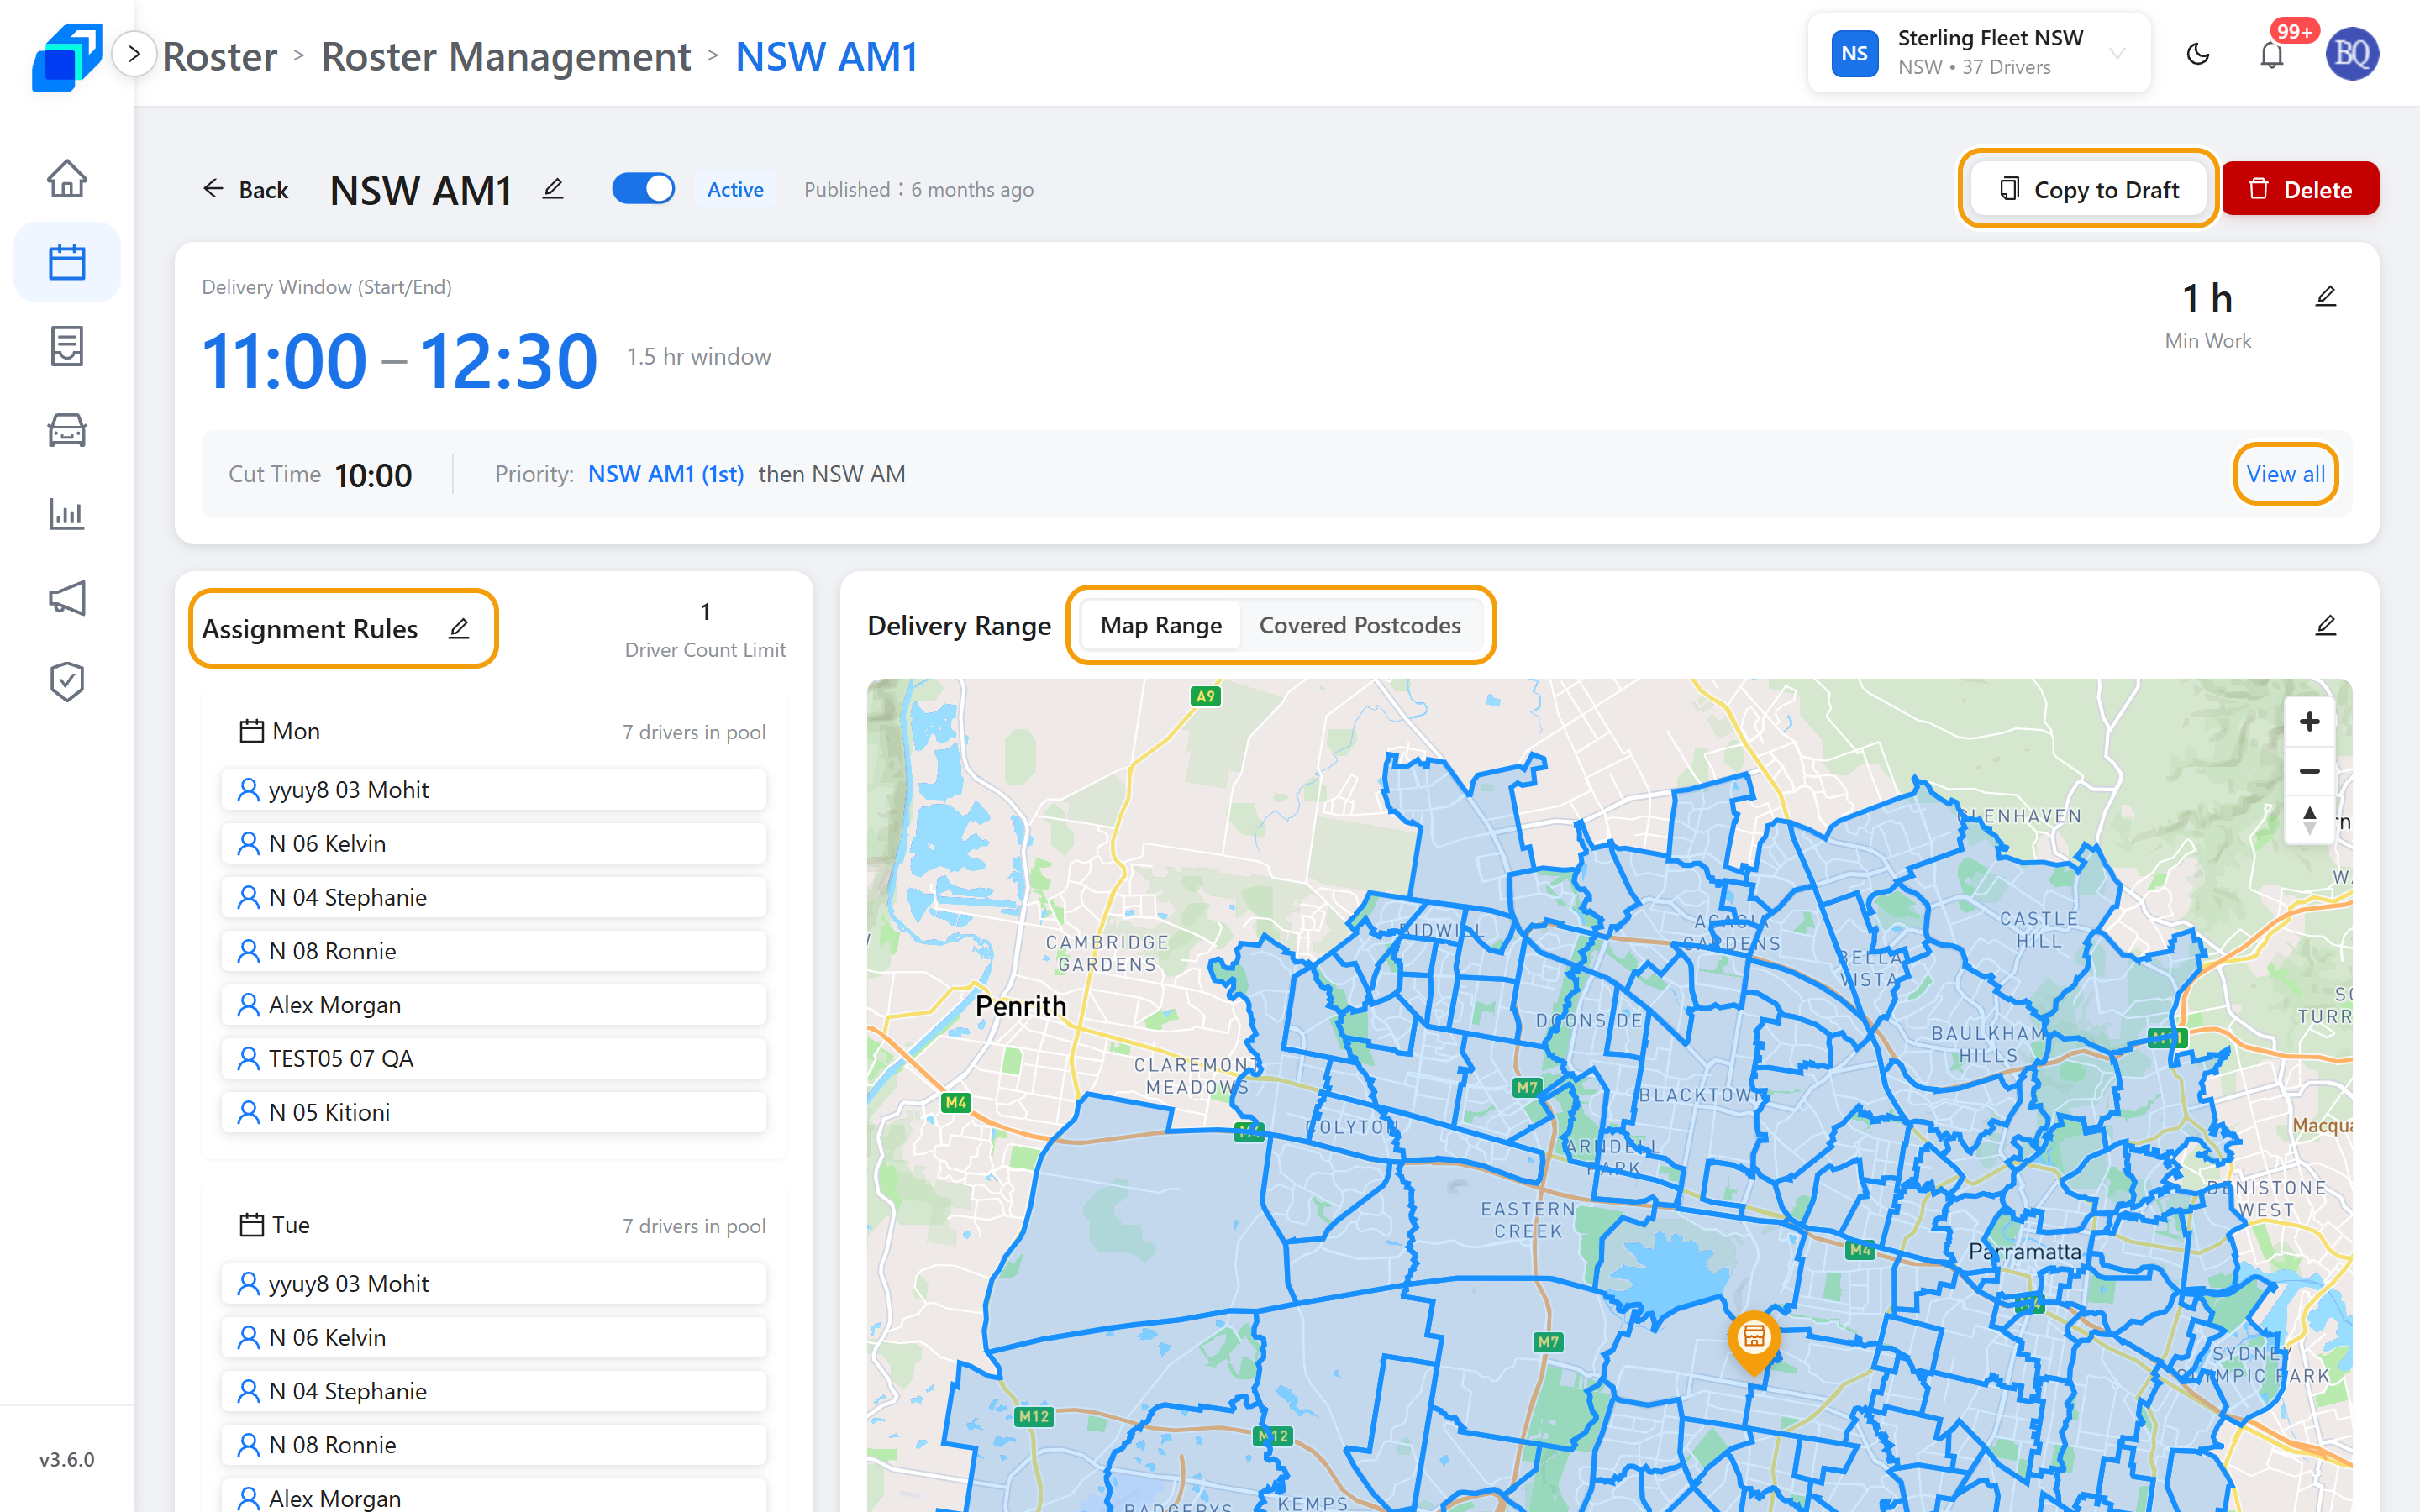
Read:
- Delivery Window, Cut Time, Min Work.
- Priority – who is planned first when cut times overlap (NSW AM1 (1st) then the next name). View all opens the full order.
- Assignment Rules – the weekdays this shift runs, and the people listed under Driver Pool.
- Delivery Range – Map Range (the blue zone) or Covered Postcodes (suburb + postcode).
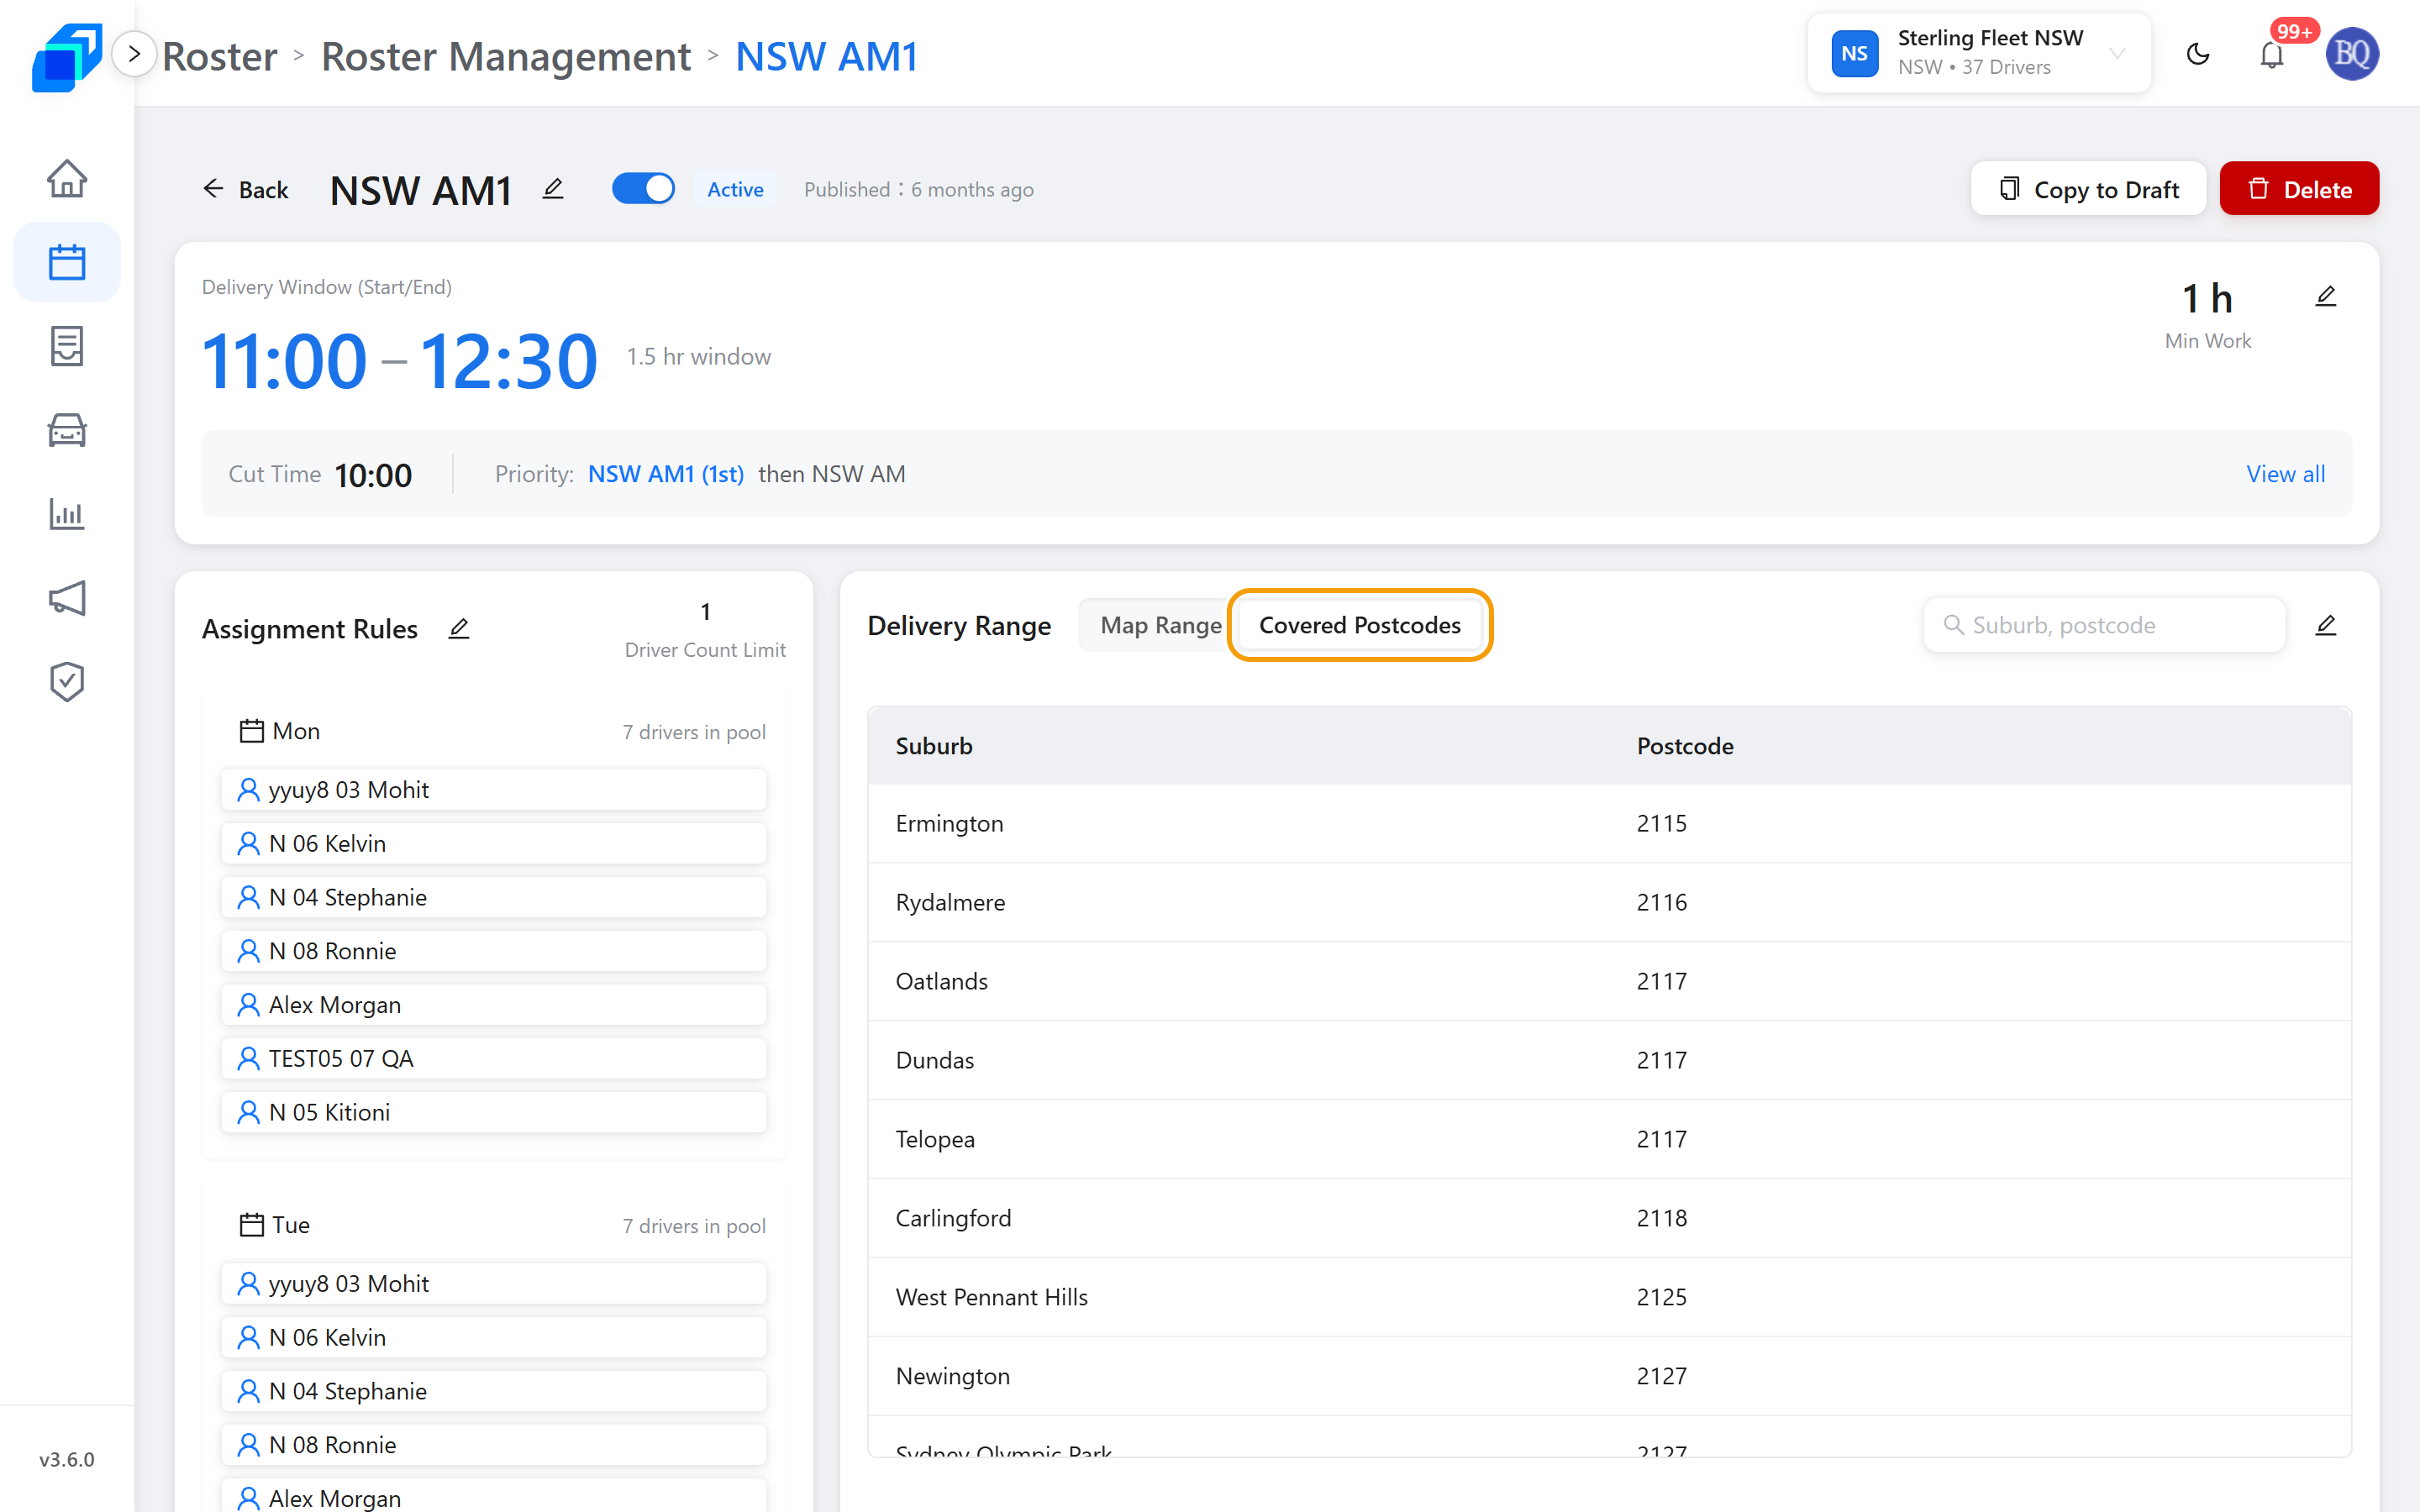
Copy to Draft (header) makes a private copy. Delete removes this shift. The Active switch turns it off without deleting.
4. Copy to Draft – CREATE
Two places, same result:
- On the list, open the three-dot menu on a card. First item is Copy to Draft. Then Deactivate, then Delete.
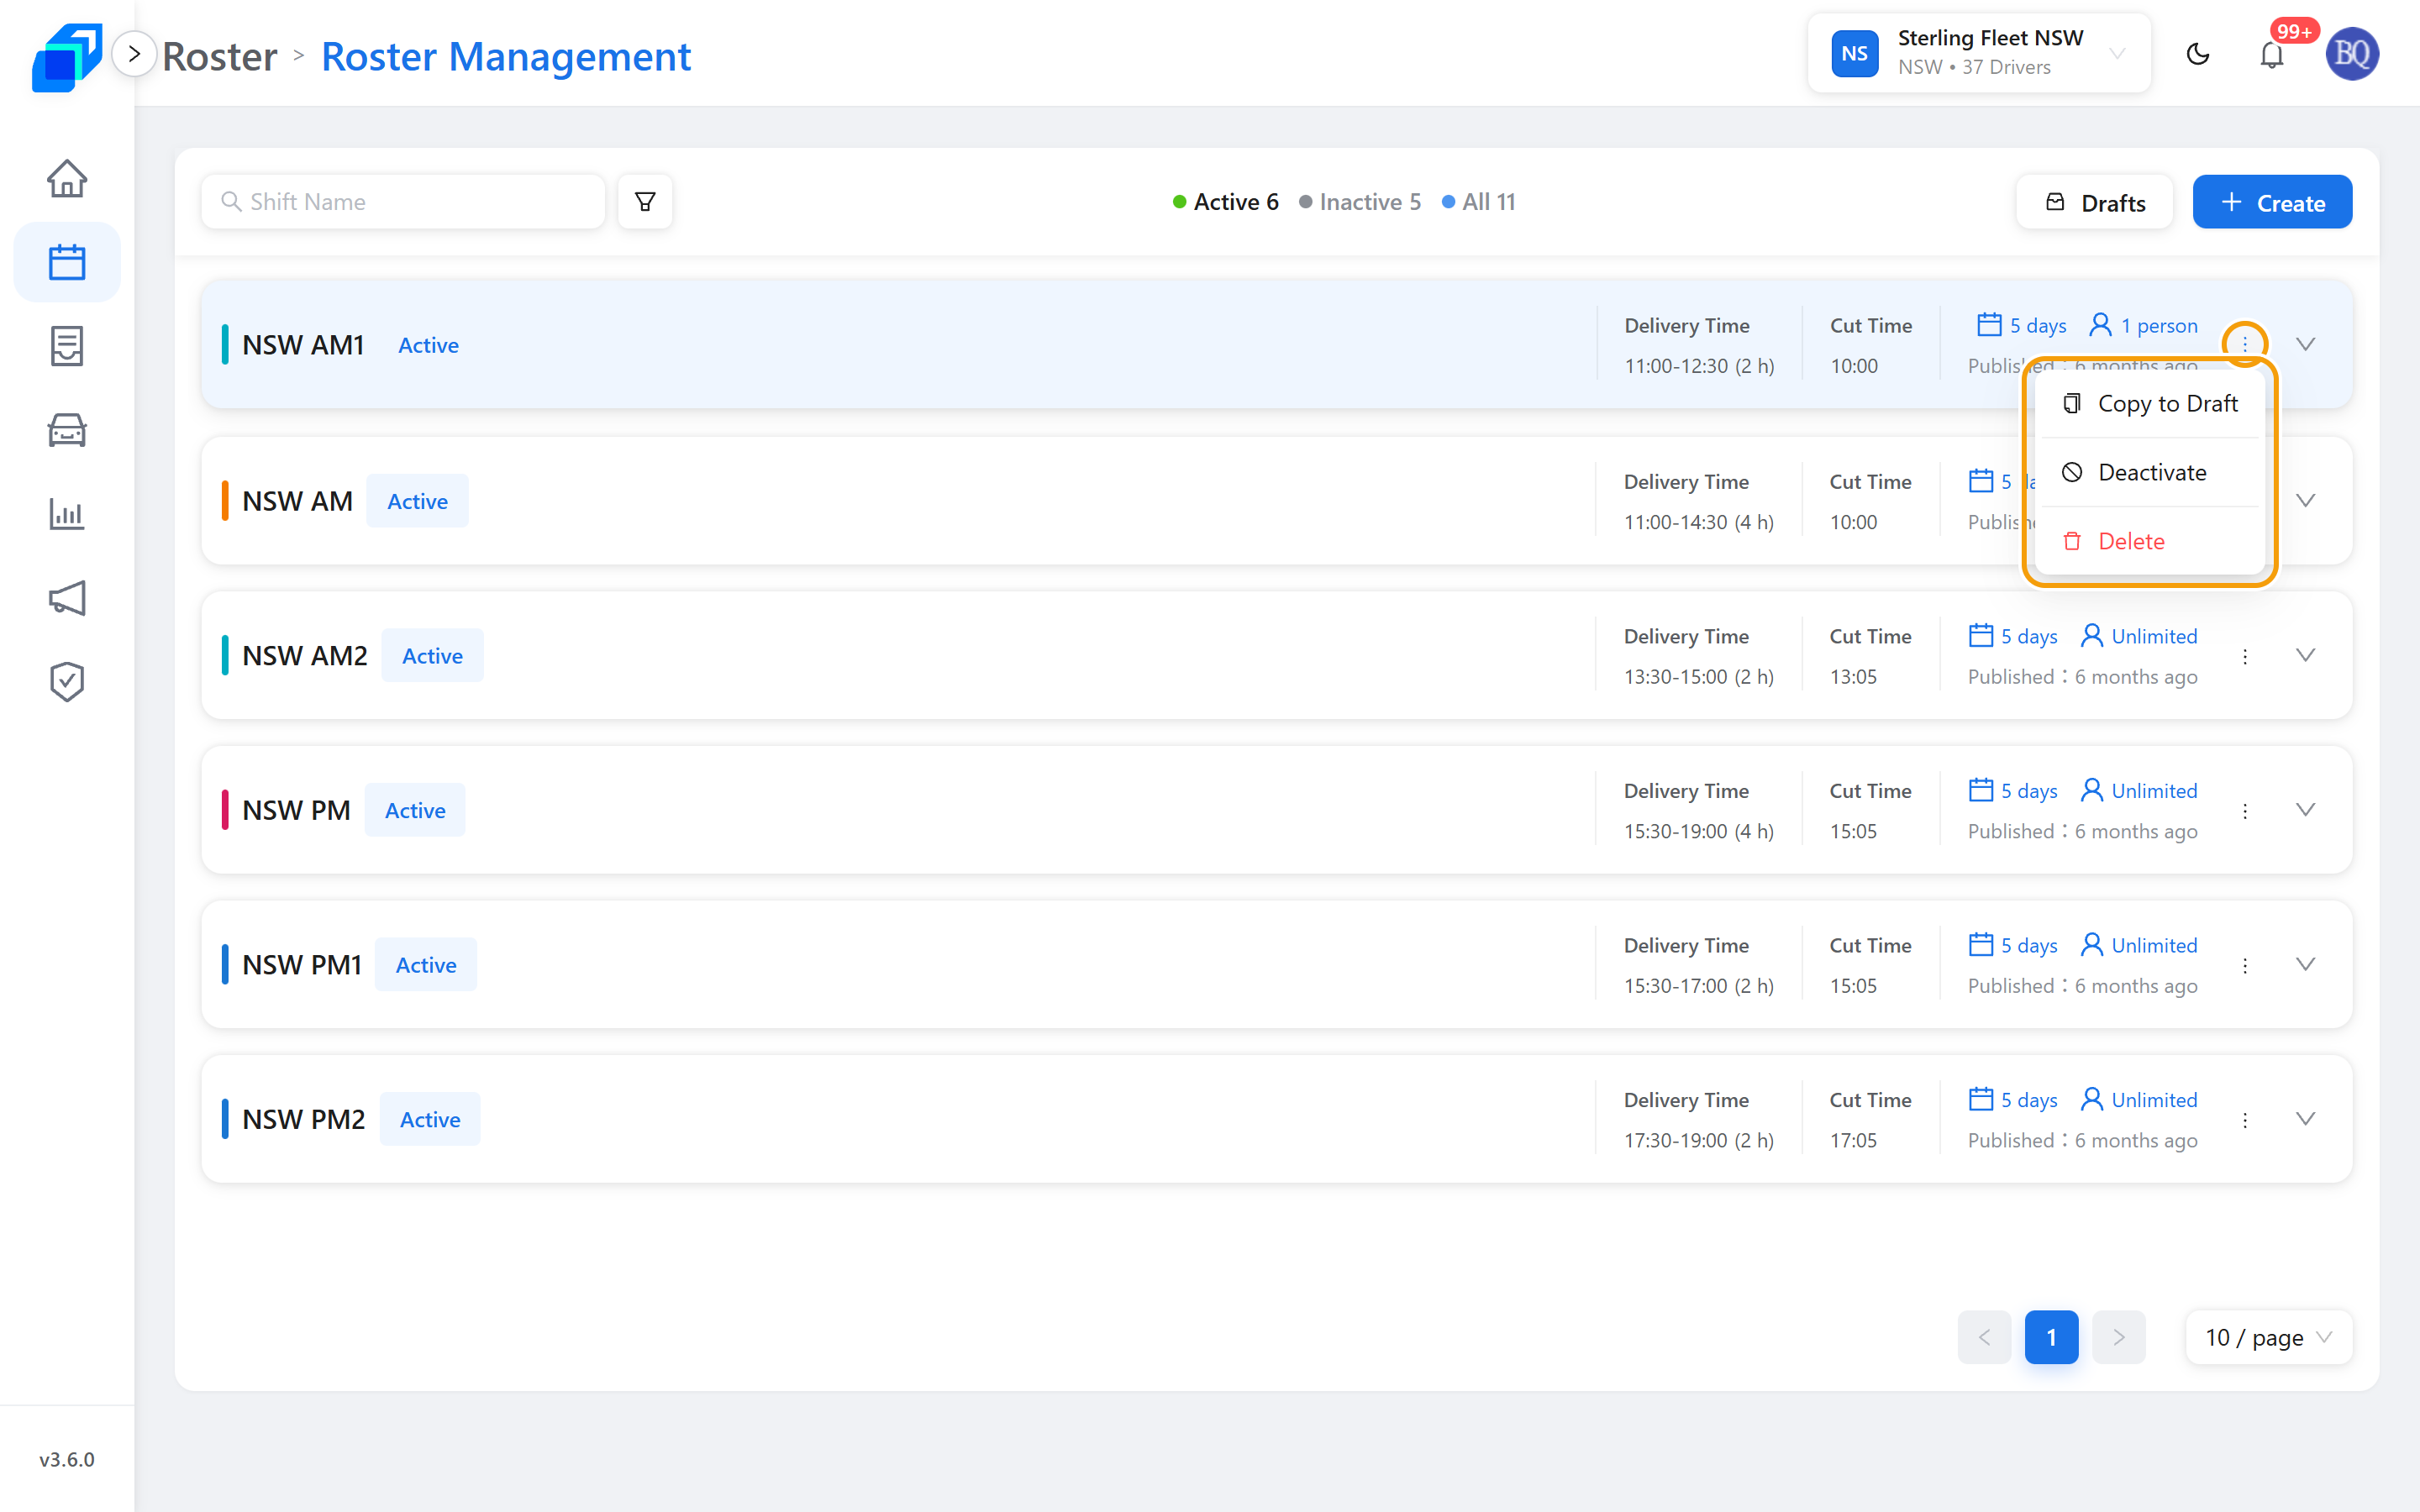
- On the shift page, click Copy to Draft.
You land on Drafts and the toast says Shift copied to drafts. Click the copy's name to open it – the badge is Draft and Publish is in its header.
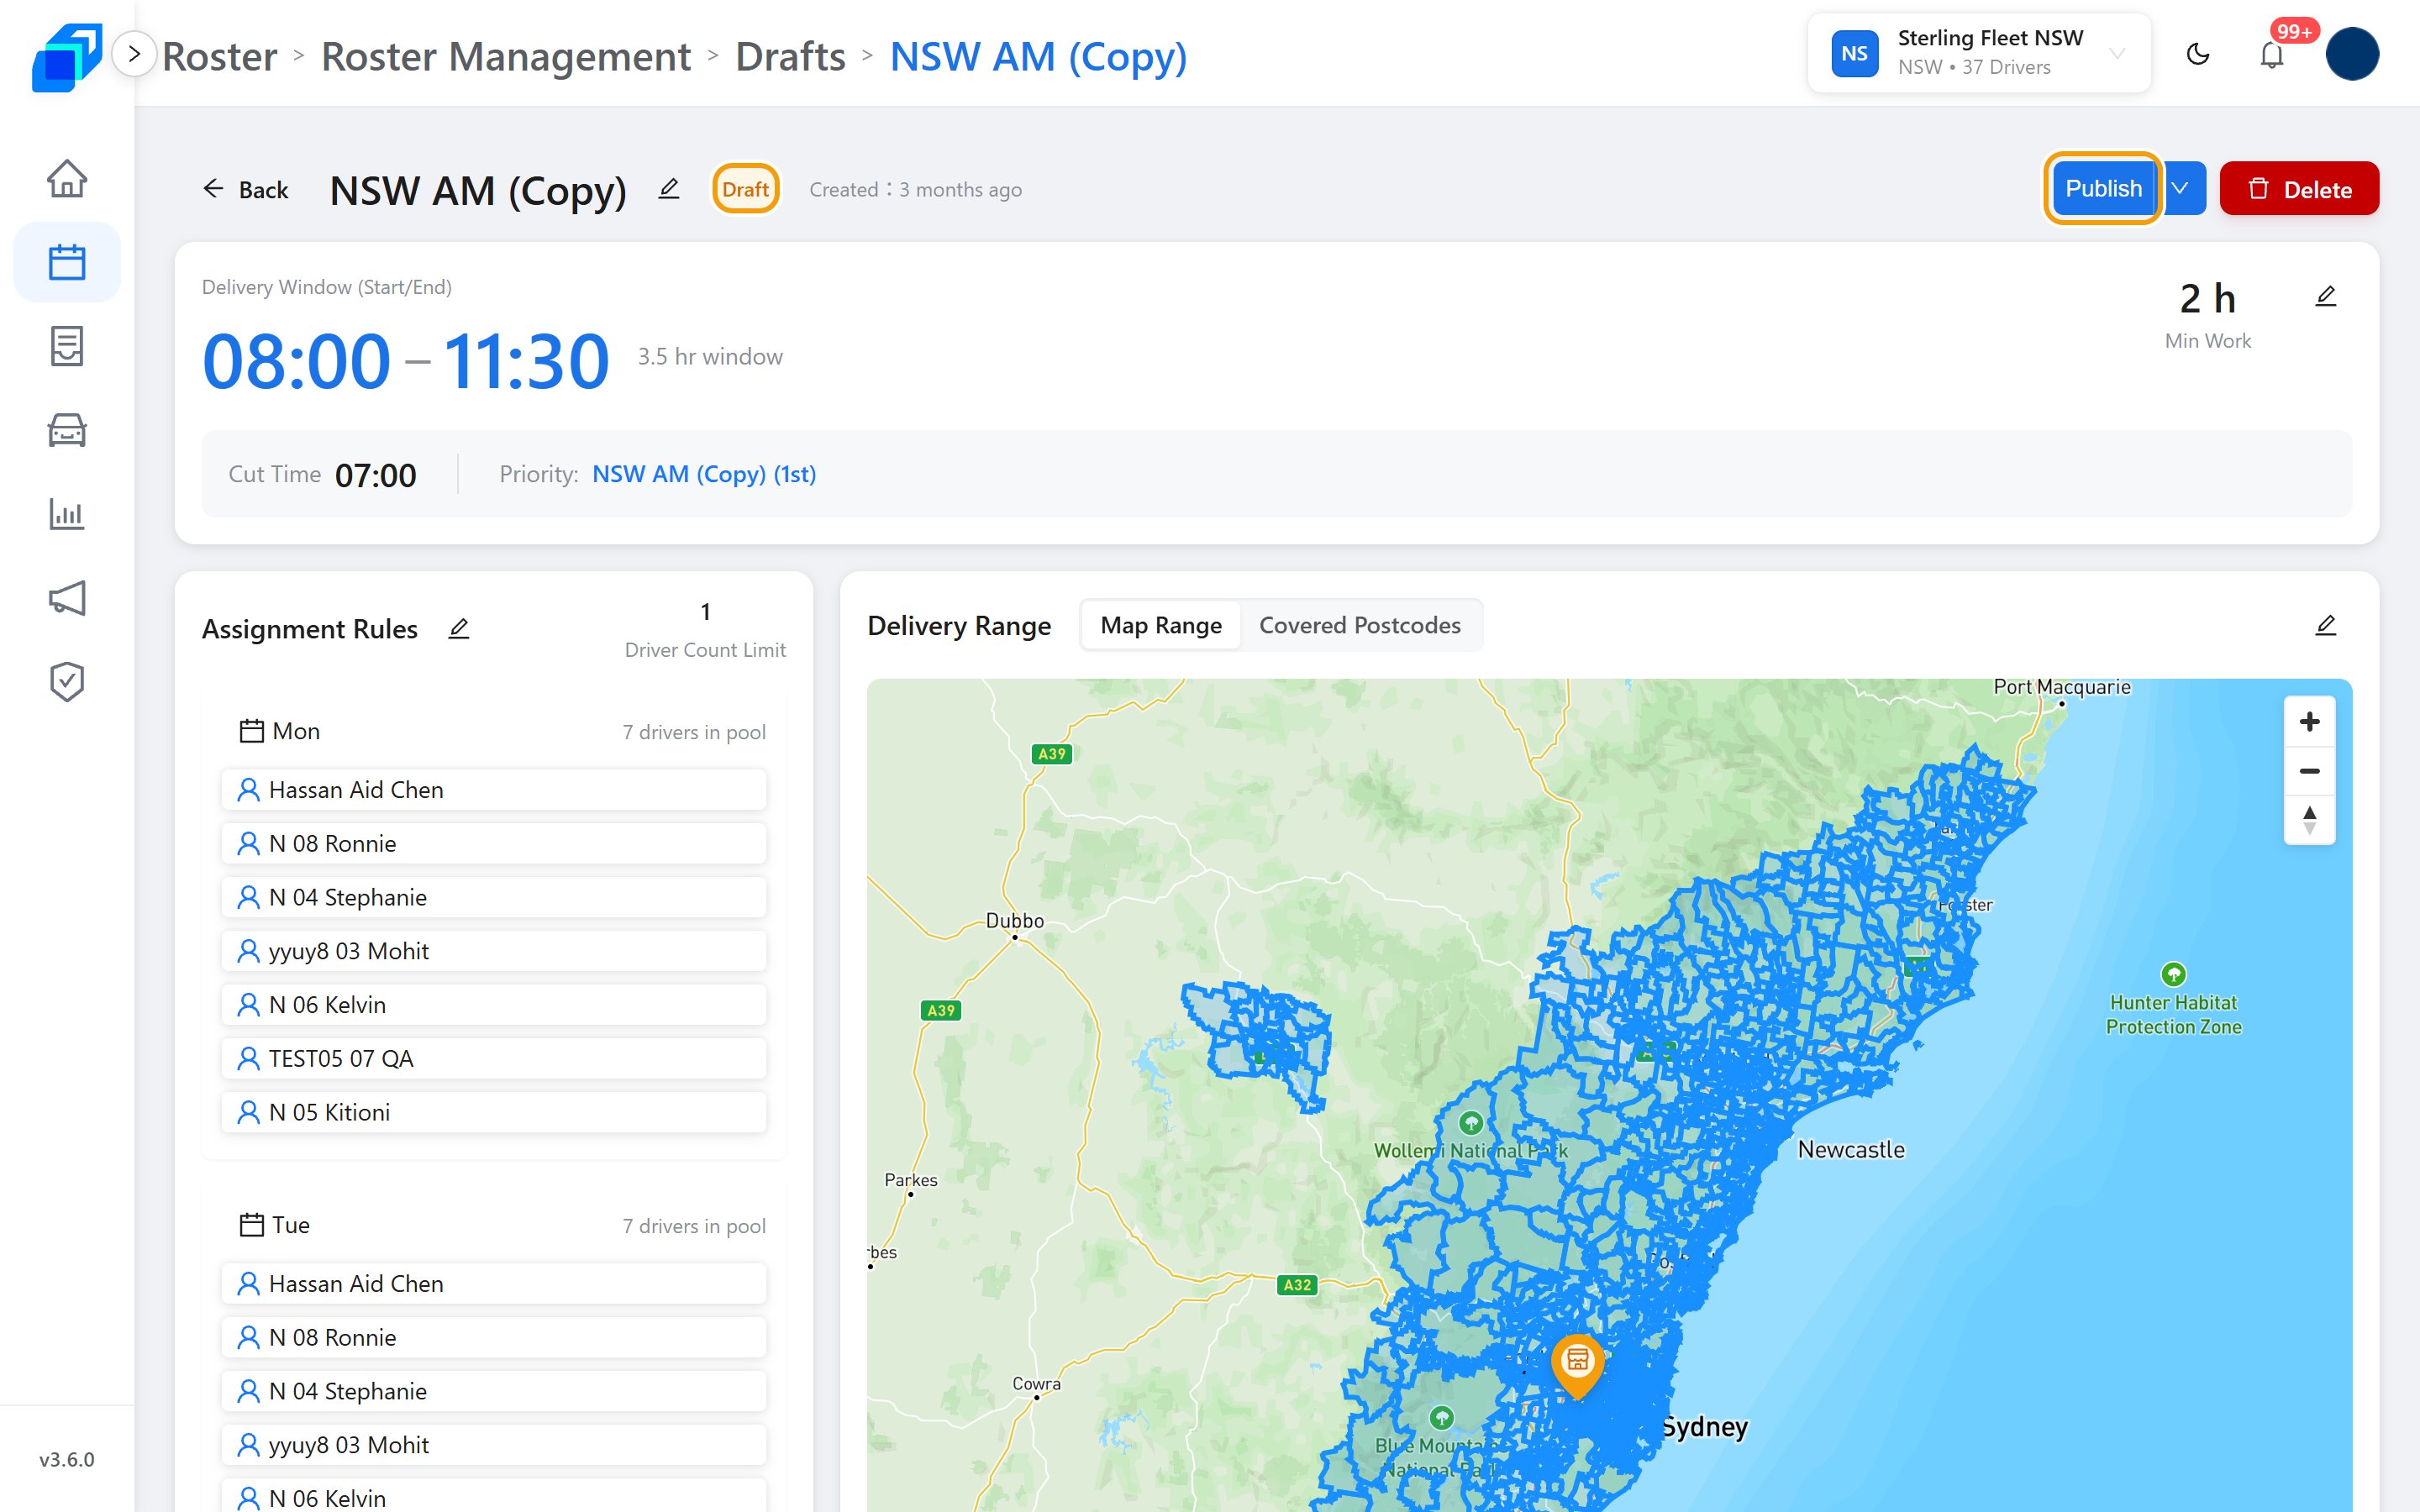
Edit the copy without touching the live shift. When it is right, Publish, or open the caret and click Schedule.
5. Schedule a draft – SET UP
On a draft, open the caret next to Publish and click Schedule.
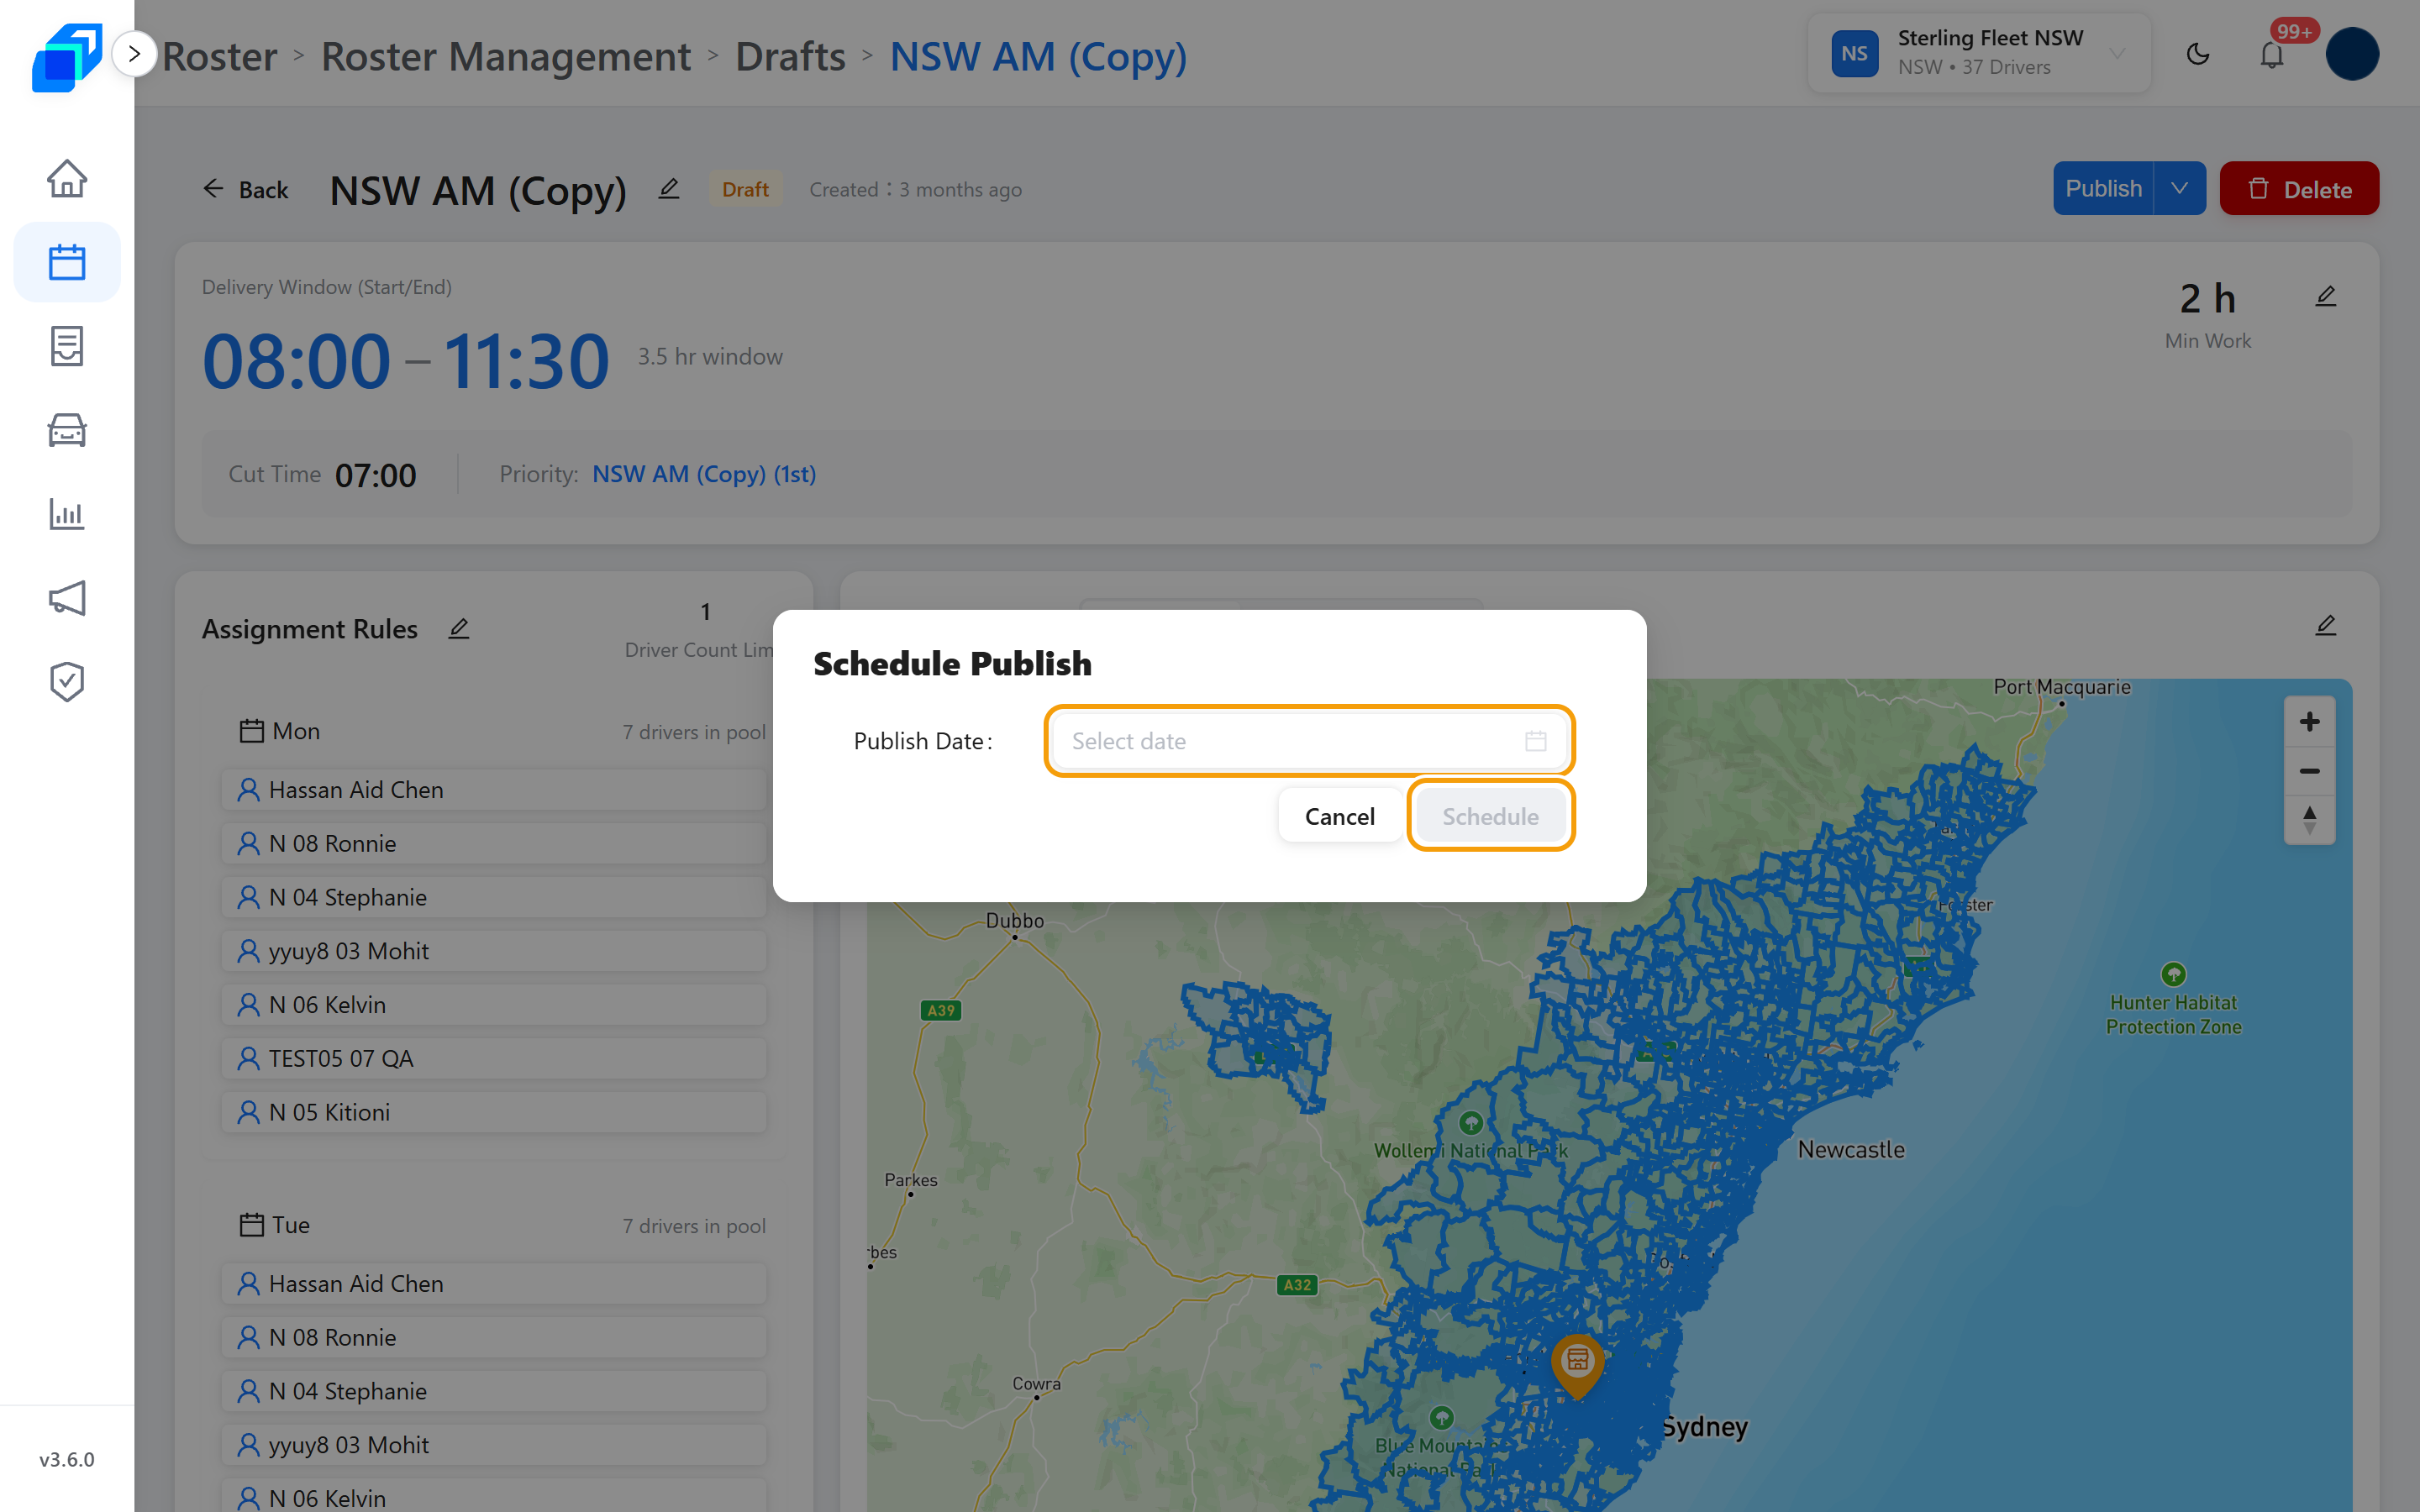
- Publish Date – the day it should go live.
- Click Schedule. The button stays disabled until you pick a date.
- Cancel leaves the draft.
You'll know it worked when the toast says the shift is scheduled for that date.
6. Edit times, priority and the driver pool – UPDATE
On the shift page, click the pencil next to the times. The card itself turns into the form – no dialog opens.
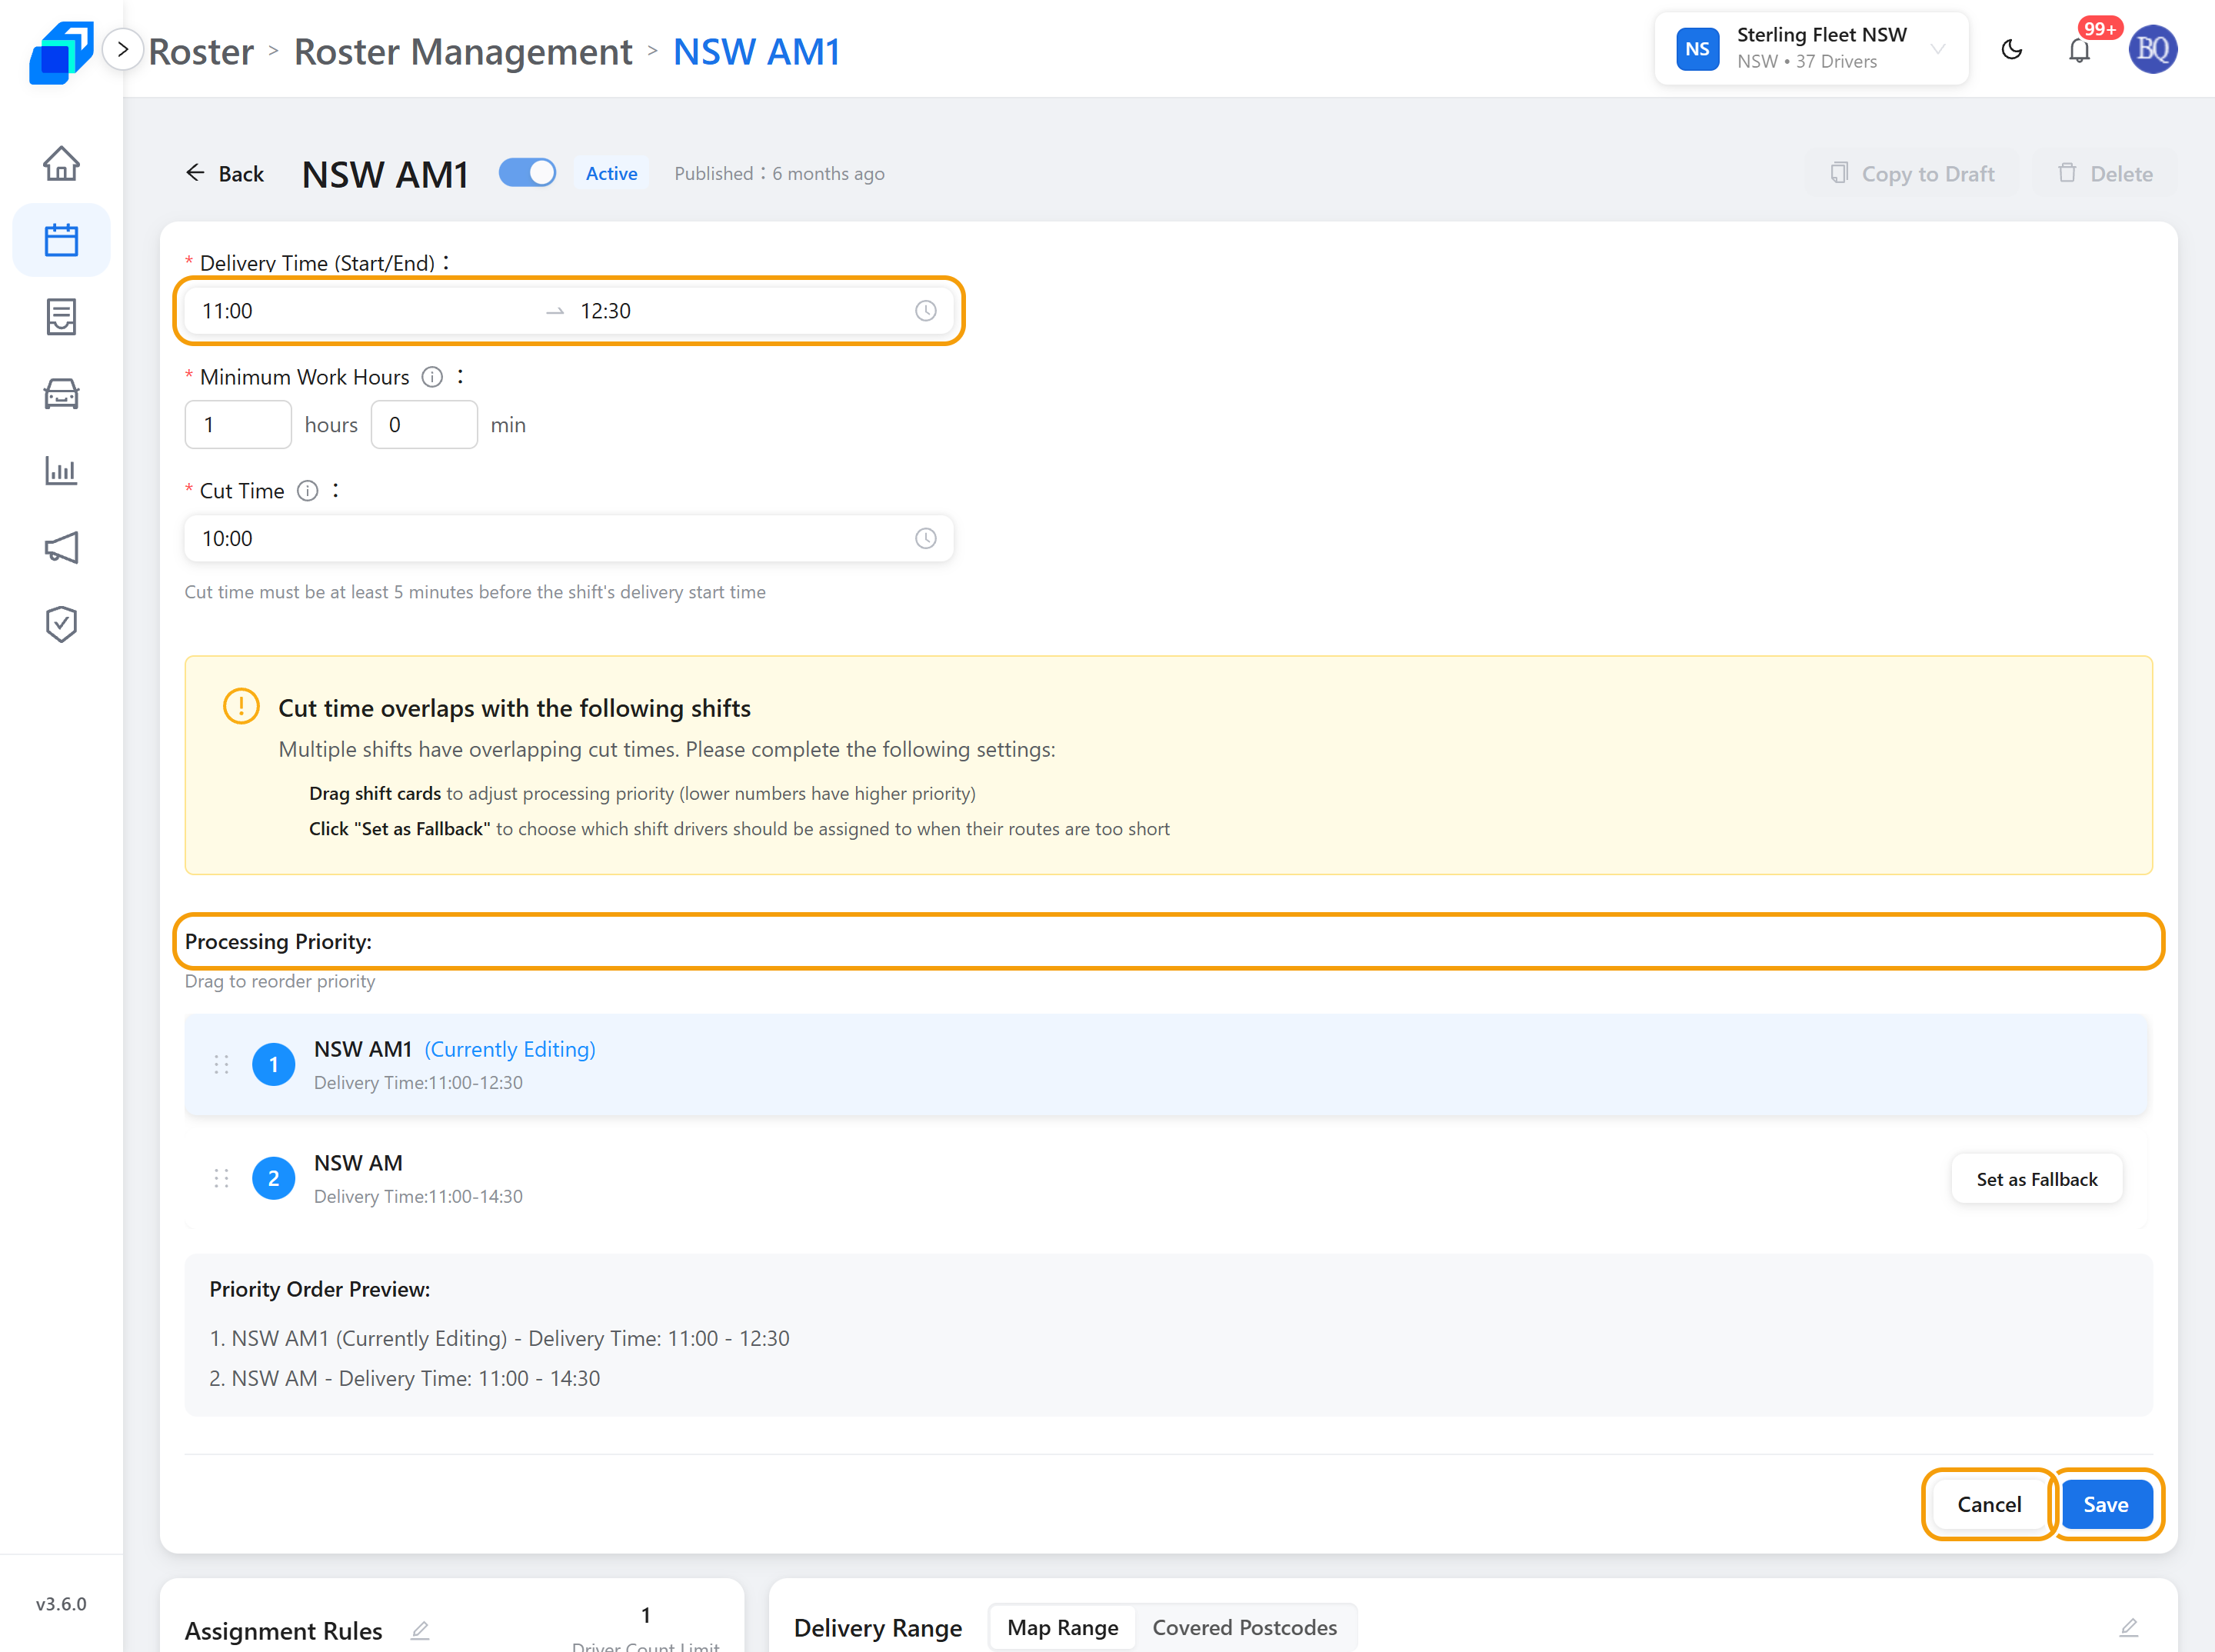
You can change Delivery Time, Minimum Work Hours, and Cut Time. Cut time must be at least five minutes before the shift's delivery start time.
If cut times overlap, the page shows Cut time overlaps with the following shifts. Then:
- Drag the cards under Processing Priority (lower number is first).
- Set as Fallback on the shift that should take leftover short routes.
- Check Priority Order Preview.
- Save.
Copy to Draft and Delete are disabled while you are editing. Discard if you do not want the change.
The shift name has its own pencil, beside the title. Type up to 50 characters, then press Enter or click away. Escape cancels.
To change who can take the shift, click the pencil on Assignment Rules. Change the days under Applicable Weekdays. Each day gets a card: pick names under Add Drivers to Pool, or click Copy Previous Day to reuse the day before. The bin icon removes that day from the shift. Click Save.
7. Redraw the delivery area – UPDATE
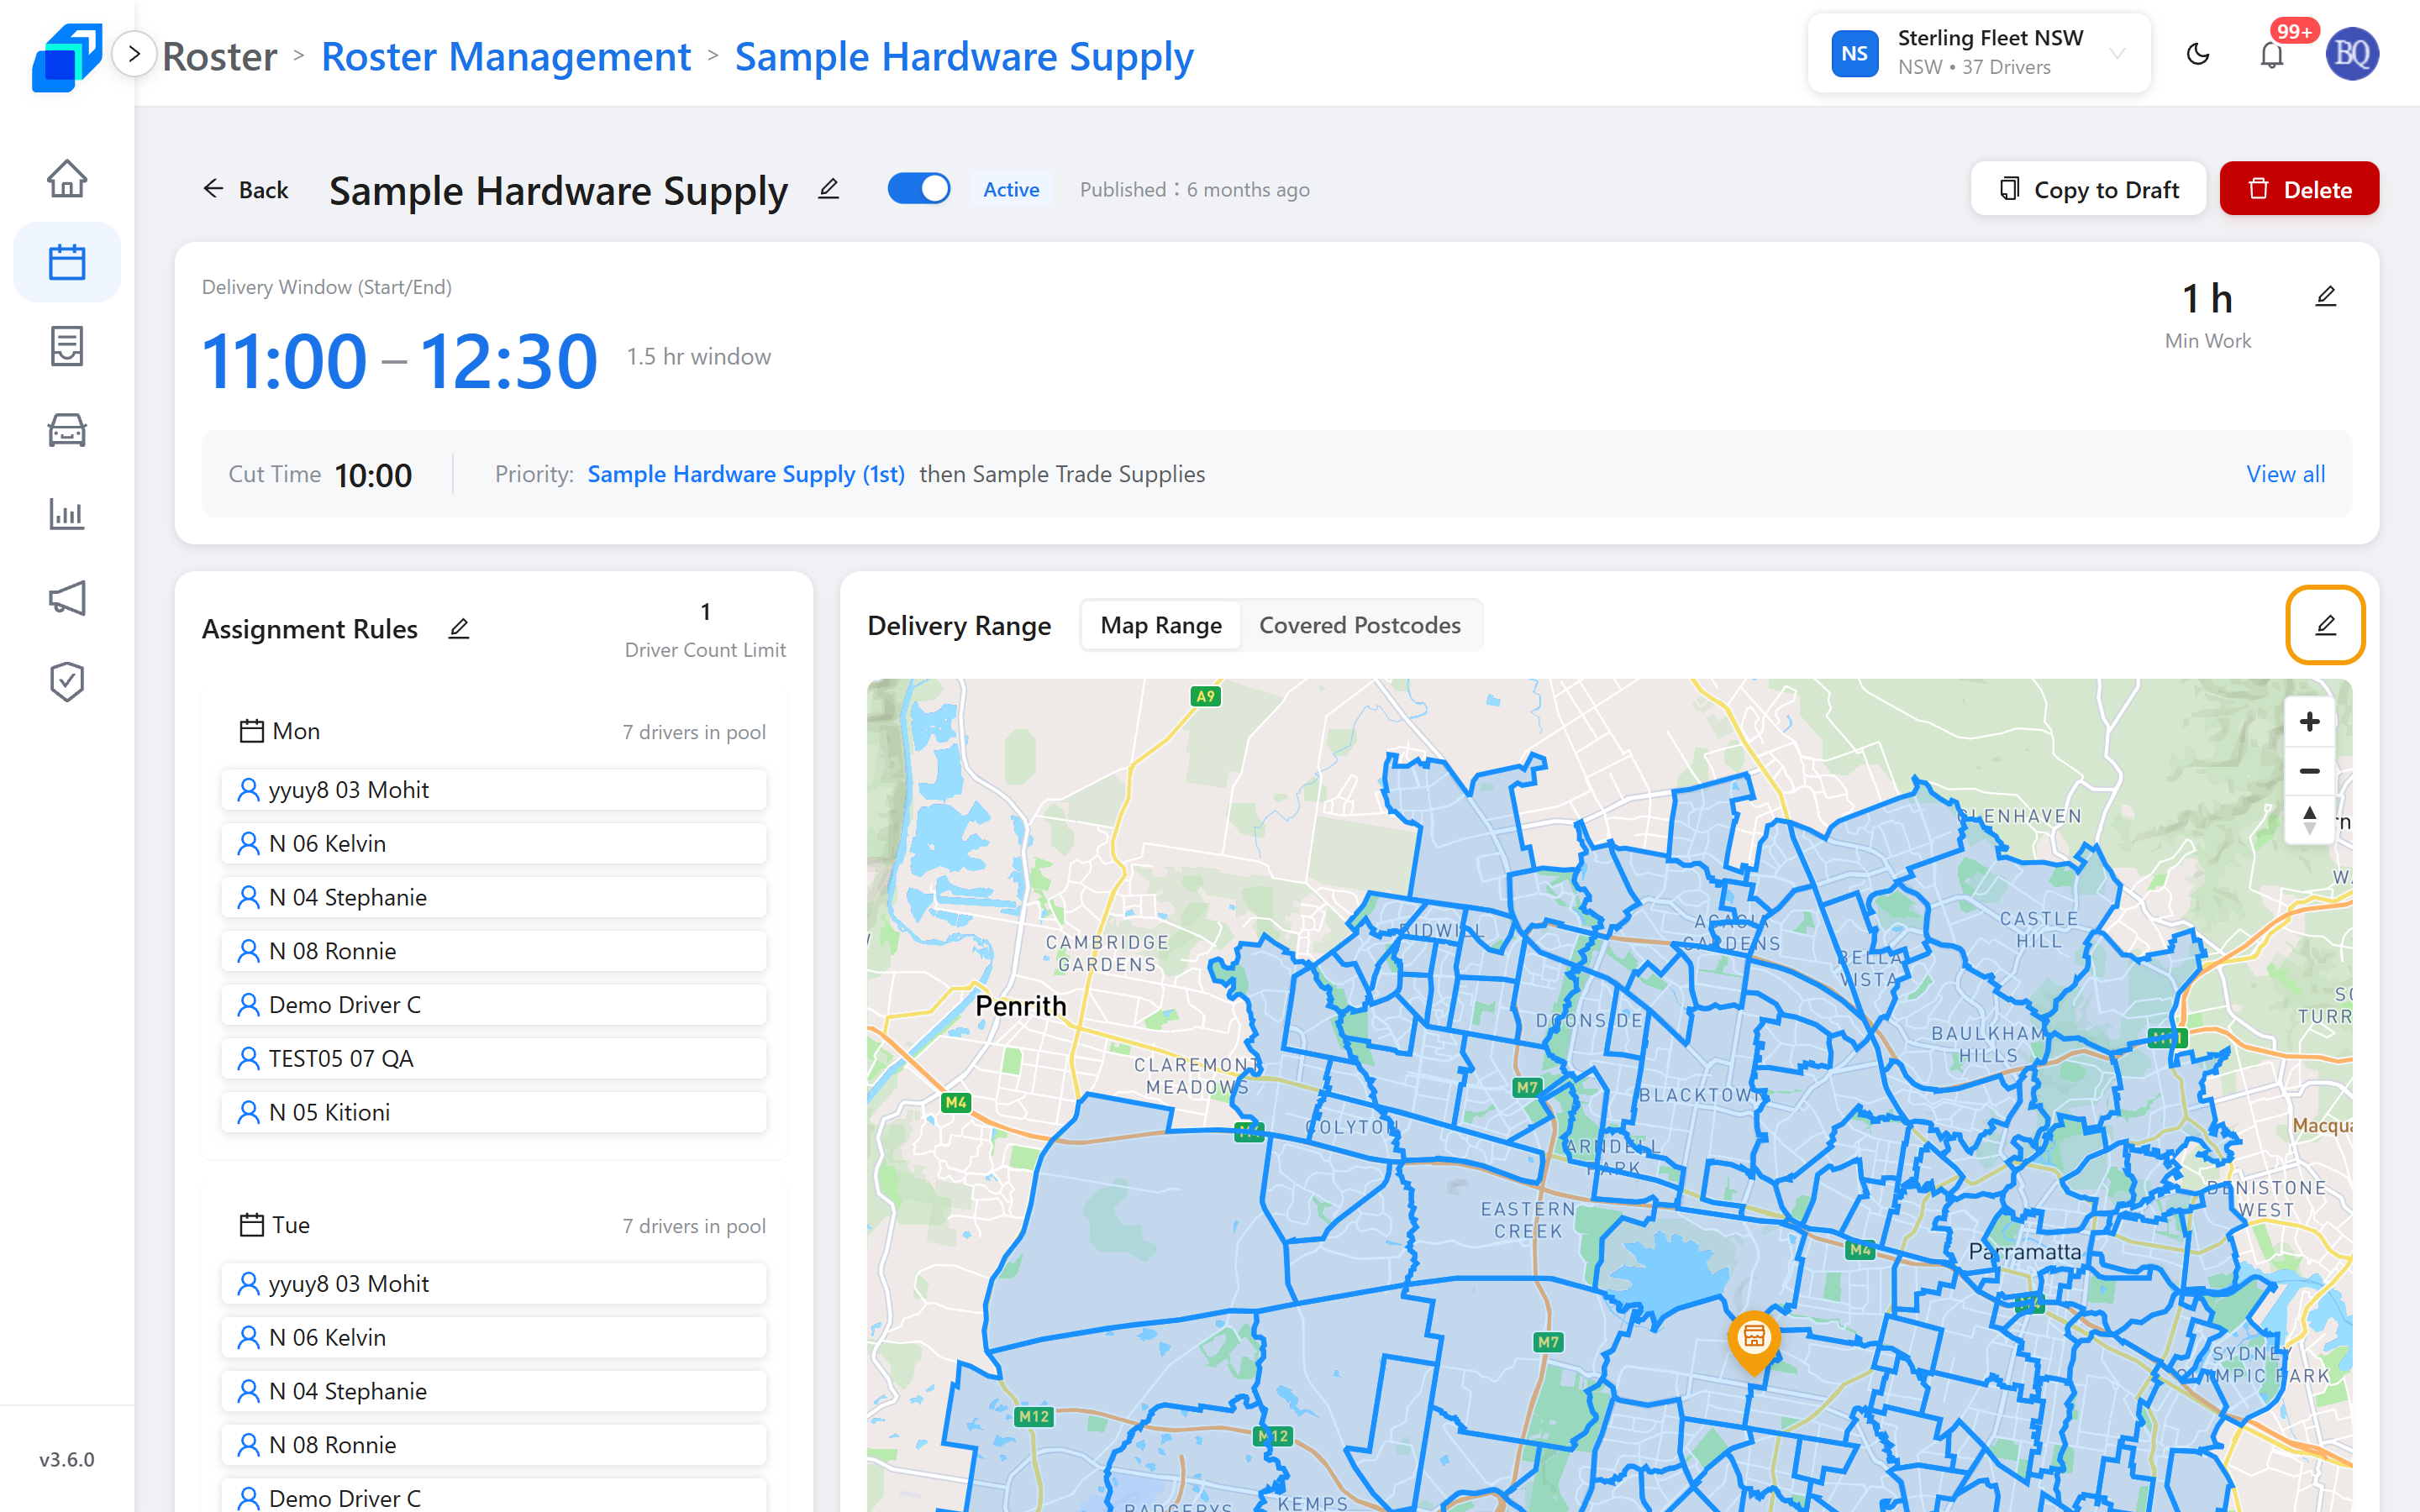
The delivery range defines the geographic boundary where orders can be fulfilled by this shift. Orders outside this boundary cannot be dispatched to this shift. On the shift detail page, find the Delivery Range card. The complete editing workflow consists of entering the editor, drawing boundaries, reviewing postcodes, saving, and verifying the completed state:
Step 1: Enter Edit
In the top-right corner of the Delivery Range card on the shift detail page, click the pencil icon (Edit). This opens the full-screen delivery area editor.
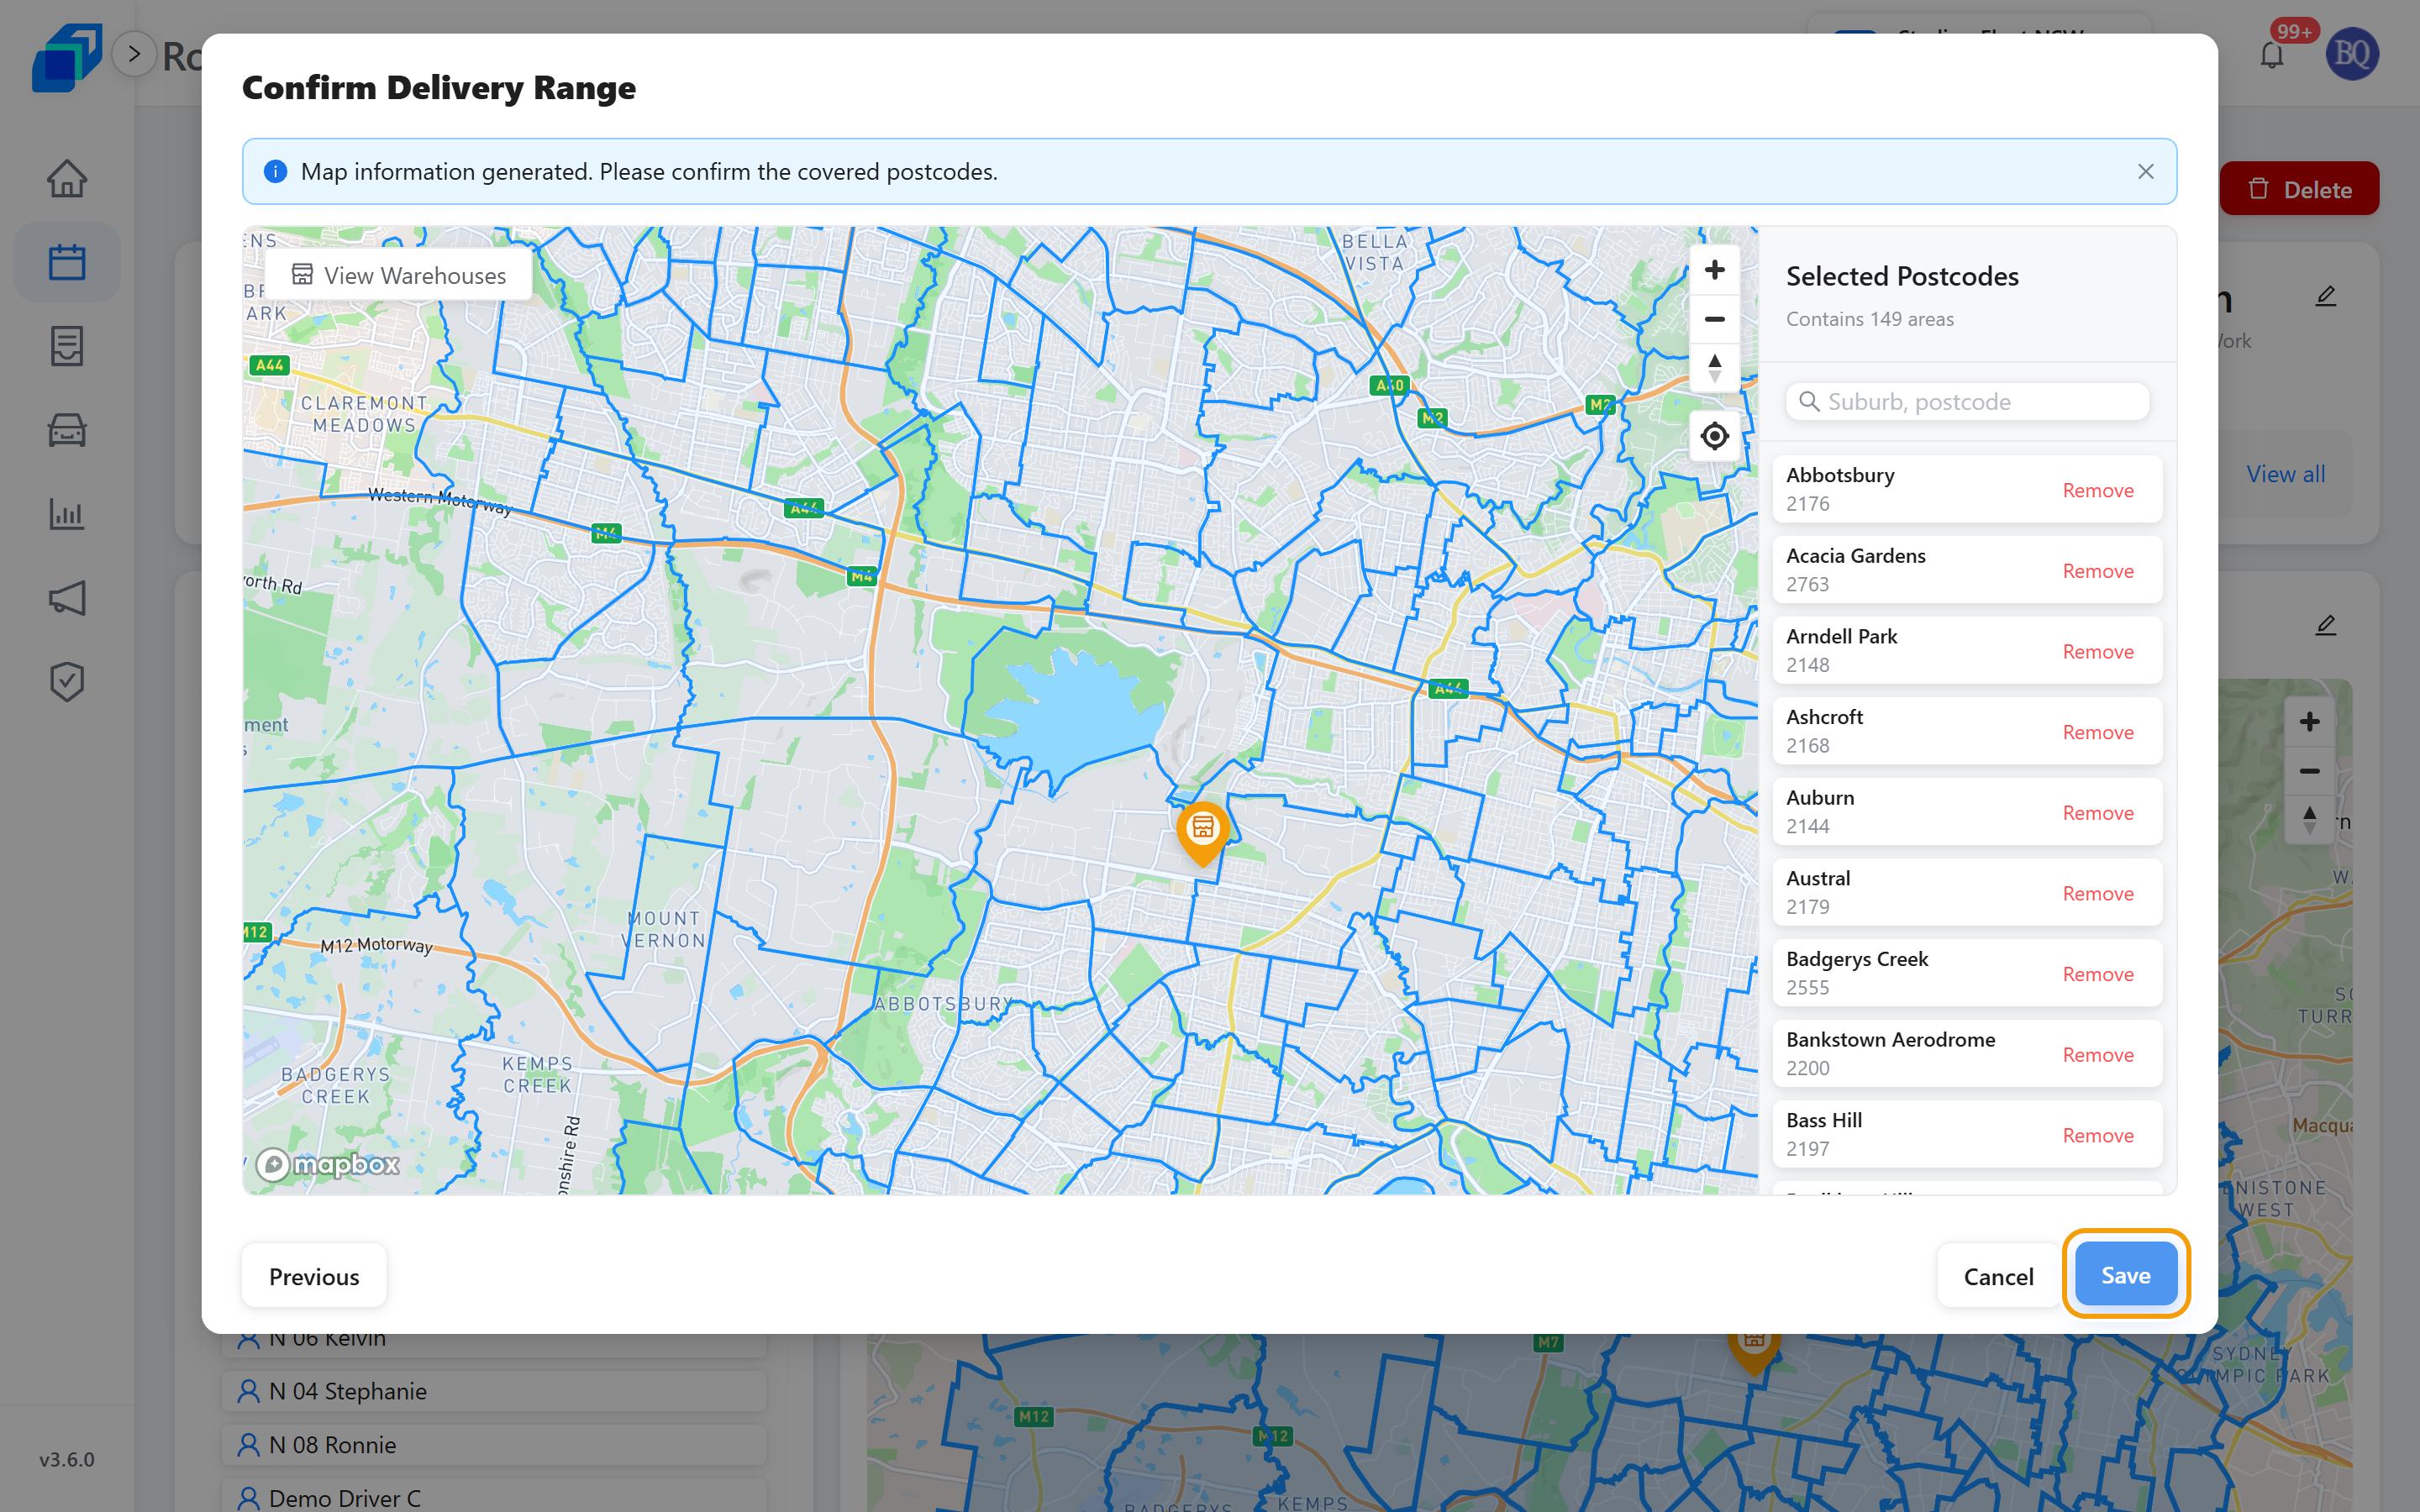
- If the shift already has an established delivery zone, the editor opens directly to the confirmation screen displaying the current postcode list (Confirm Delivery Range). Click Previous in the bottom-left corner to return to the map canvas if you wish to adjust the polygon shape.
- If the shift has no defined area yet, the editor opens directly to the map canvas under Select Delivery Range.
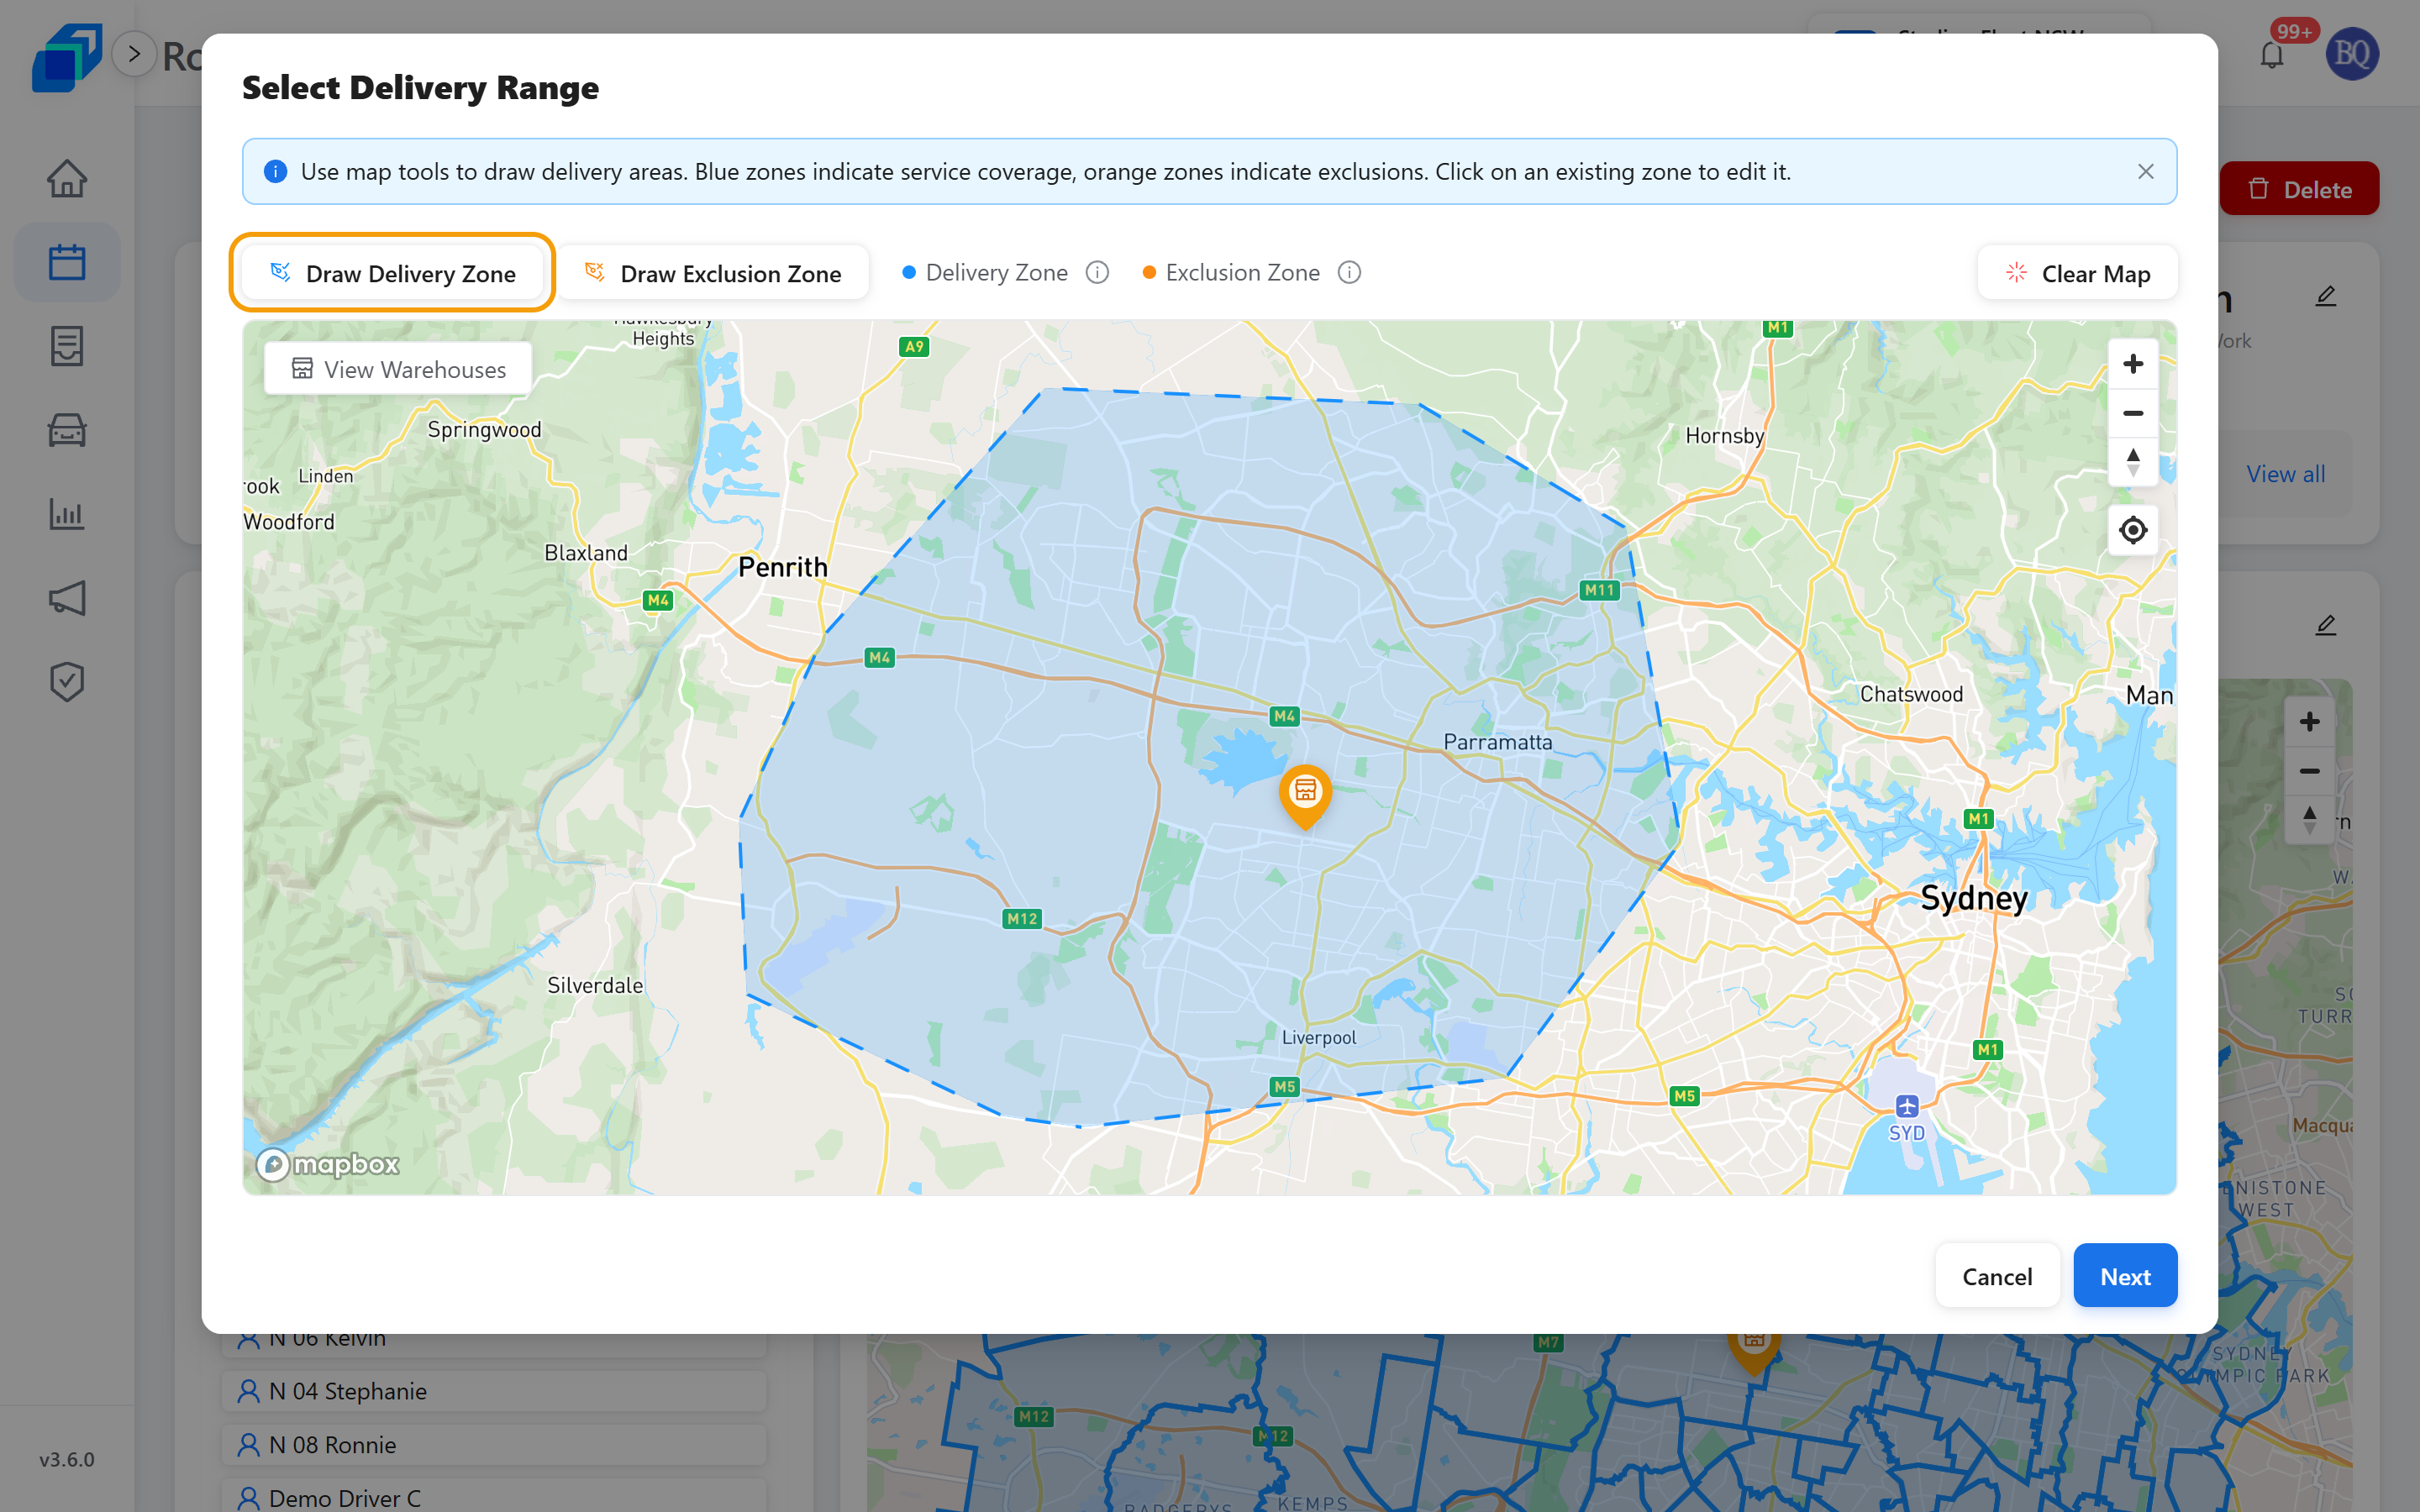
Step 2: Draw delivery zone and exclusion zone
On the map canvas, use the dedicated toolbar on the left to define your boundaries:
- Draw Delivery Zone: Click to enter blue drawing mode. Click points on the map to create a polygon representing the primary service area, and double-click to close and finish the polygon. You can create multiple delivery zones.
- Draw Exclusion Zone: If there are specific areas within your delivery zone that drivers should not service (such as remote terrain or non-serviced pockets), click to enter orange drawing mode and draw a polygon inside the delivery area. This area is carved out of the effective coverage.
- Reshape existing zones: Click an existing polygon on the map to select it, then drag its vertices to adjust the shape. Press
Escto cancel the current drawing action. - Helper tools:
- View Warehouses: Expands the warehouse list; clicking a warehouse pans and centres the map on its location.
- Clear Map: Clears all drawn delivery and exclusion zones to start fresh.
- The Area Summary on the right updates in real time with the count of delivery zones, exclusion zones, and total coverage area.
- Once your boundaries are drawn, click Next in the bottom-right corner. You must draw at least one valid delivery zone before Next activates.
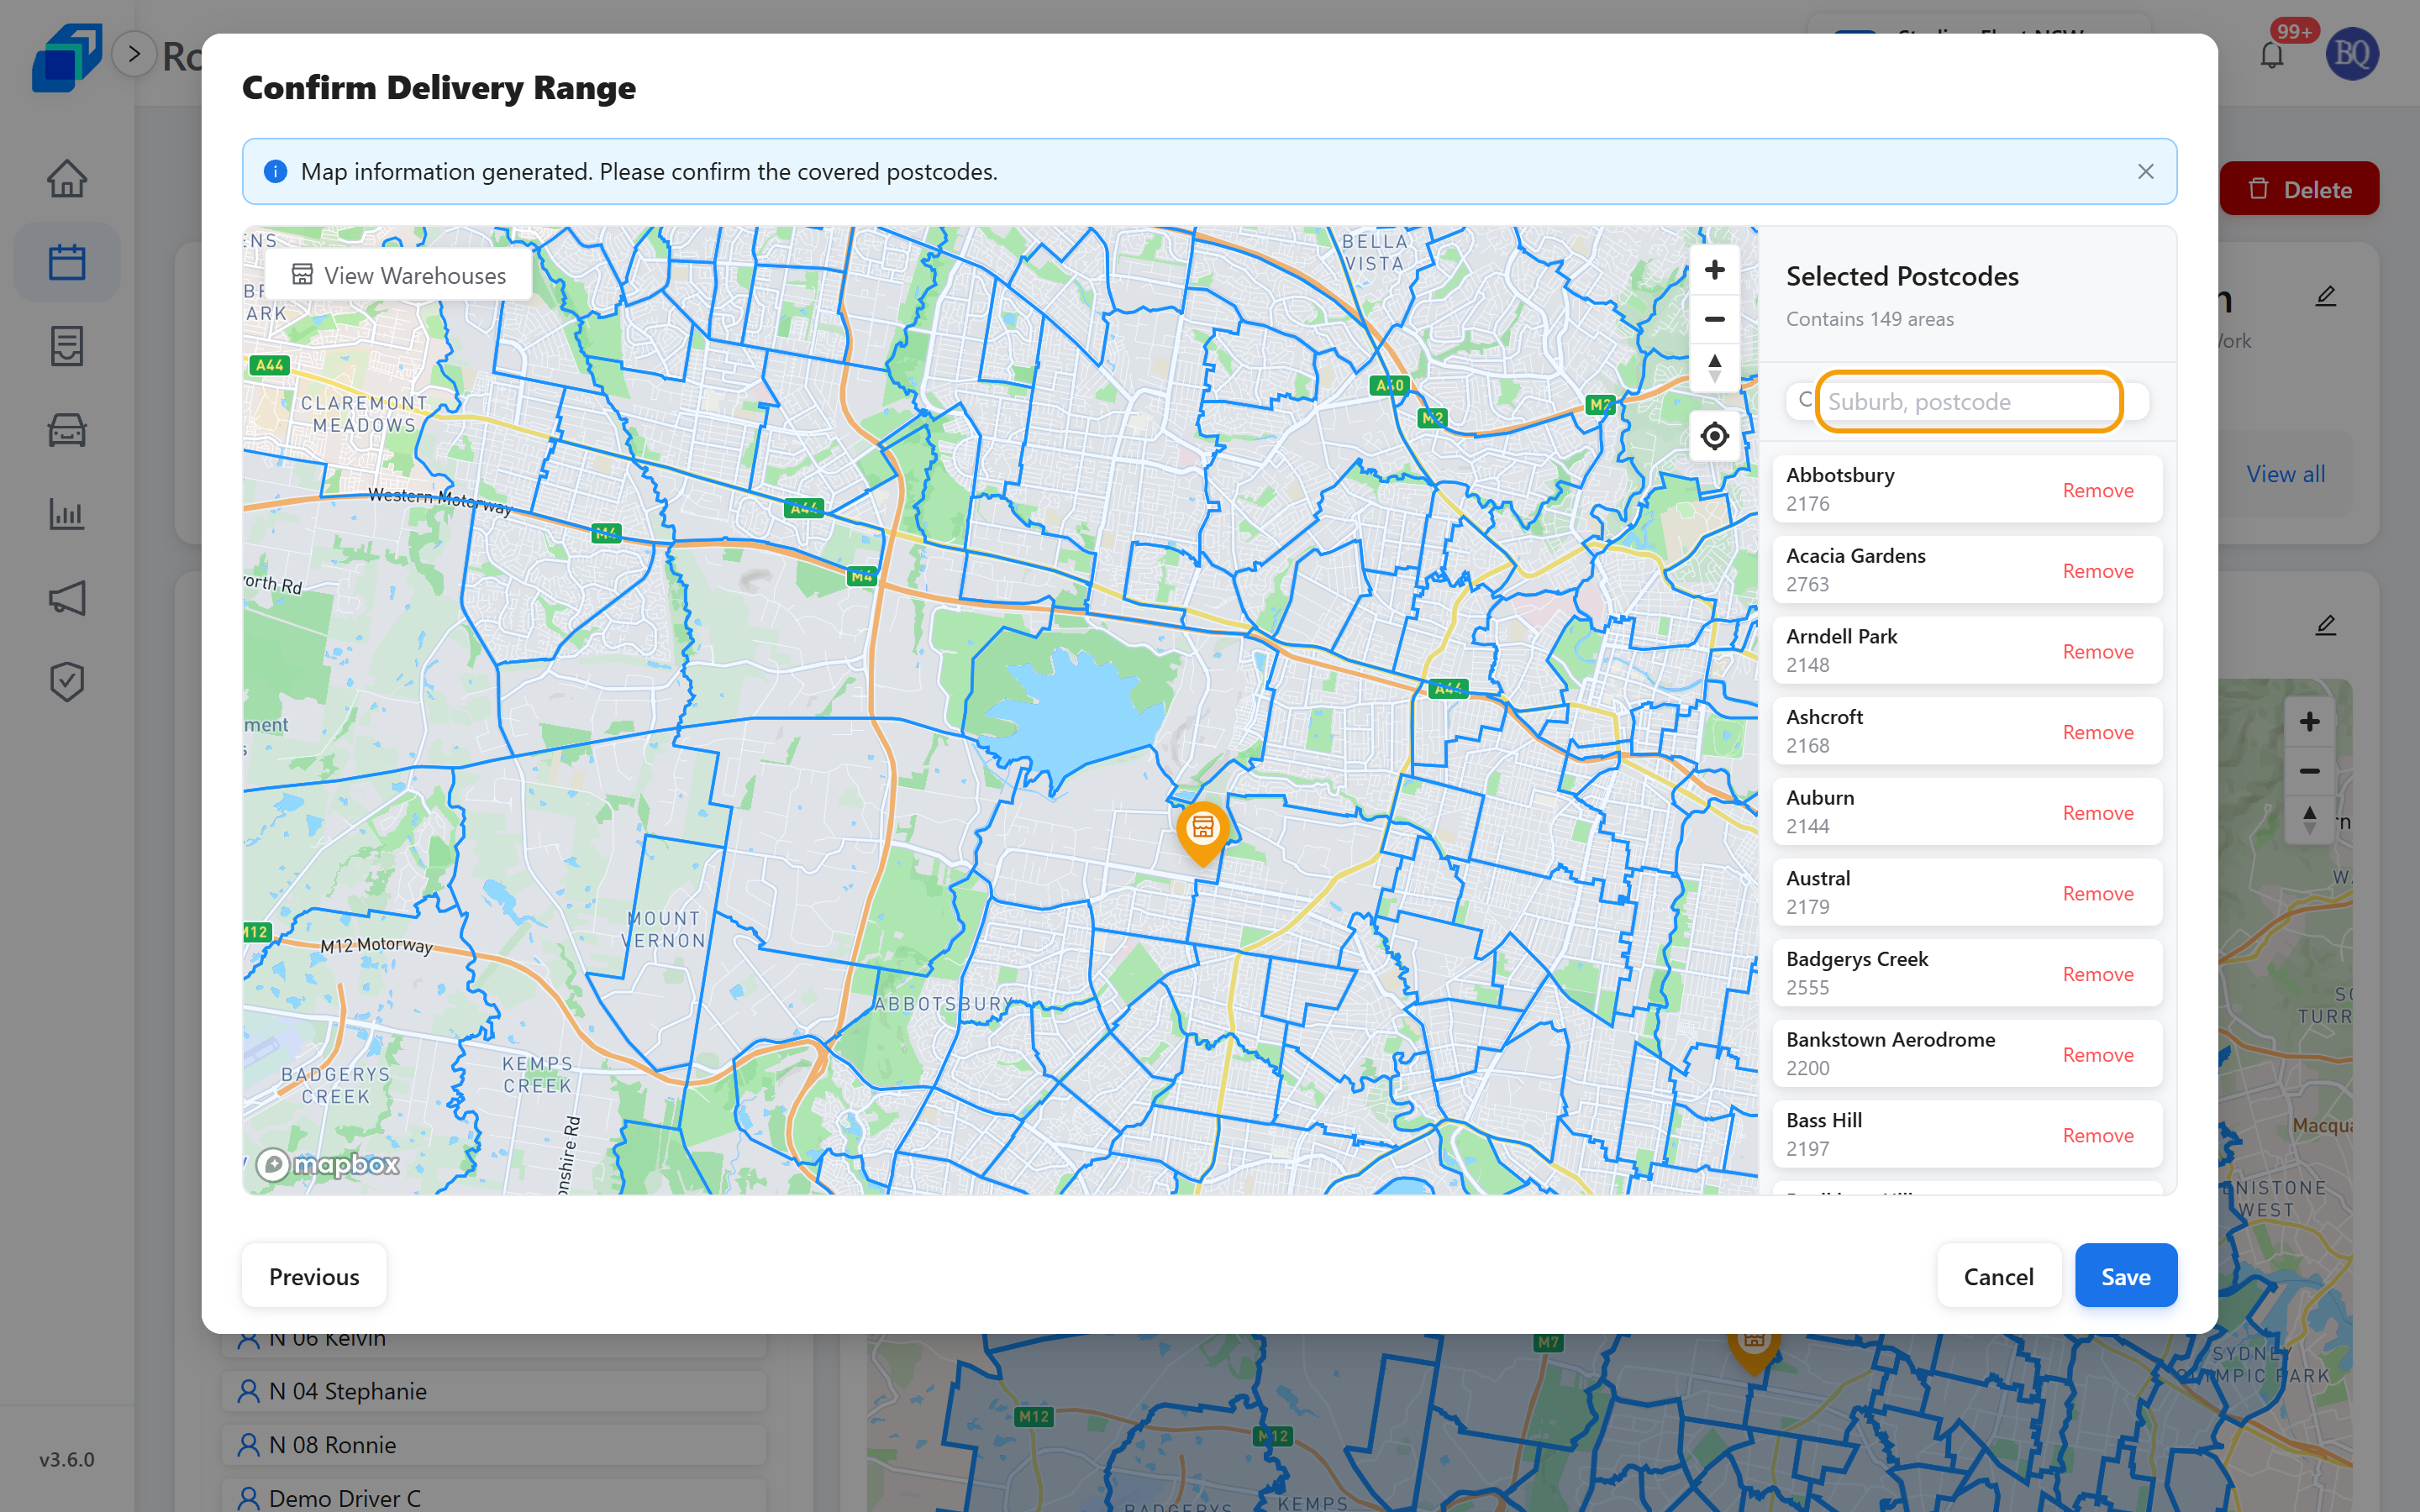
Step 3: Review covered postcodes
Clicking Next takes you to the Confirm Delivery Range screen. The map displays a purple cutout preview (Effective Coverage), and all suburbs and postcodes falling within your drawn polygon resolve automatically:
- Inspect coverage: The Selected Postcodes sidebar on the right shows the total count of covered areas alongside a detailed list of each suburb and postcode.
- Search: Use the Search postcode or suburb name field at the top to quickly check whether a specific suburb or postcode is included.
- Manual exclusion (Remove): If a postcode falls inside your drawn polygon but your team does not deliver there, click Remove next to that postcode to exclude it manually.
- Return to map: If the resolved coverage needs polygon adjustment, click Previous in the bottom-left corner to return to the drawing step.
Step 4: Save
Once the postcode list matches your dispatch requirements, click the blue Save button in the bottom-right corner.
- The editor closes, and the updated zones and postcode records are saved to the shift.
- To discard edits at any time, click the close button or cancel; a Discard area changes? prompt will confirm before reverting to the original configuration.
Step 5: Check the finished shift
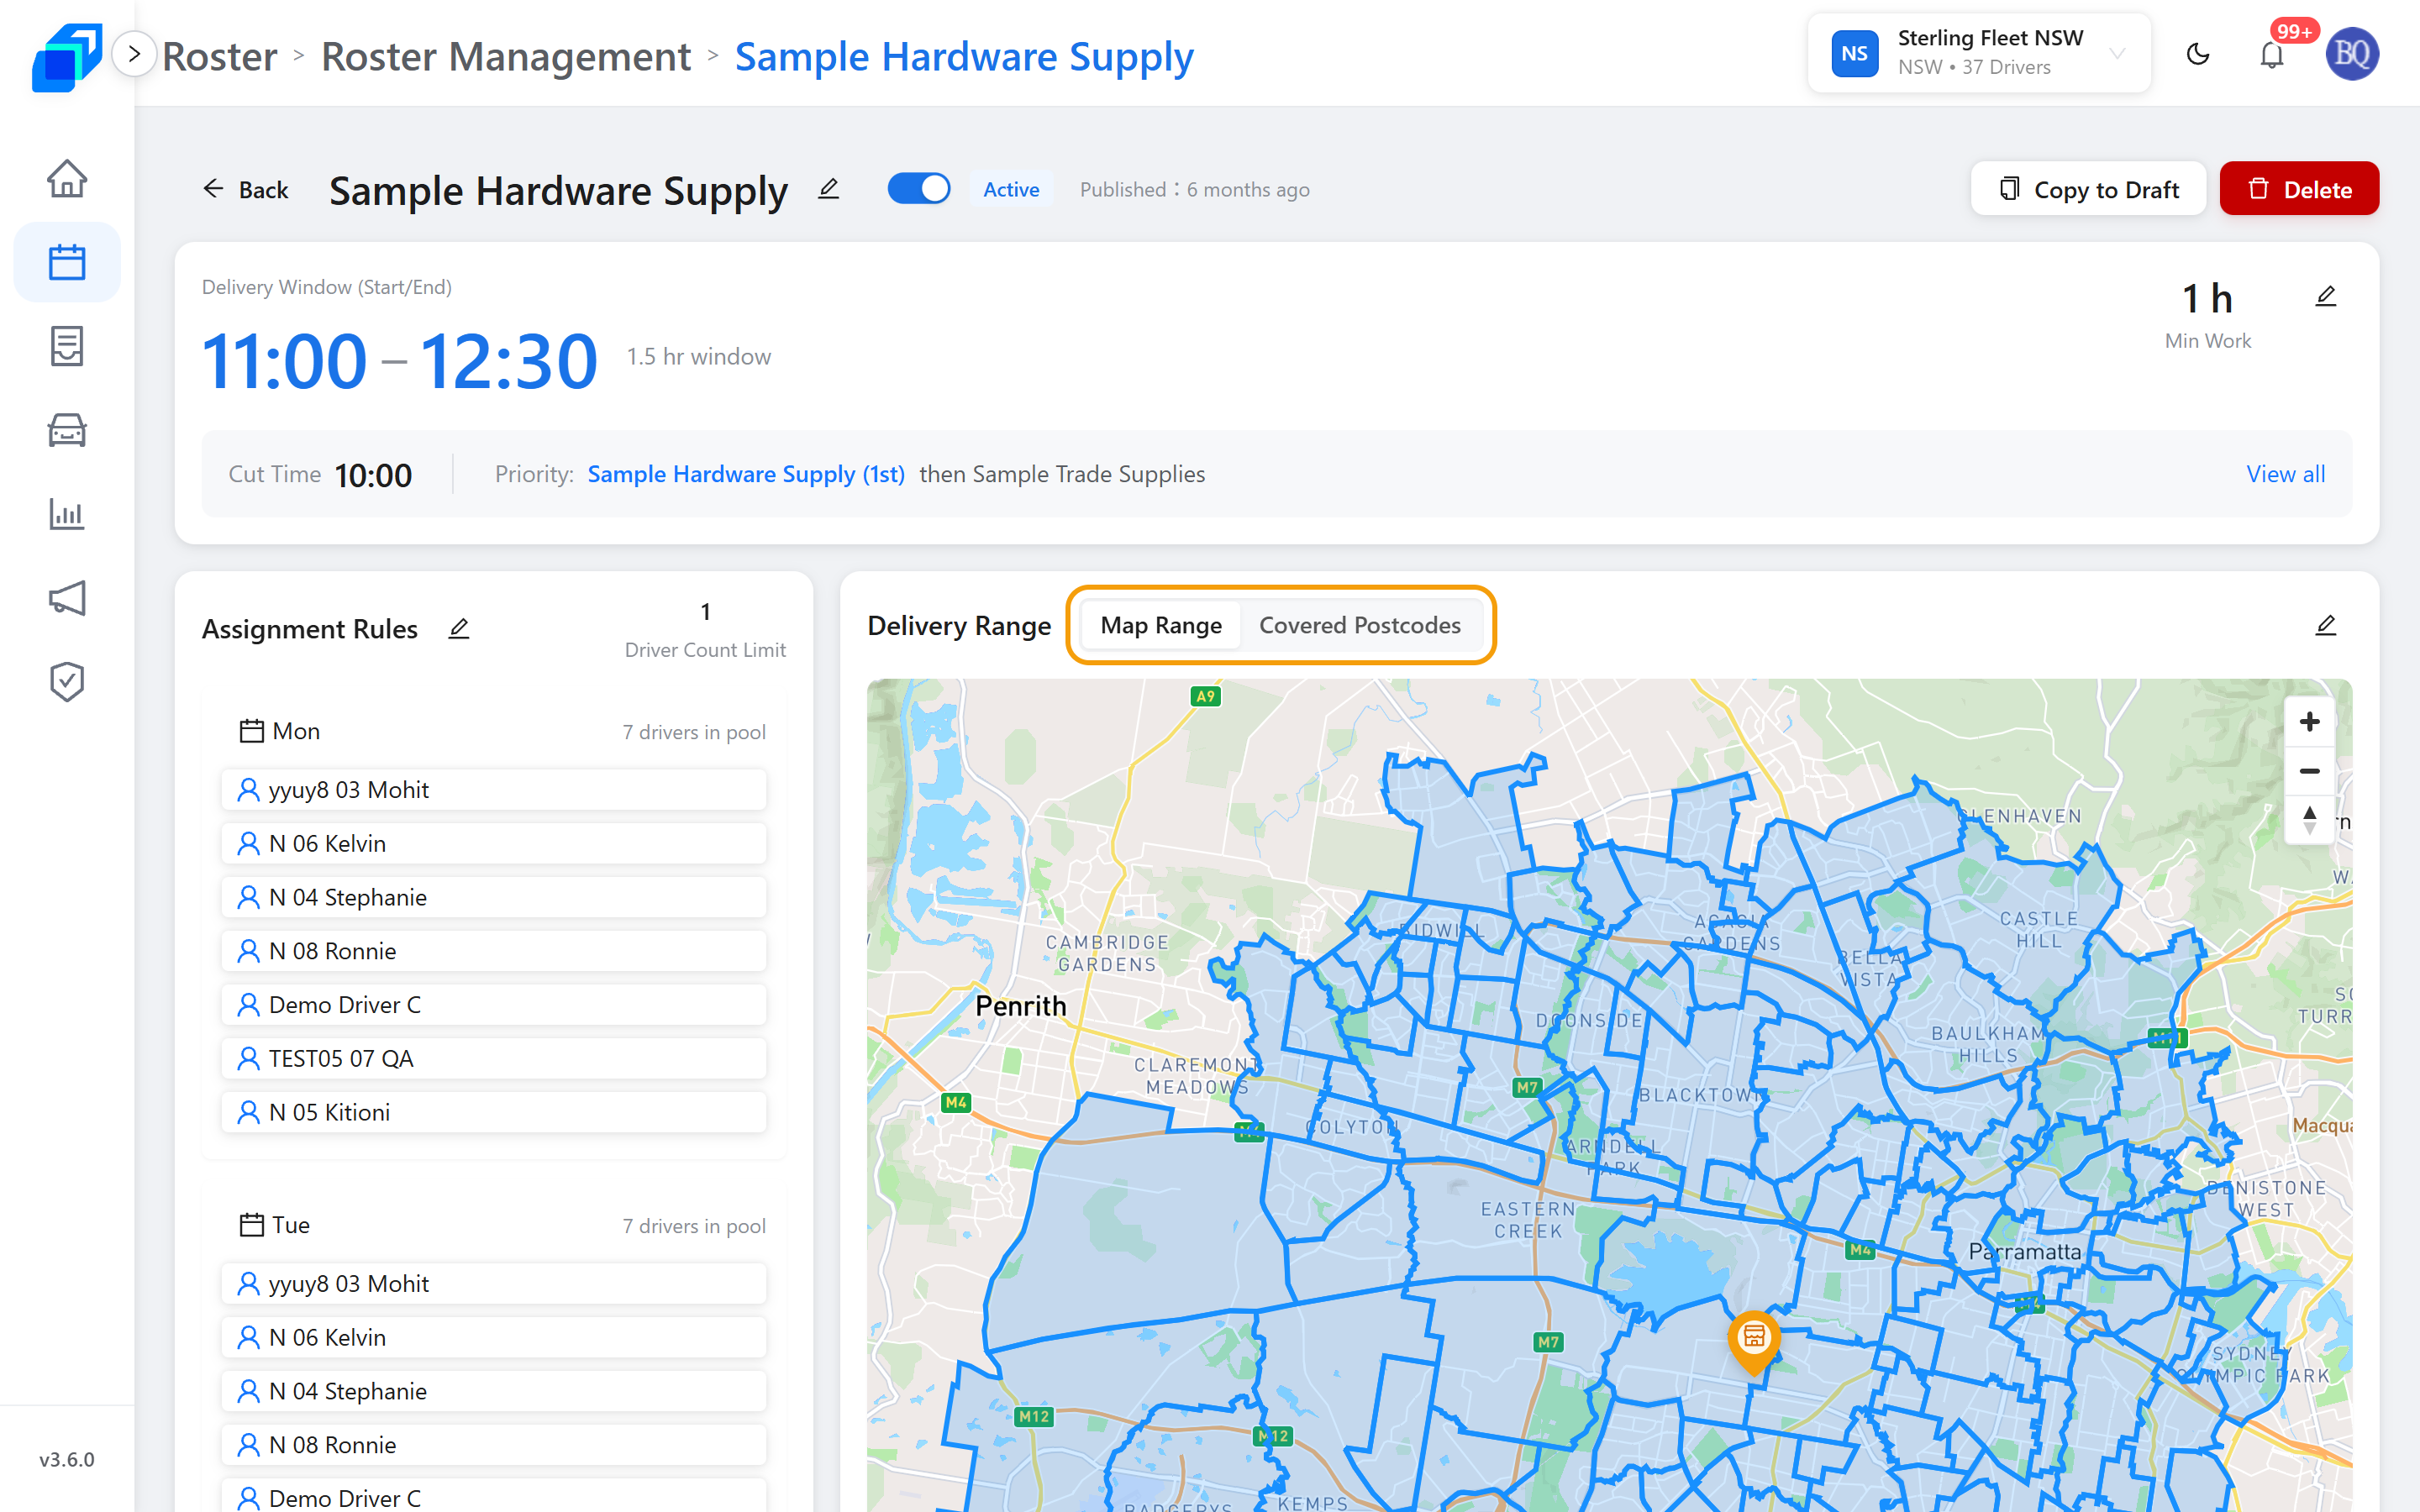
After saving, the Delivery Range card on the shift detail page immediately reflects the updated configuration across two tabs:
- Map Range: Shows the finalised polygon boundaries, cutouts, warehouse markers, and total area coverage.
- Covered Postcodes: Lists all confirmed suburbs and postal codes in a clean table format. Click the pencil icon again at any time to make future adjustments.
8. Check hours and distance for the week – VIEW
On the calendar, click Weekly Record. That opens the week's hours and distance per driver, planned against actual.
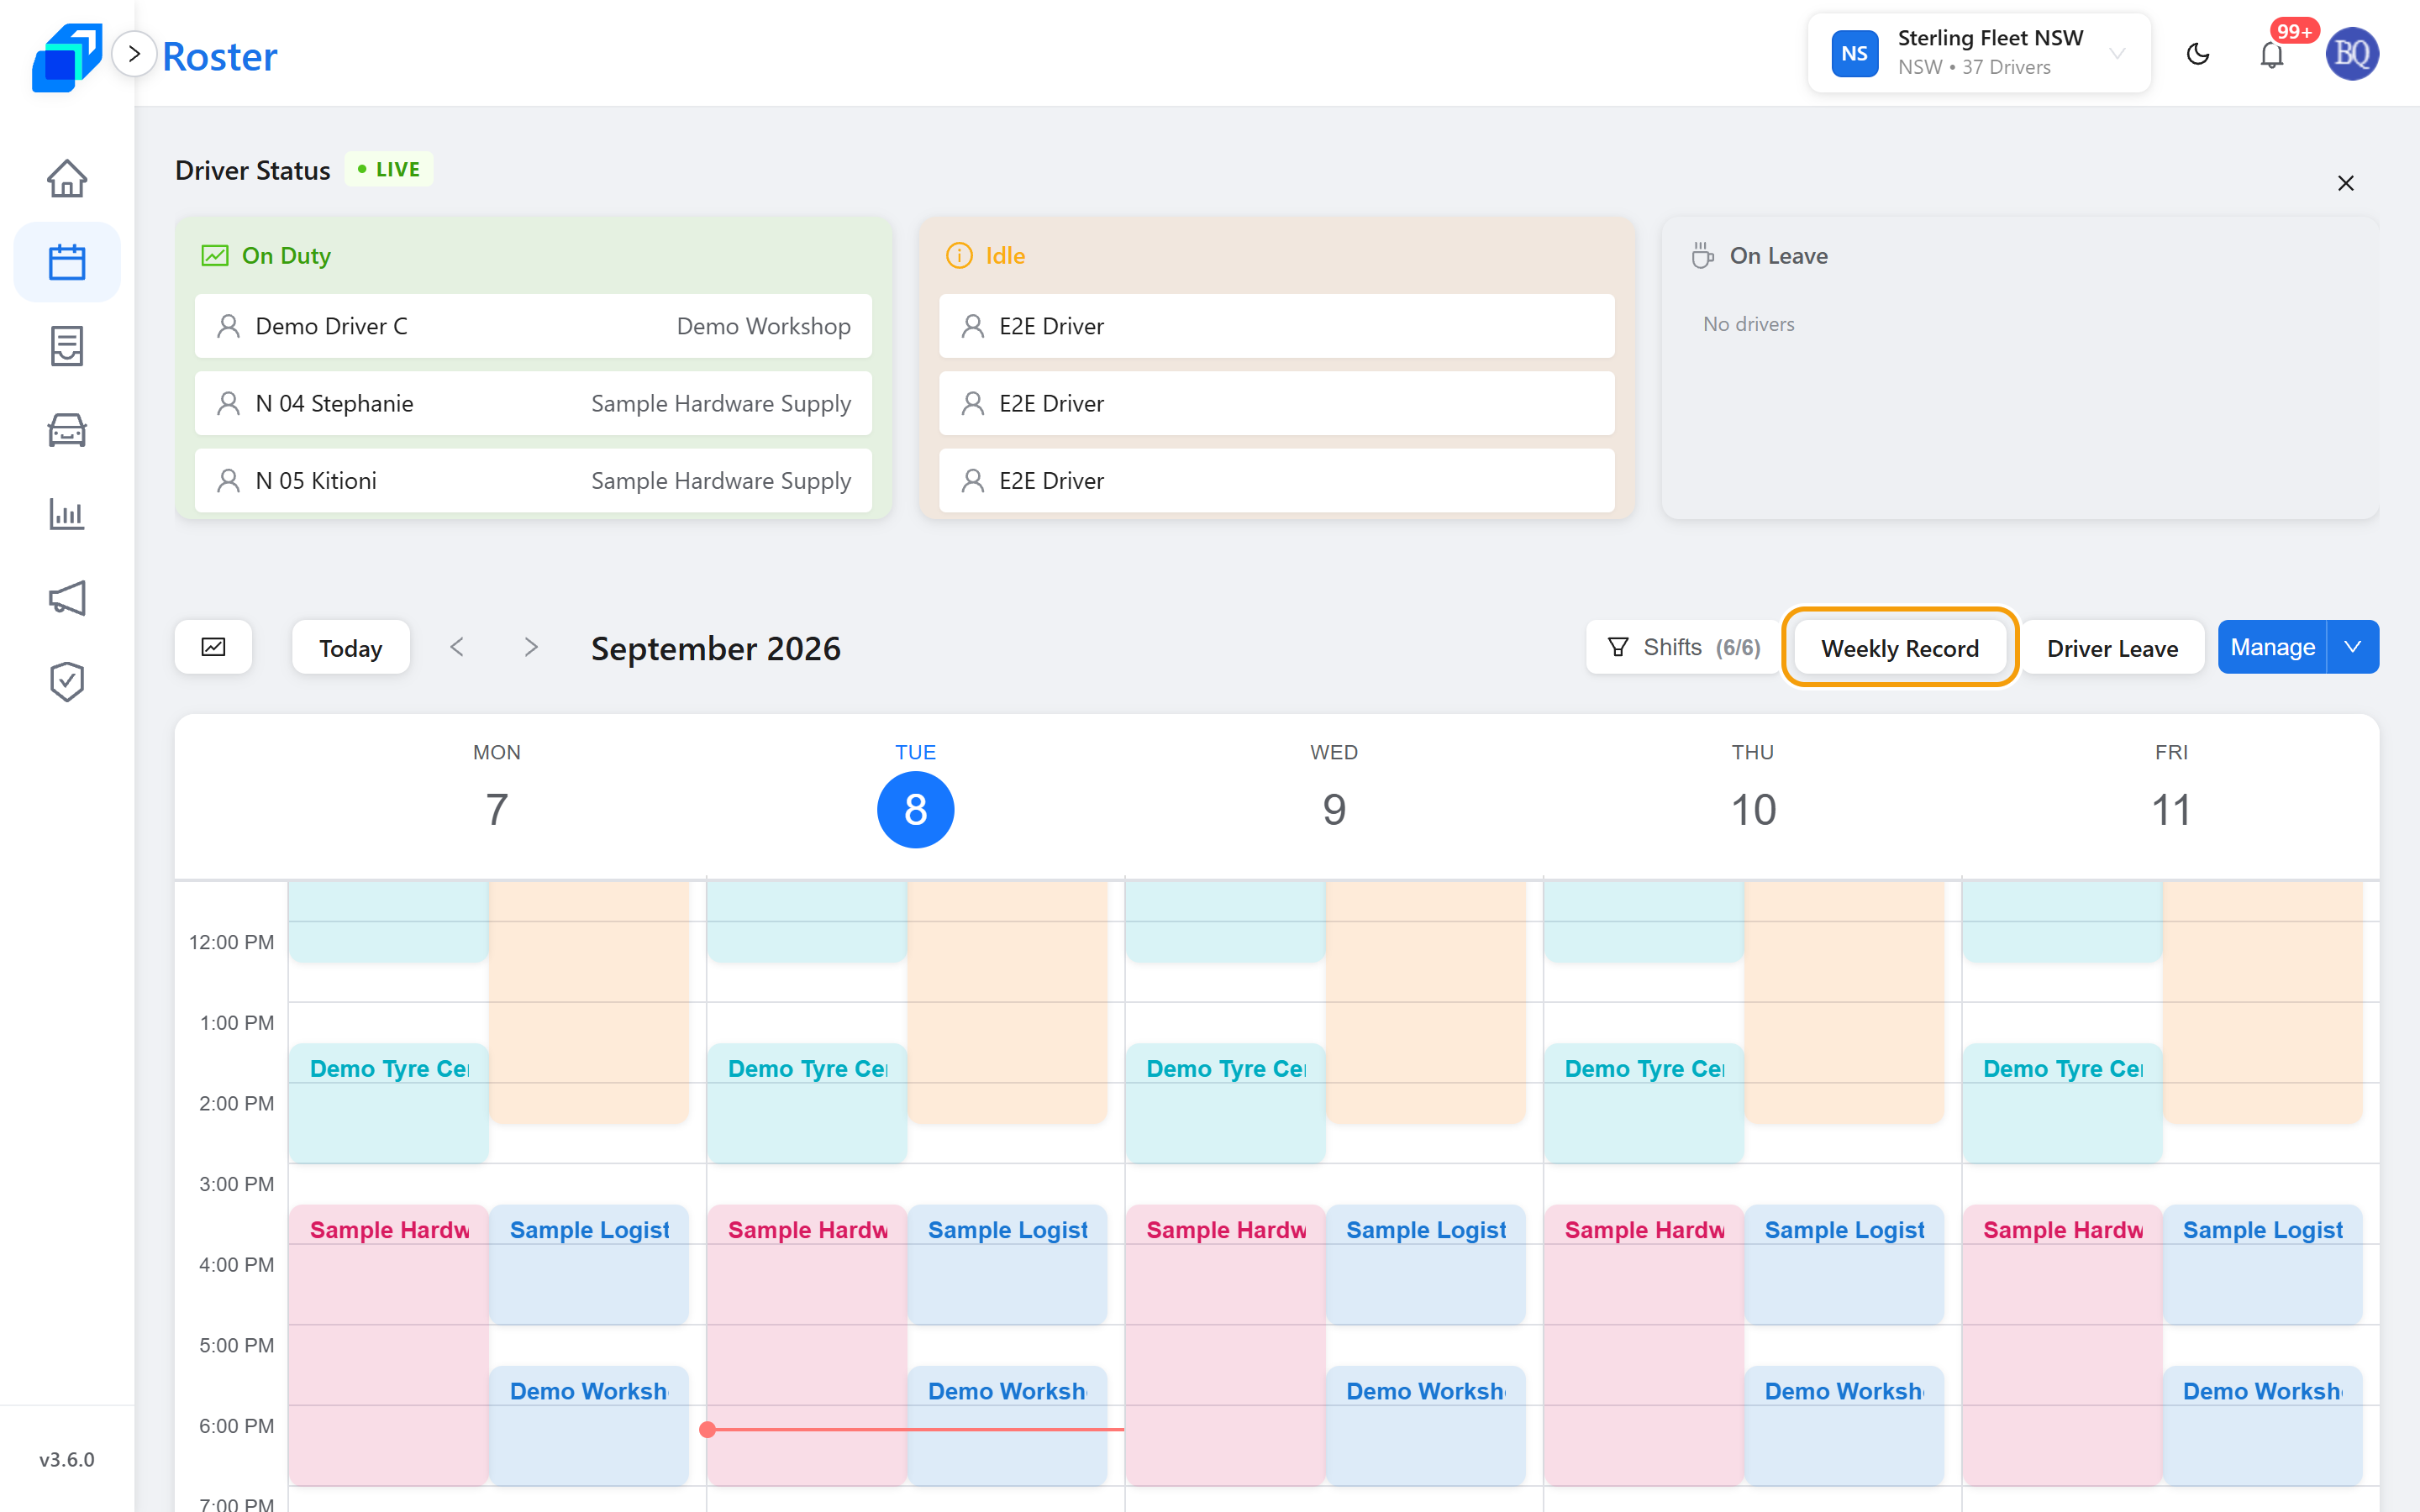
The columns, the sorting, the chart, and reading one shift's drivers are all covered on Weekly Records.
Shift statuses
- Active – the shift is live, and the week's planning uses it.
- Inactive – the shift is paused, so the week's planning skips it. Use this to suspend a shift for a while.
- Draft – the shift is an unpublished template. Find it on Drafts, review it, then publish it when it is ready.
To switch a shift between Active and Inactive, open the three-dot menu on its card and click Deactivate or Activate. On the shift page, the Active switch does the same.
Six ticks cover this area. View shift list opens Roster. Create shift shows + Create and Copy to Draft. Edit shift and Edit assignment rules show the pencils. Delete shift shows Delete. Enable / Disable shift shows the Active switch and Publish. A control your role lacks is hidden, not greyed out – ask your fleet admin if one is missing.
Next steps
- Create a shift – wizard Save Draft / Schedule
- Weekly Records – The week picker, the details table, the chart, and one shift's drivers
- Dispatch your first order
- Work a Run Sheet